Thursday, December 3, 2020

How to run docker on the new Mac Mini M1

(1) Reference to this article https://finestructure.co/blog/2020/11/27/running-docker-on-apple-silicon-m1

(2) The problem of this method of running Ubuntu iso live image is not persistent.

(3) So here is the improved method to add persistent storage to this vm.

(4) # First create an empty image data say 50G in Mac Mini
dd if=/dev/zero of=data.img bs=1m count=51200

(5) # Change the command to invoke the vm to include persistent and increase cpu to 2
./vftool -k vmlinuz -i initrd -c focal-desktop-arm64.iso -d data.img -p 2 -m 4096 -a "console=hvc0 persistent rw"
./vftool -k vmlinuz -i initrd -d data.img -c focal-desktop-arm64.iso -p 2 -m 4096 -a "console=hvc0 persistent rw"

P.S.
If you compile the latest vftool, which has added the ability to add more image files and the order of the mounted device will follow the parameters you passed in. The article was written using the first version of the vftool and will mount the data.img as the /dev/vda and the cdrom image as /dev/vdb. So if you use the latest version vftool compiled, you have to check the device name of your mounted data.img.

(6) # Attach the vm and create 3 partitions for the created image
sudo fdisk /dev/vda
# Press (n)(p)(1) to create new partition 1
# Press (enter) to accept starting sector and set size to say +25G
# Press (n)(p)(2) to create new partition 2
# Press (enter) to accept starting sector and set size to say +15G
# Press (n)(p)(3) to create new partition 3
# Accept the default options and starting block and ending block
# Press (w) to write to partition

(6) # Format partition as ext4 with labels casper-rw and home-rw in vm, this create the persistent medium for the rw partition.
sudo mkfs.ext4 /dev/vda1 -L docker-data
sudo mkfs.ext4 /dev/vda2 -L casper-rw
sudo mkfs.ext4 /dev/vda3 -L home-rw

(7) # exit shell and exit vm by ctrl-c
exit

(8) # start vm again and use a new tab using screen command to attach to the vm e.g.
screen -S docker /dev/ttys003

(9) # Create folder to mount /dev/vda1
sudo mkdir -p /mnt/docker-data
# Add this mount commands in /etc/rc.local in order to persist as editing /etc/fstab is ignored in this iso image
cat << EOF | sudo tee -a /etc/rc.local 
#!/bin/sh -e
#
# rc.local
#
# This script is executed at the end of each multiuser runlevel.
# Make sure that the script will "exit 0" on success or any other
# value on error.
#
# In order to enable or disable this script just change the execution
# bits.
#
# By default this script does nothing.

mount /dev/vda1 -t ext4 /mnt/docker-data
exit 0
EOF

cat << EOF | sudo tee -a /etc/systemd/system/rc-local.service
[Unit]
 Description=/etc/rc.local Compatibility
 ConditionPathExists=/etc/rc.local

[Service]
 Type=forking
 ExecStart=/etc/rc.local start
 TimeoutSec=0
 StandardOutput=tty
 RemainAfterExit=yes
 SysVStartPriority=99

[Install]
 WantedBy=multi-user.target
EOF

# enable rc.local see this.
sudo chmod +x /etc/rc.local
sudo systemctl start rc-local.service
sudo systemctl status rc-local.service

(10) Follow the reference article to install docker related packages.
If you have problem when installing docker. Try this = previous verion
apt install docker-ce=5:19.03.14~3-0~ubuntu-focal

(11) # Move docker data-root to the newly created partition
sudo service docker stop
cat << EOF | sudo tee -a /etc/docker/daemon.json 
{
"storage-driver": "overlay2",
"data-root": "/mnt/docker-data"
}
EOF
sudo rsync -aP /var/lib/docker/ /mnt/docker-data
sudo mv /var/lib/docker /var/lib/docker.old
sudo service docker start

(12) Additionally, install docker-compose
sudo add-apt-repository universe
sudo apt install -y python3-pip
sudo pip3 -v install docker-compose

(13) Test docker
docker run hello-world

docker run -e MYSQL_ROOT_PASSWORD=rootpassword -e MYSQL_USER=wpuser -e MYSQL_PASSWORD=wpuserpassword -e MYSQL_DATABASE=wordpressdb --name wordpressdb -d arm64v8/mariadb
docker run -e WORDPRESS_DB_USER=wpuser -e WORDPRESS_DB_PASSWORD=wpuserpassword -e WORDPRESS_DB_NAME=wordpressdb -p 8080:80 --link wordpressdb:mysql --name wordpress -d arm64v8/wordpress
# show IP address
ip addr | grep inet
# test using browser e.g. http://192.168.64.19:8080/

(14) Test docker-compose 1 (wordpress and mysql)
# create docker-compose.yaml
cd $HOME
mkdir my-wordpress
cd my-wordpress
cat > docker-compose.yaml <<EOF
version: '3'
services:
  db:
    image: arm64v8/mariadb
    volumes:
      - "./.data/db:/var/lib/mysql"
    restart: always
    environment:
      MYSQL_ROOT_PASSWORD: rootpassword
      MYSQL_DATABASE: wordpressdb
      MYSQL_USER: wpuser
      MYSQL_PASSWORD: wpuserpassword

  wordpress:
    depends_on:
      - db
    image: arm64v8/wordpress
    links:
      - db:mysql
    ports:
      - "8000:80"
    restart: always
    environment:
      WORDPRESS_DB_HOST: db:3306
      WORDPRESS_DB_NAME: wordpressdb
      WORDPRESS_DB_USER: wpuser
      WORDPRESS_DB_PASSWORD: wpuserpassword
EOF
# Start docker-compose
docker-compose up -d
# test using browser e.g. http://192.168.64.19:8000/
# after testing bring it down
docker-compose down -v

(15) Test docker-compose 2 (mongo-express)
# create docker-compose.yaml
cd $HOME
mkdir my-mongoexpress
cd my-mongoexpress
cat > docker-compose.yaml <<EOF
version: '3.1'
services:
  mongo:
    image: arm64v8/mongo
    volumes:
      - ./data:/data/db
    ports:
      - '27018:27017'
    restart: always
    environment:
      MONGO_INITDB_ROOT_USERNAME: 'root'
      MONGO_INITDB_ROOT_PASSWORD: 'example'
      MONGO_INITDB_DATABASE: 'db'

  mongo-express:
    image: arm64v8/mongo-express
    links:
      - mongo
    ports:
      - "8081:8081"
    restart: always
    environment:
      ME_CONFIG_MONGODB_ADMINUSERNAME: 'root'
      ME_CONFIG_MONGODB_ADMINPASSWORD: 'example'
      ME_CONFIG_MONGODB_ENABLE_ADMIN: 'true'
      ME_CONFIG_MONGODB_AUTH_DATABASE: 'db'
      ME_CONFIG_OPTIONS_EDITORTHEME: 'ambiance'
      ME_CONFIG_BASICAUTH_USERNAME: 'user'
      ME_CONFIG_BASICAUTH_PASSWORD: 'password'
EOF
# Start docker-compose
docker-compose up -d --remove-orphans
# test using browser e.g. http://192.168.64.19:8081/ with user password
# after testing bring it down
docker-compose down -v

(16) Change password and install openssh-server
sudo apt install -y openssh-server
# change /etc/ssh/sshd_config PermitEmptyPasswords to yes
PermitEmptyPasswords yes

(17) Use another terminal session to connect e.g.
ssh-copy-id ubuntu@192.168.64.19
ssh ubuntu@192.168.64.19

(18) This iso image has desktop Applications, so it is possible to install vnc server and connect to it via Remote Desktop or vnc://localhost:590x. To install vnc server
sudo apt install -y tightvncserver
vncserver
# restart vncserver in vm
vncserver -localhost
# create ssh tunnel in Mac, where x is the desktop number when starting vncserver
ssh ubuntu@192.168.64.19 -L 590x:localhost:590x # Reference : https://www.digitalocean.com/community/tutorials/how-to-install-and-configure-vnc-on-ubuntu-20-04
https://cat.pdx.edu/platforms/mac/remote-access/vnc-to-linux/

P.S. follow up post for the docker M1 preview and building of docker image with vnc server.
https://iphonesdkdev.blogspot.com/2020/12/20201205.html


If you need port forwarding on macOS to connect to this vm service (e.g. ssh or vnc), see this article https://www.papercut.com/kb/Main/MacPortForwarding

How to run on Headless Mac Mini M1 with nohup and screen

(1) Need a HDMI dummy simulator attached to Mac Mini for full speed operation. Be sure to have HDMI 2.0 and 4K support and some dummy simulators have Pass-Through EDID Emulator (also with 4K support) so that you can attach 4K monitor or via screen sharing in HD when working on it with attached keyboard and mouse.

(2) Disable sleep mode and set never sleep for HD and monitor on System Preferences of Mac Mini.

(3) Enable Sharing and SSH login on Mac Mini.

(4) generate ssh key-pair on mac mini and your terminal or your phone. If using Android phone, recommend Termux app for remote shell access.
e.g. ssh-keygen -t rsa # generate key pair on Mac Mini and remote client

(5) copy the ssh key-pair to mac mini if using another terminal from mac.
e.g. ssh-copy-id user@x.x.x.x

(6) Login in Mac Mini via ssh remotely
e.g. ssh user@x.x.x.x

(7) # Apple Compressor command line batch submission example (no need for nohup)
/Applications/Compressor.app/Contents/MacOS/Compressor -batchname "My First Batch" \
-jobpath ~/Movies/MySource_x265.mp4 \
-settingpath /Applications/Compressor.app/Contents/Resources/Settings/ProRes/proRes422Name.compressorsetting \
-locationpath ~/Movies/MyOutput_ProRes422.mov

(8) # install youtube-dl, prerequisite: Command Line Tools for Xcode 12.2 for Python 3.8 to be installed
sudo mkdir -p /usr/local/bin
sudo curl -L https://github.com/l1ving/youtube-dl/releases/latest/download/youtube-dl -o /usr/local/bin/youtube-dl
sudo chmod a+rx /usr/local/bin/youtube-dl
youtube-dl --version
sudo youtube-dl -U # update youtube-dl
youtube-dl --version # check version after update
cd $HOME/Downloads
mkdir -p youtube
cd youtube
youtube-dl -f mp4 <youtube url>

(9) Either use nohup or screen command for persistent jobs.

# nohup example
nohup bash -c 'youtube-dl -f 401 https://youtu.be/8rPB4A3zDnQ' &> nohup.youtubedl.4k_2.out &

(10)screen example (suitable for command utility with tty input
# create a screen and run python script
screen -S tensorflow
conda activate python38
python cnn.py
# leave (detach) the screen by Control-A d

# create second screen and run handbrake conversion
screen -S handbrake
conda deactivate
$HOME/Downloads/HandBrakeCLI -i $HOME/Downloads/8KVIDEO120FPS-8rPB4A3zDnQ_4.1G.mp4 -o $HOME/Downloads/8KVIDEO_x265.mp4 -e x265 -q24
# leave (detach) the screen by Control-A d

# list all the screen ids
screen -ls

# Reattach to one of the screen e.g. 6473.tensorflow
screen -r 6473

# Exit Screen if the process terimated
exit

Saturday, November 21, 2020

How to install tensorflow for the new Mac M1 hardware

Prerequisite: Xcode 12.2 and Command Line Tools for Xcode 12.2

(1) # Download the archive for this repo from https://github.com/apple/tensorflow_macos/releases
cd $HOME/Downloads/
curl -fsSLO https://github.com/apple/tensorflow_macos/releases/download/v0.1alpha0/tensorflow_macos-0.1alpha0.tar.gz
tar xzvf tensorflow_macos-0.1alpha0.tar.gz
/bin/bash ./tensorflow_macos/install_venv.sh --help

(2) # Download Miniconda from https://conda-forge.org/blog/posts/2020-10-29-macos-arm64/

(3) # Install Miniconda and after installtion, exit shell and login again
/bin/bash -c "$(curl -fsSL https://github.com/conda-forge/miniforge/releases/latest/download/Miniforge3-MacOSX-arm64.sh)"

(4) # Once it's installed, create a Python 3.8 env by running
conda create --name python38 python=3.8

(5) # Put a path to where the arm64 libraries are. For example...
libs="$HOME/Downloads/tensorflow_macos/arm64/"

(6) # Replace this with the path of your Conda environment
env="$HOME/miniforge3/envs/python38"

(7) # upgrade
conda upgrade -c conda-forge pip setuptools cached-property six

(8) # activate env
conda activate python38
# conda deactivate

(9) pip install --upgrade -t "$env/lib/python3.8/site-packages/" --no-dependencies --force "$libs/grpcio-1.33.2-cp38-cp38-macosx_11_0_arm64.whl"

(10) pip install --upgrade -t "$env/lib/python3.8/site-packages/" --no-dependencies --force "$libs/h5py-2.10.0-cp38-cp38-macosx_11_0_arm64.whl"

(11) pip install --upgrade -t "$env/lib/python3.8/site-packages/" --no-dependencies --force "$libs/numpy-1.18.5-cp38-cp38-macosx_11_0_arm64.whl"

(12) pip install --upgrade -t "$env/lib/python3.8/site-packages/" --no-dependencies --force "$libs/tensorflow_addons-0.11.2+mlcompute-cp38-cp38-macosx_11_0_arm64.whl"

(13) # install these
conda install -c conda-forge -y absl-py
conda install -c conda-forge -y astunparse
conda install -c conda-forge -y gast
conda install -c conda-forge -y opt_einsum
conda install -c conda-forge -y termcolor
conda install -c conda-forge -y typing_extensions
conda install -c conda-forge -y wheel
conda install -c conda-forge -y typeguard

pip install tensorboard

pip install wrapt flatbuffers tensorflow_estimator google_pasta keras_preprocessing protobuf


(14) pip install --upgrade -t "$env/lib/python3.8/site-packages/" --no-dependencies --force "$libs/tensorflow_macos-0.1a0-cp38-cp38-macosx_11_0_arm64.whl"

(15) # Run this to test
time python tftest.py


tftest.py    Select all
from datetime import datetime import numpy as np import tensorflow as tf from tensorflow.python.compiler.mlcompute import mlcompute mlcompute.set_mlc_device(device_name="cpu") # tensorflow:Eager mode on GPU is extremely slow. So use CPU instead print("Hello, Tensorflow! ", end='') print(tf.__version__) print("start" , datetime.now()) X_raw = np.array([2013, 2014, 2015, 2016, 2017, 2018], dtype=np.float32) y_raw = np.array([12000, 14000, 15000, 16500, 17500, 19000], dtype=np.float32) X = (X_raw - X_raw.min()) / (X_raw.max() - X_raw.min()) y = (y_raw - y_raw.min()) / (y_raw.max() - y_raw.min()) X = tf.constant(X) y = tf.constant(y) a = tf.Variable(initial_value=0.) b = tf.Variable(initial_value=0.) variables = [a, b] num_epoch = 10000 optimizer = tf.keras.optimizers.SGD(learning_rate=1e-3) for e in range(num_epoch): with tf.GradientTape() as tape: y_pred = a * X + b loss = 0.5 * tf.reduce_sum(tf.square(y_pred - y)) grads = tape.gradient(loss, variables) optimizer.apply_gradients(grads_and_vars=zip(grads, variables)) print(a, b) print("end" , datetime.now())


(16) Test run this cnn.py https://github.com/apple/tensorflow_macos/issues/25

Saturday, October 24, 2020

How to use SpriteKit in SwiftUI and preview SKScene in Xcode 12

This demo the code using Xcode 12.0.1 under macOSX 10.15.7 The iOS14 has a new SpriteView for the SKScene, this demo a player movement with on-screen joystick control. This file does not need the creation of sks file and using code to generate the SKNodes required. The graphics assets and touches codes are borrowed from this Elton Game - Introduction to Sprite Kit. https://designcode.io/spritekit-intro

Create this swift file for iOS14 and you can preview it in SwiftUI under Xcode 12


SKContentView.swift.sh    Select all
// // SKContentView.swift // import SwiftUI import SpriteKit class GameScene: SKScene { // Nodes var player : SKNode? var joystick : SKNode? var joystickKnob : SKNode? // Boolean var joystickAction = false // Measure var knobRadius : CGFloat = 50.0 // Sprite Engine added in Lesson 2 var previousTimeInterval : TimeInterval = 0 let playerSpeed = 4.0 override func didMove(to view: SKView) { physicsBody = SKPhysicsBody(edgeLoopFrom: frame) let player = SKSpriteNode(imageNamed: "player/1") self.player = player let joystick = SKSpriteNode(imageNamed: "arrow") self.joystick = joystick let joystickKnob = SKSpriteNode(imageNamed: "knob") self.joystickKnob = joystickKnob joystick.addChild(joystickKnob) player.position = CGPoint(x: frame.midX, y: frame.size.height / 5 * 3) joystick.position = CGPoint(x: 80, y: 80) addChild(player) addChild(joystick) view.showsFPS = true view.showsNodeCount = true } } extension GameScene { // Touch Began override func touchesBegan(_ touches: Set<UITouch>, with event: UIEvent?) { for touch in touches { if let joystickKnob = joystickKnob { let location = touch.location(in: joystick!) joystickAction = joystickKnob.frame.contains(location) } } } // Touch Moved override func touchesMoved(_ touches: Set<UITouch>, with event: UIEvent?) { guard let joystick = joystick else { return } guard let joystickKnob = joystickKnob else { return } if !joystickAction { return } // Distance for touch in touches { let position = touch.location(in: joystick) let length = sqrt(pow(position.y, 2) + pow(position.x, 2)) let angle = atan2(position.y, position.x) if knobRadius > length { joystickKnob.position = position } else { joystickKnob.position = CGPoint(x: cos(angle) * knobRadius, y: sin(angle) * knobRadius) } } } // Touch End added in Lesson 2 override func touchesEnded(_ touches: Set<UITouch>, with event: UIEvent?) { for touch in touches { let xJoystickCoordinate = touch.location(in: joystick!).x let xLimit: CGFloat = 200.0 if xJoystickCoordinate > -xLimit && xJoystickCoordinate > xLimit { resetKnobPosition() } } } } // MARKS: Action added in Lesson 2 extension GameScene { func resetKnobPosition() { let initialPoint = CGPoint(x:0, y:0) let moveBack = SKAction.move(to: initialPoint, duration:0.1) moveBack.timingMode = .linear joystickKnob?.run(moveBack) joystickAction = false } } // MARKS: Game Loop added in Lesson 2 extension GameScene { override func update( _ currentTime: TimeInterval) { let deltaTime = currentTime - previousTimeInterval previousTimeInterval = currentTime // player movement guard let joystickKnob = joystickKnob else { return } let xPosition = Double(joystickKnob.position.x) let yPosition = Double(joystickKnob.position.y) let displacement = CGVector(dx:deltaTime * xPosition * playerSpeed, dy:deltaTime * yPosition * playerSpeed) let move = SKAction.move(by: displacement, duration:0) player?.run(move) } } struct SKContentView: View { var scene: SKScene { let scene = GameScene() scene.size = CGSize(width: 300, height: 400) scene.scaleMode = .fill return scene } var body: some View { SpriteView(scene: scene) .frame(width: 300, height: 400) .edgesIgnoringSafeArea(.all) } } struct SKContentView_Previews: PreviewProvider { static var previews: some View { SKContentView() } }


player/1
arrow
knob

Saturday, October 17, 2020

How to download WWDC2020 videos and subtitles

The scripts for previous WWDC are here https://iphonesdkdev.blogspot.com/2017/07/how-to-fetch-wwdc-2017-video-subtitle.html

Create and Run this script wwdc2020_fetch_srt.sh to fetch WWDC2020 subtitle


wwdc2020_fetch_en.srt.sh    Select all
#!/bin/bash # @Last Modified by: javacom # @Last Modified time: 2020-10-17 WWDC_YEAR=2020; # WWDC_SESSION_PREFIX=https://developer.apple.com/videos/play/wwdc$WWDC_YEAR; WWDC_LOCAL_DIR=$(basename $WWDC_SESSION_PREFIX); detect_video_m3u8 () { local session_url=$WWDC_SESSION_PREFIX/$SESSION_ID/; local session_html=$(curl -s $session_url); local video_url=$(echo "$session_html" | grep .m3u8 | grep $SESSION_ID | head -n1 | sed "s#.*\"\(https://.*m3u8\)\".*#\1#"); echo "$session_html" | grep .mp4 | grep $SESSION_ID | sed "s#.*\"\(https://.*mp4\).*\".*#\1#" | while read mp4_url; do local mp4_filename=$(basename $mp4_url | cut -d. -f1); local srt_filename=$mp4_filename.en.srt; # local srt_filename=$mp4_filename.zh.srt; echo "> Subtitle local: $WWDC_LOCAL_DIR/$srt_filename" >&2; > $WWDC_LOCAL_DIR/$srt_filename; done echo "$video_url"; echo "> Video: $video_url" >&2; } detect_subtitle_m3u8 () { local video_url=$1; # en subtitle local subtitle_uri=$(curl -s $video_url | grep "LANGUAGE=\"en\",URI" | sed "s#.*URI=\"\(.*\)\"#\1#"); # zh subtitle #local subtitle_uri=$(curl -s $video_url | grep "LANGUAGE=\"zh\"" | sed "s#.*URI=\"\(.*\)\"#\1#"); local subtitle_url=$subtitle_uri; [[ "$subtitle_uri" != http* ]] && { subtitle_url=$(dirname $video_url)/$subtitle_uri; } echo "$subtitle_url"; echo "> Subtitle: $subtitle_url" >&2; } download_subtitle_contents () { local subtitle_url=$1; echo "> Downloading... " local subtitle_base_url=$(dirname $subtitle_url); curl -s $subtitle_url | grep "webvtt" | while read webvtt; do local subtitle_webvtt=$subtitle_base_url/$webvtt; #echo "- get $subtitle_webvtt"; local subtitle_content=$(curl -s $subtitle_webvtt); # en subtitle ls $WWDC_LOCAL_DIR/"wwdc$WWDC_YEAR"_"$SESSION_ID"*.en.srt | while read srt_file; do # zh subtitle # ls $WWDC_LOCAL_DIR/"wwdc$WWDC_YEAR"_"$SESSION_ID"*.zh.srt | while read srt_file; do echo "$subtitle_content" >> $srt_file; done done } main () { [ ! -d $WWDC_LOCAL_DIR ] && { mkdir $WWDC_LOCAL_DIR; } #Year 2020 change {3\} to {3,5\} curl -s $WWDC_SESSION_PREFIX | grep /videos/play/wwdc$WWDC_YEAR | sed "s#.*/videos/play/wwdc$WWDC_YEAR/\([0-9]\{3,5\}\).*#\1#" | sort | uniq | while read SESSION_ID; do #echo "SESSION_ID is" $SESSION_ID local video_url=$(detect_video_m3u8 $SESSION_ID); local subtitle_url=$(detect_subtitle_m3u8 $video_url); download_subtitle_contents $subtitle_url; done } main;


Run this shell script to format as SRT subtitle

shellscript.sh    Select all
WWDC_YEAR=2020; # cd wwdc$WWDC_YEAR mkdir -p sd mkdir -p hd for i in *_sd.??.srt; do sed -e '/WEBVTT/d;/X-TIMESTAMP/d;s/align.middle line.*$//;' $i | awk '/^[0-9]{2}:[0-9]{2}:/ {seen[$0]++; skipduplicated=0} {if (seen[$0]>1) skipduplicated=1; if (!skipduplicated) print $0}' | awk -v RS="" '{gsub("\n", "-Z"); print}' | awk '$0 !~/^WEB/ {print $0}' | uniq | awk '{printf "\n%s-Z%s", NR,$0 }' | awk -v ORS="\n\n" '{gsub("-Z", "\n"); print}' | sed -e 's/.A:middle$//g;s/&gt;/>/g;s/&lt;/</g;1,2d;' > sd/$i; done for i in *_hd.??.srt; do sed -e '/WEBVTT/d;/X-TIMESTAMP/d;s/align.middle line.*$//;' $i | awk '/^[0-9]{2}:[0-9]{2}:/ {seen[$0]++; skipduplicated=0} {if (seen[$0]>1) skipduplicated=1; if (!skipduplicated) print $0}' | awk -v RS="" '{gsub("\n", "-Z"); print}' | awk '$0 !~/^WEB/ {print $0}' | uniq | awk '{printf "\n%s-Z%s", NR,$0 }' | awk -v ORS="\n\n" '{gsub("-Z", "\n"); print}' | sed -e 's/.A:middle$//g;s/&gt;/>/g;s/&lt;/</g;1,2d;' > hd/$i; done


Run this script wwdc2020_fetch_mp4.sh to download all mp4 (HD and SD) videos (also works for 2021)

wwdc2020_fetch_mp4.sh    Select all
#!/bin/bash # @Last Modified by: javacom # @Last Modified time: 2020-10-17 WWDC_YEAR=2020; # change to 2021 also works for WWDC2021 # WWDC_SESSION_PREFIX=https://developer.apple.com/videos/play/wwdc$WWDC_YEAR; WWDC_LOCAL_DIR=$(basename $WWDC_SESSION_PREFIX); download_mp4_video () { local session_url=$WWDC_SESSION_PREFIX/$SESSION_ID/; local session_html=$(curl -s $session_url); local video_url=$(echo "$session_html" | grep .m3u8 | grep $SESSION_ID | head -n1 | sed "s#.*\"\(https://.*m3u8\)\".*#\1#"); echo "$session_html" | grep .mp4 | grep $SESSION_ID | sed "s#.*\"\(https://.*mp4\).*\".*#\1#" | while read mp4_url; do local mp4_filename=$(basename $mp4_url); if [ -e $WWDC_LOCAL_DIR/$mp4_filename ] then echo "> MP4 already existed : $WWDC_LOCAL_DIR/$mp4_filename" >&2; echo "> To resume broken download use curl -C - --connect-timeout 1200 -o $WWDC_LOCAL_DIR/$mp4_filename $mp4_url" >&2; echo " " >&2; else echo "> MP4 Downloading... : $mp4_url" >&2; curl --connect-timeout 120 -o $WWDC_LOCAL_DIR/$mp4_filename $mp4_url fi done } main () { [ ! -d $WWDC_LOCAL_DIR ] && { mkdir $WWDC_LOCAL_DIR; } #Year 2020 change {3\} to {3,5\} curl -s $WWDC_SESSION_PREFIX | grep /videos/play/wwdc$WWDC_YEAR | sed "s#.*/videos/play/wwdc$WWDC_YEAR/\([0-9]\{3,5\}\).*#\1#" | sort | uniq | while read SESSION_ID; do download_mp4_video $SESSION_ID; done } main;


Run this script to rename the video or subtitles to proper title (HD & SD) videos

wwdc2020_rename_title.sh    Select all
#!/bin/sh # @Last Modified by: javacom # @Last Modified time: 2020-10-17 #sd video curl -s https://developer.apple.com/videos/wwdc2020/ | grep -B1 "video-title" | sed -e 's#[[:space:]]\{10,\}<a href="/videos/play/wwdc2020/\([0-9]\{3,5\}\).*#\[ -f "wwdc2020_\1_sd.mp4" \] \&\& mv "wwdc2020_\1_sd.mp4" "wwdc2020_\1_sd_#' -e "s/[\@:’\'\,?]//g" -e "s/\"\(The.*\)\"/\1/" -e 's#.*video-title..\(.*\)\(</h4>\)#\1.mp4"#' -e '/--/d' | sed '/^\[ -f/{N;s/\n//;}' | /bin/bash #hd video curl -s https://developer.apple.com/videos/wwdc2020/ | grep -B1 "video-title" | sed -e 's#[[:space:]]\{10,\}<a href="/videos/play/wwdc2020/\([0-9]\{3,5\}\).*#\[ -f "wwdc2020_\1_hd.mp4" \] \&\& mv "wwdc2020_\1_hd.mp4" "wwdc2020_\1_hd_#' -e "s/[\@:’\'\,?]//g" -e "s/\"\(The.*\)\"/\1/" -e 's#.*video-title..\(.*\)\(</h4>\)#\1.mp4"#' -e '/--/d' | sed '/^\[ -f/{N;s/\n//;}' | /bin/bash #sd video en.srt curl -s https://developer.apple.com/videos/wwdc2020/ | grep -B1 "video-title" | sed -e 's#[[:space:]]\{10,\}<a href="/videos/play/wwdc2020/\([0-9]\{3,5\}\).*#\[ -f "wwdc2020_\1_sd.en.srt" \] \&\& mv "wwdc2020_\1_sd.en.srt" "wwdc2020_\1_sd_#' -e "s/[\@:’\'\,?]//g" -e "s/\"\(The.*\)\"/\1/" -e 's#.*video-title..\(.*\)\(</h4>\)#\1.en.srt"#' -e '/--/d' | sed '/^\[ -f/{N;s/\n//;}' | /bin/bash #hd video en.srt curl -s https://developer.apple.com/videos/wwdc2020/ | grep -B1 "video-title" | sed -e 's#[[:space:]]\{10,\}<a href="/videos/play/wwdc2020/\([0-9]\{3,5\}\).*#\[ -f "wwdc2020_\1_hd.en.srt" \] \&\& mv "wwdc2020_\1_hd.en.srt" "wwdc2020_\1_hd_#' -e "s/[\@:’\'\,?]//g" -e "s/\"\(The.*\)\"/\1/" -e 's#.*video-title..\(.*\)\(</h4>\)#\1.en.srt"#' -e '/--/d' | sed '/^\[ -f/{N;s/\n//;}' | /bin/bash #sd video zh.srt curl -s https://developer.apple.com/videos/wwdc2020/ | grep -B1 "video-title" | sed -e 's#[[:space:]]\{10,\}<a href="/videos/play/wwdc2020/\([0-9]\{3,5\}\).*#\[ -f "wwdc2020_\1_sd.zh.srt" \] \&\& mv "wwdc2020_\1_sd.zh.srt" "wwdc2020_\1_sd_#' -e "s/[\@:’\'\,?]//g" -e "s/\"\(The.*\)\"/\1/" -e 's#.*video-title..\(.*\)\(</h4>\)#\1.zh.srt"#' -e '/--/d' | sed '/^\[ -f/{N;s/\n//;}' | /bin/bash #hd video zh.srt curl -s https://developer.apple.com/videos/wwdc2020/ | grep -B1 "video-title" | sed -e 's#[[:space:]]\{10,\}<a href="/videos/play/wwdc2020/\([0-9]\{3,5\}\).*#\[ -f "wwdc2020_\1_hd.zh.srt" \] \&\& mv "wwdc2020_\1_hd.zh.srt" "wwdc2020_\1_hd_#' -e "s/[\@:’\'\,?]//g" -e "s/\"\(The.*\)\"/\1/" -e 's#.*video-title..\(.*\)\(</h4>\)#\1.zh.srt"#' -e '/--/d' | sed '/^\[ -f/{N;s/\n//;}' | /bin/bash # For WWDC2021 WWDC_YEAR=2021; VIDEO=sd; curl -s https://developer.apple.com/videos/wwdc${WWDC_YEAR}/ | grep -B1 "video-title" | sed -e "s#[[:space:]]\{10,\}<a href=./videos/play/wwdc202./\([0-9]\{3,5\}\).*#\[ -f \"wwdc${WWDC_YEAR}-\1_${VIDEO}.mp4\" \] \&\& mv \"wwdc${WWDC_YEAR}-\1_${VIDEO}.mp4\" \"wwdc${WWDC_YEAR}-\1_sd_#" -e "s/[\@:’\'\,?]//g" -e "s/\"\(The.*\)\"/\1/" -e 's#.*video-title..\(.*\)\(</h4>\)#\1.mp4"#' -e '/--/d' | sed '/^\[ -f/{N;s/\n//;}' | sed "s#[\/@:’\'\,]#_#g" | /bin/bash


# Example nohup commnad for Linux Download

nohup bash -c 'cd $HOME/Downloads/WWDC/; ./wwdc2020_fetch_mp4.sh' &> nohup.wwdc2020.mp4.out &

nohup bash -c 'cd $HOME/Downloads/WWDC/; ./wwdc2020_fetch_en.srt.sh' &> nohup.wwdc2020.en.srt.out &

# or use screen utility to download
screen -S wwdcdownloadmp4
bash wwdc2020_fetch_mp4.sh


If want to remove special characters in filename "brew install rename" and use this command to rename
rename "s/[\@:’\'\,]//g" *.mp4 *.srt


Wednesday, August 7, 2019

Xcode 11 beta 5 SwiftUI changes


NavigationButton  becomes  NavigationLink  Select all
NavigationButton( destination: LandmarkDetail(landmark: landmark)) { LandmarkRow(landmark: landmark) }

NavigationButton  becomes  NavigationLink  Select all
NavigationLink( destination: LandmarkDetail(landmark: landmark) .environmentObject(self.userData) ) { LandmarkRow(landmark: landmark) }


ForEach  .identified by:  Select all
ForEach(["iPhone SE", "iPhone XS Max"].identified(by: \.self)) { deviceName in LandmarkList() .previewDevice(PreviewDevice(rawValue: deviceName)) .previewDisplayName(deviceName) } .environmentObject(UserData())

ForEach  id:  Select all
ForEach(["iPhone SE", "iPhone XS Max"], id: \.self) { deviceName in LandmarkList() .previewDevice(PreviewDevice(rawValue: deviceName)) .previewDisplayName(deviceName) } .environmentObject(UserData())


BindableObject  becomes  ObservableObject  Select all
final class UserData: BindableObject { let didChange = PassthroughSubject<UserData, Never>() var showFavoritesOnly = false { didSet { didChange.send(self) } } var landmarks = landmarkData { didSet { didChange.send(self) } } }

BindableObject  becomes  ObservableObject  Select all
final class UserData: ObservableObject { @Published var showFavoritesOnly = false @Published var landmarks = landmarkData }


Saturday, June 8, 2019

How to use SwiftUI previews for existing project and storyboard

Here is an example code to create a new swift file for an existing project and use the storyboard Main.storyboard and preview the MainViewController instance in the new iOS 13 SwiftUI framework under Xcode 11.

If you add TabbedView to NavigationView in this example, please use Xcode 11 Beta 2.

MainViewPreviews.swift    Select all
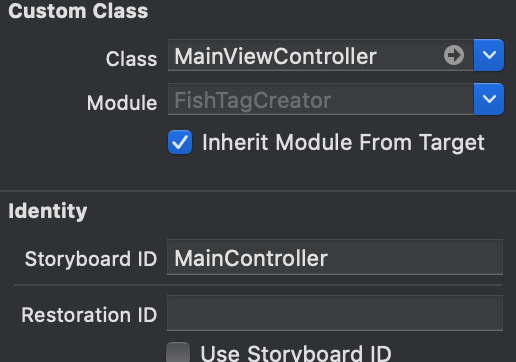
// MainViewPreviews.swift // FishTagCreator // // Created by javacom on 8 Jun 2019. // import SwiftUI #if DEBUG struct MainViewControllerPreviews : PreviewProvider, UIViewControllerRepresentable { // MARK: PreviewProvider static var previews: some View { MainViewControllerPreviews() } // MARK: UIViewControllerRepresentable typealias UIViewControllerType = MainViewController func makeUIViewController( context: Context ) -> MainViewController { let mainStoryboard: UIStoryboard = UIStoryboard(name: "Main", bundle: nil) let mainViewController: MainViewController = mainStoryboard.instantiateViewController(withIdentifier: "MainController") as! MainViewController return mainViewController } func updateUIViewController( _ uiViewController : MainViewController, context: Context) { } } #endif


It is important to assign a storyboard ID say "MainController" to your MainViewController in Main.storyboard's identity inspector.