

Friday, December 9, 2022

Tuesday, August 23, 2022

Tuesday, April 19, 2022
How to use M1 Max / M1 Ultra machine to crack password using brute force
M1 Max and M1 Ultra has lots of GPU power for cracking password. For brute force attach we can use hashcat and John the Ripper.
(1) Installation
(1.1) Install XCode and Command Line Utilities from Apple
(1.2) Install Homebrew
(1.3) Install John the Ripper and add path by using Terminal command
(1.4) Install rar and. unrar for testing (as the HomeBrew version might not working.
(1.5)Install hashcat from git
(2) Testing
% rar2john test.rar
test.rar:$rar5$16$852481e911dc38c66cec2fbe8e9a825b$15$e1c319e802eec30efab80c6bd7470468$8$f9c3bfde638768a5
And copy the hash value in blue color and it will be used again in hashcat
Use hashcat to brute force attack
If finished, the password will be in testrar.out.txt $rar5$16$852481e911dc38c66cec2fbe8e9a825b$15$e1c319e802eec30efab80c6bd7470468$8$f9c3bfde638768a5:1234
Testing of zip file with password
Testing of pdf file with password
Testing of office file with password
If you don't have the machine for cracking purpose, you can do this using cloud GPU for a fee.
(1) Installation
(1.1) Install XCode and Command Line Utilities from Apple
(1.2) Install Homebrew
(1.3) Install John the Ripper and add path by using Terminal command
brew install john-jumbo
export PATH=/opt/homebrew/Cellar/john-jumbo/1.9.0/share/john/:$PATH
(1.4) Install rar and. unrar for testing (as the HomeBrew version might not working.
cd $(HOME)/Downloads
wget https://www.rarlab.com/rar/rarmacos-arm-611.tar.gz
sudo cp rar/rar /usr/local/bin
sudo cp rar/unrar /usr/local/bin
(1.5)Install hashcat from git
cd $(HOME)/Downloads
git clone https://github.com/hashcat/hashcat.git
cd hashcat
make
(2) Testing
# create a test.rar file with password of 1234 for testing
cd $(HOME)/Downloads
mkdir -p testhashcat
cd testhascat
echo 'I am testing' > test.txt
rar a -P1234 test.rar test.txt
Use John the Ripper to generate hash% rar2john test.rar
test.rar:$rar5$16$852481e911dc38c66cec2fbe8e9a825b$15$e1c319e802eec30efab80c6bd7470468$8$f9c3bfde638768a5
And copy the hash value in blue color and it will be used again in hashcat
Use hashcat to brute force attack
../hashcat/hashcat -m 13000 -w 3 -a 3 \
'$rar5$16$852481e911dc38c66cec2fbe8e9a825b$15$e1c319e802eec30efab80c6bd7470468$8$f9c3bfde638768a5' \
--increment --increment-min 2 --increment-max 8 '?d?d?d?d?d?d?d?d' --potfile-path=rarfile.pot  -o testrar.out.txt
Explanation of the parameters used in hashcat
-m 13000 means --hash-type RAR5 see here https://hashcat.net/wiki/doku.php?id=example_hashes
-a 3 means attack-mode Brute-force
-w 3 Workload Profiles High
--increment --increment-min 2 --increment-max 8
means increment the guess password with minimum of 2 and maximum of 8

?d means digit as below
Built-in charsets are
?l = abcdefghijklmnopqrstuvwxyz
?u = ABCDEFGHIJKLMNOPQRSTUVWXYZ
?d = 0123456789
?h = 0123456789abcdef
?H = 0123456789ABCDEF
?s = «space»!"#$%&'()*+,-./:;<=>?@[\]^_`{|}~
?a = ?l?u?d?s
If finished, the password will be in testrar.out.txt $rar5$16$852481e911dc38c66cec2fbe8e9a825b$15$e1c319e802eec30efab80c6bd7470468$8$f9c3bfde638768a5:1234
Testing of zip file with password
zip -e test.zip test.txt
zip2john test.zip
% zip2john test.zip
ver 1.0 efh 5455 efh 7875 test.zip/test.txt PKZIP Encr: 2b chk, TS_chk, cmplen=25, decmplen=13, crc=A491CD37
test.zip/test.txt:$pkzip2$1*2*2*0*19*d*a491cd37*0*42*0*19*a491*796a*55a56112ff0d2913127e2502764b2f8044e7975a5a23014084*$/pkzip2$:test.txt:test.zip::test.zip
../hashcat/hashcat -m 17210 -w 3 -a 3 \
'$pkzip2$1*2*2*0*19*d*a491cd37*0*42*0*19*a491*796a*55a56112ff0d2913127e2502764b2f8044e7975a5a23014084*$/pkzip2$' \
--increment --increment-min 2 --increment-max 8 '?d?d?d?d?d?d?d?d' --potfile-path=zipfile.pot -o testzip.out.txt

% cat testzip.out.txt
$pkzip2$1*2*2*0*19*d*a491cd37*0*42*0*19*a491*796a*55a56112ff0d2913127e2502764b2f8044e7975a5a23014084*$/pkzip2$:1256
Testing of pdf file with password
% perl pdf2john.pl testpdf.pdf
testpdf.pdf:$pdf$4*4*128*-4*1*16*9d60ea4e1b8444818557a392476b3ab3*32*13f7b5e82e85872782a2795121fc850d00000000000000000000000000000000*32*7f8b9892322afb0dccd7a4259da14c65e9d5009abb26bae6d1708fed9dc60edc

../hashcat/hashcat -m 10500 -w 3 -a 3 \
'$pdf$4*4*128*-4*1*16*9d60ea4e1b8444818557a392476b3ab3*32*13f7b5e82e85872782a2795121fc850d00000000000000000000000000000000*32*7f8b9892322afb0dccd7a4259da14c65e9d5009abb26bae6d1708fed9dc60edc' \
--increment --increment-min 2 --increment-max 8 '?d?d?d?d?d?d?d?d' --potfile-path=pdffile.pot -o testpdf.out.txt
note: hash-type for pdf
10400	PDF 1.1 - 1.3 (Acrobat 2 - 4)
10410	PDF 1.1 - 1.3 (Acrobat 2 - 4), collider #1
10420	PDF 1.1 - 1.3 (Acrobat 2 - 4), collider #2
10500	PDF 1.4 - 1.6 (Acrobat 5 - 8)
10600	PDF 1.7 Level 3 (Acrobat 9)
10700	PDF 1.7 Level 8 (Acrobat 10 - 11)
Testing of office file with password
% python office2john.py test.docx
test.docx:$office$*2013*100000*256*16*561f4dcaaac333e7c06d150f9ea5aea2*ef4e7b026217124561ecb865b324eac4*e9ef4a859f2c81581db0e27d9ce48e6451b82cd1641941e8adc10dc5600969cb

../hashcat/hashcat -m 9600 -w 3 -a 3 \
'$office$*2013*100000*256*16*561f4dcaaac333e7c06d150f9ea5aea2*ef4e7b026217124561ecb865b324eac4*e9ef4a859f2c81581db0e27d9ce48e6451b82cd1641941e8adc10dc5600969cb' \
--increment --increment-min 2 --increment-max 8 '?h?h?h?h?h?h?h?h' --potfile-path=officefile.pot -o testdocx.out.txt
note: hash-type for office doc
9400	MS Office 2007
9500	MS Office 2010
9600	MS Office 2013
If you don't have the machine for cracking purpose, you can do this using cloud GPU for a fee.
Sunday, April 17, 2022
How to install Ubuntu on Intel Macbook Air/Pro with T2 Security Chip
Currently you cannot easily install Linux onto an Apple computer which uses the T2 security chip because the Linux Kernel with the T2 support is not included in any of the currently released distributions as a default kernel. And cannot use the built-in keyboard, trackpad, bluetooth and neither WiFi nor ethernet.
(1) There is a patched Ubuntu ISO for Macbook Air/Pro (2018-2020) with T2 Security Chip hardware here. https://github.com/marcosfad/mbp-ubuntu/releases
(2) This ISO image requires you to install on the internal SSD and if you are on the lastest macOS Monterey, the internal SSD would be encrypted. It is not recommended to dual booting Macbook with both macOS and Linux unless you have good backups and are prepared to perform a clean install or restore from backup since you will at some point most likely do something which will prevent either OS from booting and possibly risk losing access to all the data in one or both operating systems.
(3) So it is probably better to use USB to boot up for testing out Linux on Macbook first.
You can download this installed ISO images here (2.64GB) and burn it to an USB stick with 128GB using balenaEtcher for Mac. You don't need to unzip the downloaded zip file as balenaEtcher can read zip file and write to the USB stick directly. The image has an extra 10GB exFAT partition, so that data can be exchanged offline with PC or Mac.
(4) The Macbook should be Disable Secure Boot and Set allowed boot media based on the instructions here https://support.apple.com/HT208330
(5) Then plug in the USB and restart the Macbook and press option key while bootup, then select EFI boot to startup Ubuntu. The installed version of this Ubuntu image, username and password are all ubuntu
(6) This patched Ubuntu ISO should worked for the butterfly keyboard, function keys, touch pad, bluetooth, display and audio. But the microphone might not be working. If the wifi is not working initially, the fix is here using the Terminal (control-option-T) commands
Fix wifi issue of ubuntu-mbp image
Then
Ubuntu Short Cut Key on Mac
Move window to left or right
command + arrow (e.g. left or right)
Switch desktop
control + option + arrow (e.g. up or down)
Move current window to desktop command + shift + page up / page down
command + shift + fn + arrow (e.g. up or down)
Show all desktops
command
Change window
command + tab
Further Installation of Waydroid and sideload of Android apk on Ubuntu
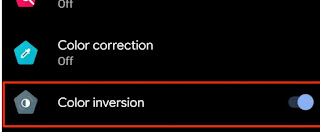
Color correction of WayDroid
Go to Settings App -> Accessibility -> Color inversion (on)
If you want to install Ubuntu Mate Desktop, the terminal command is
(1) There is a patched Ubuntu ISO for Macbook Air/Pro (2018-2020) with T2 Security Chip hardware here. https://github.com/marcosfad/mbp-ubuntu/releases
(2) This ISO image requires you to install on the internal SSD and if you are on the lastest macOS Monterey, the internal SSD would be encrypted. It is not recommended to dual booting Macbook with both macOS and Linux unless you have good backups and are prepared to perform a clean install or restore from backup since you will at some point most likely do something which will prevent either OS from booting and possibly risk losing access to all the data in one or both operating systems.
(3) So it is probably better to use USB to boot up for testing out Linux on Macbook first.
You can download this installed ISO images here (2.64GB) and burn it to an USB stick with 128GB using balenaEtcher for Mac. You don't need to unzip the downloaded zip file as balenaEtcher can read zip file and write to the USB stick directly. The image has an extra 10GB exFAT partition, so that data can be exchanged offline with PC or Mac.
(4) The Macbook should be Disable Secure Boot and Set allowed boot media based on the instructions here https://support.apple.com/HT208330
(5) Then plug in the USB and restart the Macbook and press option key while bootup, then select EFI boot to startup Ubuntu. The installed version of this Ubuntu image, username and password are all ubuntu
(6) This patched Ubuntu ISO should worked for the butterfly keyboard, function keys, touch pad, bluetooth, display and audio. But the microphone might not be working. If the wifi is not working initially, the fix is here using the Terminal (control-option-T) commands
Fix wifi issue of ubuntu-mbp image
sudo dpkg -i /usr/src/iso-firmware.deb
#edit /etc/NetworkManager/NetworkManager.conf as below
sudo editor /etc/NetworkManager/NetworkManager.conf
- NetworkManager.conf Select all
[main]
plugins=ifupdown,keyfile

[ifupdown]
managed=false

[device]
wifi.scan-rand-mac-address=no
#edit /etc/NetworkManager/conf.d/wifi_backend.conf and add # sign to stop iwd as below
sudo editor /etc/NetworkManager/conf.d/wifi_backend.conf
- wifi_backend.conf Select all
#[device]
#wifi.backend=iwd
Then
# restart NetworkManager
sudo systemctl restart NetworkManager
sudo modprobe brcmfmac
Then reboot Ubuntu...
Ubuntu Short Cut Key on Mac
Move window to left or right
command + arrow (e.g. left or right)
Switch desktop
control + option + arrow (e.g. up or down)
Move current window to desktop command + shift + page up / page down
command + shift + fn + arrow (e.g. up or down)
Show all desktops
command
Change window
command + tab
Further Installation of Waydroid and sideload of Android apk on Ubuntu
- shell script Select all
sudo apt update
sudo apt install python3-pip lxc curl wget -y
sudo pip install pyclip

export DISTRO="focal" && sudo curl https://repo.waydro.id/waydroid.gpg --output /usr/share/keyrings/waydroid.gpg && echo "deb [signed-by=/usr/share/keyrings/waydroid.gpg] https://repo.waydro.id/ $DISTRO main" > ~/waydroid.list && sudo mv ~/waydroid.list /etc/apt/sources.list.d/waydroid.list

sudo apt update
sudo apt install dkms -y

# if old Linux Kernel get this https://github.com/anbox/anbox-modules
# With Linux Kernel 5.17 (that is >=5.7), download and build Linux modules from here https://github.com/choff/anbox-modules
wget https://github.com/choff/anbox-modules/archive/refs/heads/master.zip
unzip master.zip
cd anbox-modules-master/
sudo ./INSTALL.sh

# check Linux kernel modules installed anbox-ashmem & anbox-binder
dkms status

# install waydroid
sudo apt install waydroid -y
#sudo editor /etc/resolv.conf as
nameserver 8.8.8.8
nameserver 8.8.4.4
#sudo editor /etc/gbinder.d/anbox.conf as
[Protocol]
/dev/binder = aidl2
/dev/vndbinder = aidl2
/dev/hwbinder = hidl

[ServiceManager]
/dev/binder = aidl2
/dev/vndbinder = aidl2
/dev/hwbinder = hidl
Logout Ubuntu (PC keyboard: control-alt-delete / Mac keyboard: control-option-fn-delete)
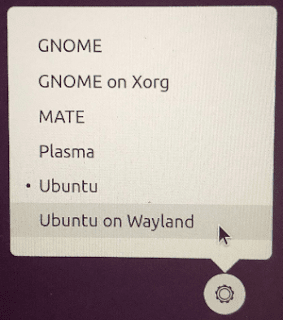
And login again with "Ubuntu on Wayland" (setting at the bottom right hand corner)

# Download waydroid image (752.66 MB) then init
sudo waydroid init
sudo systemctl start waydroid-container
waydroid session start

# sideload apk (x86_64 apk only)
waydroid app install myapplication.apk
Color correction of WayDroid
Go to Settings App -> Accessibility -> Color inversion (on)

If you want to install Ubuntu Mate Desktop, the terminal command is
sudo apt-get update
sudo apt-get install ubuntu-mate-desktop
Saturday, April 9, 2022
How to erase Mac SSD for downgrade macOS to older version
It used to be using created bootable USB stick in order to downgrade macOS to older version, as in here.
But with the new macOS Monterey and with the T2 Security Chip of modem Mac, your Macintosh SSD will be encrypted and for Intel Mac, the bootcamp partition will also encrypted.
As a result, you cannot install macOS from USB stick to the encrptyed SSD, even if you have enabled boot from media in the Startup Security Utility.
The downgrade path will now require you to erase all content and settings first.
If you haven't do so, you have to do Erase Mac as below before installing any macOS version.
In addition, if you want to downgrade macOS, you have to do
Step (1) Backup all your important data and be sure you have a good Internet connection for the remaining steps
Step (2) Erase Mac, reboot Mac and select Erase Mac from the menu. This will wipe and remove all the whole Macintosh SSD, including the encrypted Macintosh partition and bootcamp partition if any, you might need to authenticate by entering the admin password of your existing MacOS to do this. You can use Internet Recovery to the original macOS version (Option-Shift-Command-R), or else it will default to the latest macOS Monterey (Option-Command-R).
Step (3) Activate Mac, reboot Mac and enter Recovery by pressing Command-R and activate the Mac.
Step (4) Internet Recovery, reboot Mac and enter Recovery by pressing Command-R and use Internet Recovery to choose install original version of macOS.
Step (5) Enable boot from media, After successful installation of the old macOS version, create bootable USB stick of your required macOS version based on this guide from Apple. Reboot Mac and enable boot from media from in the Startup Security Utility.
Step (5) Install macOS from USB stick, reboot again and press Option to choose the USB stick to install from macOS.
But with the new macOS Monterey and with the T2 Security Chip of modem Mac, your Macintosh SSD will be encrypted and for Intel Mac, the bootcamp partition will also encrypted.
As a result, you cannot install macOS from USB stick to the encrptyed SSD, even if you have enabled boot from media in the Startup Security Utility.
The downgrade path will now require you to erase all content and settings first.
If you haven't do so, you have to do Erase Mac as below before installing any macOS version.
In addition, if you want to downgrade macOS, you have to do
Step (1) Backup all your important data and be sure you have a good Internet connection for the remaining steps
Step (2) Erase Mac, reboot Mac and select Erase Mac from the menu. This will wipe and remove all the whole Macintosh SSD, including the encrypted Macintosh partition and bootcamp partition if any, you might need to authenticate by entering the admin password of your existing MacOS to do this. You can use Internet Recovery to the original macOS version (Option-Shift-Command-R), or else it will default to the latest macOS Monterey (Option-Command-R).
Step (3) Activate Mac, reboot Mac and enter Recovery by pressing Command-R and activate the Mac.
Step (4) Internet Recovery, reboot Mac and enter Recovery by pressing Command-R and use Internet Recovery to choose install original version of macOS.
Step (5) Enable boot from media, After successful installation of the old macOS version, create bootable USB stick of your required macOS version based on this guide from Apple. Reboot Mac and enable boot from media from in the Startup Security Utility.
Step (5) Install macOS from USB stick, reboot again and press Option to choose the USB stick to install from macOS.
Thursday, June 10, 2021
How to download WWDC2021 videos and subtitles
The scripts for previous WWDC are here
https://iphonesdkdev.blogspot.com/2020/10/how-to-download-wwdc2020-videos-and.html
https://iphonesdkdev.blogspot.com/2017/07/how-to-fetch-wwdc-2017-video-subtitle.html
Create and Run this script wwdc2021_fetch_srt.sh to fetch WWDC2021 subtitle
Run this shell script to format as SRT subtitle
Run this script wwdc2021_fetch_mp4.sh to download all mp4 (HD and SD) videos (also works for 2021)
Run this script to rename the video or subtitles to proper title (HD & SD) videos
# Example nohup commnad for Linux Download
nohup bash -c 'cd $HOME/Downloads/WWDC/; ./wwdc2021_fetch_mp4.sh' &> nohup.wwdc2021.mp4.out &
nohup bash -c 'cd $HOME/Downloads/WWDC/; ./wwdc2021_fetch_en.srt.sh' &> nohup.wwdc2021.en.srt.out &
# or use screen utility to download
screen -S wwdcdownloadmp4
bash wwdc2021_fetch_mp4.sh
https://iphonesdkdev.blogspot.com/2017/07/how-to-fetch-wwdc-2017-video-subtitle.html
Create and Run this script wwdc2021_fetch_srt.sh to fetch WWDC2021 subtitle
- wwdc2021_fetch_en.srt.sh Select all
#!/bin/bash
# @Last Modified by:   javacom
# @Last Modified time: 2021-06-10

WWDC_YEAR=2021;
#
WWDC_SESSION_PREFIX=https://developer.apple.com/videos/play/wwdc$WWDC_YEAR;
WWDC_LOCAL_DIR=$(basename $WWDC_SESSION_PREFIX);

detect_video_m3u8 () {
 local session_url=$WWDC_SESSION_PREFIX/$SESSION_ID/;
 local session_html=$(curl -s $session_url);
 local video_url=$(echo "$session_html" | grep .m3u8 | grep $SESSION_ID | head -n1 | sed "s#.*\"\(https://.*m3u8\)\".*#\1#");
 echo "$session_html" | grep .mp4 | grep $SESSION_ID | sed "s#.*\"\(https://.*mp4\).*\".*#\1#" | while read mp4_url; do
  local mp4_filename=$(basename $mp4_url | cut -d. -f1);
  local srt_filename=$mp4_filename.en.srt;
#  local srt_filename=$mp4_filename.zh.srt;
  echo "> Subtitle local: $WWDC_LOCAL_DIR/$srt_filename" >&2;
  > $WWDC_LOCAL_DIR/$srt_filename;
 done
 echo "$video_url";
 echo "> Video: $video_url" >&2;
}

detect_subtitle_m3u8 () {
 local video_url=$1;
# en subtitle
 local subtitle_uri=$(curl -s $video_url | grep "LANGUAGE=\"eng\"" | grep "TYPE=SUBTITLES" | sed "s#.*URI=\"\(.*\)\"#\1#" | sed "s#.FORCED=NO##");

# zh subtitle
 #local subtitle_uri=$(curl -s $video_url | grep "LANGUAGE=\"zh\"" | sed "s#.*URI=\"\(.*\)\"#\1#");
 local subtitle_url=$subtitle_uri;
 [[ "$subtitle_uri" != http* ]] && {
  subtitle_url=$(dirname $video_url)/$subtitle_uri;
 }
 echo "$subtitle_url";
 echo "> Subtitle: $subtitle_url" >&2;
}

download_subtitle_contents () {
 local subtitle_url=$1;
 echo "> Downloading... "

 local subtitle_base_url=$(dirname $subtitle_url);
 curl -s $subtitle_url | grep "webvtt" | while read webvtt; do
  local subtitle_webvtt=$subtitle_base_url/$webvtt;
  #echo "- get $subtitle_webvtt";
  local subtitle_content=$(curl -s $subtitle_webvtt);
# en subtitle
  ls $WWDC_LOCAL_DIR/"wwdc$WWDC_YEAR"-"$SESSION_ID"*.en.srt | while read srt_file; do
# zh subtitle
#  ls $WWDC_LOCAL_DIR/"wwdc$WWDC_YEAR"-"$SESSION_ID"*.zh.srt | while read srt_file; do
   echo "$subtitle_content" >> $srt_file;
  done
 done
}

main () {
 [ ! -d $WWDC_LOCAL_DIR ] && {
  mkdir $WWDC_LOCAL_DIR;
 }

#Year 2020/2021 change {3\} to {3,5\}
 curl -s $WWDC_SESSION_PREFIX | grep /videos/play/wwdc$WWDC_YEAR | sed "s#.*/videos/play/wwdc$WWDC_YEAR/\([0-9]\{3,5\}\).*#\1#" | sort | uniq | while read SESSION_ID; do
  #echo "SESSION_ID is" $SESSION_ID
  local video_url=$(detect_video_m3u8 $SESSION_ID);
  local subtitle_url=$(detect_subtitle_m3u8 $video_url);

  download_subtitle_contents $subtitle_url;
 done
}

main;
Run this shell script to format as SRT subtitle
- shellscript.sh Select all
WWDC_YEAR=2021;
#
cd wwdc$WWDC_YEAR
mkdir -p sd
mkdir -p hd
for i in *_sd.??.srt; do sed -e '/WEBVTT/d;/X-TIMESTAMP/d;s/align.middle line.*$//;' $i | awk '/^[0-9]{2}:[0-9]{2}:/ {seen[$0]++; skipduplicated=0} {if (seen[$0]>1) skipduplicated=1; if (!skipduplicated) print $0}' | awk -v RS="" '{gsub("\n", "-Z"); print}' | awk '$0 !~/^WEB/ {print $0}' | uniq | awk '{printf "\n%s-Z%s", NR,$0 }' | awk -v ORS="\n\n" '{gsub("-Z", "\n"); print}' | sed -e 's/.A:middle$//g;s/>/>/g;s/</</g;1,2d;' > sd/$i; done
for i in *_hd.??.srt; do sed -e '/WEBVTT/d;/X-TIMESTAMP/d;s/align.middle line.*$//;' $i | awk '/^[0-9]{2}:[0-9]{2}:/ {seen[$0]++; skipduplicated=0} {if (seen[$0]>1) skipduplicated=1; if (!skipduplicated) print $0}' | awk -v RS="" '{gsub("\n", "-Z"); print}' | awk '$0 !~/^WEB/ {print $0}' | uniq | awk '{printf "\n%s-Z%s", NR,$0 }' | awk -v ORS="\n\n" '{gsub("-Z", "\n"); print}' | sed -e 's/.A:middle$//g;s/>/>/g;s/</</g;1,2d;' > hd/$i; done
Run this script wwdc2021_fetch_mp4.sh to download all mp4 (HD and SD) videos (also works for 2021)
- wwdc2021_fetch_mp4.sh Select all
#!/bin/bash
# @Last Modified by:   javacom
# @Last Modified time: 2021-06-10

WWDC_YEAR=2021;
#
WWDC_SESSION_PREFIX=https://developer.apple.com/videos/play/wwdc$WWDC_YEAR;
WWDC_LOCAL_DIR=$(basename $WWDC_SESSION_PREFIX);

download_mp4_video () {
 local session_url=$WWDC_SESSION_PREFIX/$SESSION_ID/;
 local session_html=$(curl -s $session_url);
 local video_url=$(echo "$session_html" | grep .m3u8 | grep $SESSION_ID | head -n1 | sed "s#.*\"\(https://.*m3u8\)\".*#\1#");
 echo "$session_html" | grep .mp4 | grep $SESSION_ID | sed "s#.*\"\(https://.*mp4\).*\".*#\1#" | while read mp4_url; do
  local mp4_filename=$(basename $mp4_url);
  if [ -e $WWDC_LOCAL_DIR/$mp4_filename ]
  then
      echo "> MP4 already existed : $WWDC_LOCAL_DIR/$mp4_filename" >&2;
      echo "> To resume broken download use curl -C - --connect-timeout 1200 -o $WWDC_LOCAL_DIR/$mp4_filename $mp4_url" >&2;
      echo " " >&2;
  else
      echo "> MP4 Downloading... : $mp4_url" >&2;
      curl  --connect-timeout 120 -o $WWDC_LOCAL_DIR/$mp4_filename $mp4_url
  fi
 done
}

main () {
 [ ! -d $WWDC_LOCAL_DIR ] && {
  mkdir $WWDC_LOCAL_DIR;
 }

#Year 2020/2021 change {3\} to {3,5\}
 curl -s $WWDC_SESSION_PREFIX | grep /videos/play/wwdc$WWDC_YEAR | sed "s#.*/videos/play/wwdc$WWDC_YEAR/\([0-9]\{3,5\}\).*#\1#" | sort | uniq | while read SESSION_ID; do
  download_mp4_video $SESSION_ID;
 done
}

main;
Run this script to rename the video or subtitles to proper title (HD & SD) videos
- wwdc2021_rename_title.sh Select all
#!/bin/sh
# @Last Modified by:   javacom
# @Last Modified time: 2021-6-10


# For WWDC2021 video files, VIDEO=sd or VIDEO=hd
WWDC_YEAR=2021; VIDEO=sd; curl -s https://developer.apple.com/videos/wwdc${WWDC_YEAR}/ | grep -B1 "video-title"  | sed -e "s#[[:space:]]\{10,\}<a href=./videos/play/wwdc202./\([0-9]\{3,5\}\).*#\[ -f  \"wwdc${WWDC_YEAR}-\1_${VIDEO}.mp4\" \] \&\& mv \"wwdc${WWDC_YEAR}-\1_${VIDEO}.mp4\" \"wwdc${WWDC_YEAR}-\1_${VIDEO}_#" -e "s/[\@:’\'\,?]//g" -e "s/\"\(The.*\)\"/\1/" -e 's#.*video-title..\(.*\)\(</h4>\)#\1.mp4"#' -e '/--/d' | sed '/^\[ -f/{N;s/\n//;}' | sed  "s#[\/@:’\'\,]#_#g" | /bin/bash

# For WWDC2021 English subtitle files, VIDEO=sd or VIDEO=hd
WWDC_YEAR=2021; VIDEO=sd; curl -s https://developer.apple.com/videos/wwdc${WWDC_YEAR}/ | grep -B1 "video-title"  | sed -e "s#[[:space:]]\{10,\}<a href=./videos/play/wwdc202./\([0-9]\{3,5\}\).*#\[ -f  \"wwdc${WWDC_YEAR}-\1_${VIDEO}.en.srt\" \] \&\& mv \"wwdc${WWDC_YEAR}-\1_${VIDEO}.en.srt\" \"wwdc${WWDC_YEAR}-\1_${VIDEO}_#" -e "s/[\@:’\'\,?]//g" -e "s/\"\(The.*\)\"/\1/" -e 's#.*video-title..\(.*\)\(</h4>\)#\1.en.srt"#' -e '/--/d' | sed '/^\[ -f/{N;s/\n//;}' | sed  "s#[\/@:’\'\,]#_#g" | /bin/bash
# Example nohup commnad for Linux Download
nohup bash -c 'cd $HOME/Downloads/WWDC/; ./wwdc2021_fetch_mp4.sh' &> nohup.wwdc2021.mp4.out &
nohup bash -c 'cd $HOME/Downloads/WWDC/; ./wwdc2021_fetch_en.srt.sh' &> nohup.wwdc2021.en.srt.out &
# or use screen utility to download
screen -S wwdcdownloadmp4
bash wwdc2021_fetch_mp4.sh
Thursday, April 8, 2021
How to write subrountine call in macOS assembly code for x86_64 and arm64
(1) Demo the subrountine call in macOS assembly code for x86_64 and arm64. For M1 Mac with Rosetta 2 installed, it can compile and run x86_64 and arm64 binary after installation of Xcode
(2) To compile with -g and codesign the program so as to debug in lldb under macOS.
(3) To debug using lldb
- callfactorial.c Select all
/*
* An application that illustrates calling the factorial function defined elsewhere.
*/

#include <stdio.h>
#include <inttypes.h>

uint64_t factorial(unsigned n);

int main() {
    for (unsigned i = 0; i < 20; i++) {
        printf("factorial(%2u) = %llu\n", i, factorial(i));
    }
}
- factorial.s Select all
# ----------------------------------------------------------------------
# A 64-bit recursive implementation of the function
#
#     uint64_t factorial(unsigned n)
#
# implemented recursively with x86_64 and arm64 assembly code
# -----------------------------------------------------------------------

        .globl  _factorial

        .text
#ifdef __arm64__
        .align 4
#endif

_factorial:
#ifdef __x86_64__
        cmp     $1, %rdi            # n <= 1?
        jnbe    L1                  # if not, go do a recursive call
        mov     $1, %rax            # otherwise return 1
        ret
#endif
#ifdef __arm64__
        cmp     x8, #1              //# n > 1?
        b.gt    L1                  //# if yes, go do a recursive call
        mov     x0, #1              //# otherwise return 1
        ret
#endif
L1:
#ifdef __x86_64__
        push    %rdi                # save n on stack (also aligns %rsp!)
        dec     %rdi                # n-1
        call    _factorial          # factorial(n-1), result goes in %rax
        pop     %rdi                # restore n
        imul    %rdi, %rax          # n * factorial(n-1), stored in %rax
        ret
#endif
#ifdef __arm64__
        STP     X8, LR, [SP, #-16]! //# push x8 and LR(x30)
                                    //  LR is to return from subroutine
        subs    x8, x8, #1          //# n-1
        bl      _factorial          //# factorial(n-1), result goes in x0
        LDP     X8, LR, [SP], #16   //# pop x8 and LR(x30)
        mul     x0, x0, x8          //# n * factorial(n-1), stored in x0
        ret
#endif
(2) To compile with -g and codesign the program so as to debug in lldb under macOS.
- shell script Select all
# To compile and codesign x86_64 version
clang factorial.s callfactorial.c -g -o callfactorial_arm64 -arch x86_64 && codesign --entitlement entitlements --force -s - callfactorial_x86_64
# To compile and codesign arm64 version
clang factorial.s callfactorial.c -g -o callfactorial_arm64 -arch arm64 && codesign --entitlement entitlements --force -s - callfactorial_arm64
(3) To debug using lldb
- shell script Select all
lldb callfactorial_x86_64
# or
lldb callfactorial_arm64

# lldb debug session for arm64 - useful commands
(lldb) breakpoint set --name main --name factorial
(lldb) breakpoint list
(lldb) run
(lldb) step
(lldb) po i
(lldb) reg read x0 x8 lr pc
(lldb) reg read -f t cpsr
# lldb debug session for x86_64 - useful commands
(lldb) reg read -f d rax rdi rflags
(lldb) reg read -f t rflags
# print the address value in the stackpointer for x86_64
(lldb) p *(int **)$sp
# hint: to search lldb command history use ctrl-r
Saturday, April 3, 2021
How to use inline assembly language for M1 Mac for x86_64 and arm64
(1) Demo the inline assembly code for x86_64 and arm64
(2) Demo the assembly source code as a separate function for x86_64 and arm64
(3) Compile with
clang add-inline.c -o add-inline_x86_64 -arch x86_64
clang add-inline.c -o add-inline_arm64 -arch arm64
clang add-main.c add.s -o add-main_x86_64 -arch x86_64
clang add-main.c add.s -o add-main_arm64 -arch arm64
(4) Disassemble with (e.g.)
otool -otV add-inline_arm64
(5) Install Rosetta 2 on M1 to run the x86_64 version (e.g.)
./add-main_x86_64
(6) codesign and debug with lldb (e.g.)
clang -g -o add-inline_x86_64 add-inline.c -arch x86_64
codesign --entitlement entitlements --force -s - add-inline_x86_64
lldb add-inline_x86_64
(lldb) breakpoint set --file add-inline.c --line 7
(7) floating point example for x86_64 and arm64
compile with
clang sum.s callsum.c -o callsum_x86_64 -arch x86_64
clang sum.s callsum.c -o callsum_arm64 -arch arm64
Debug and codesign similar to above example
- add-inline.c Select all
#include <stdio.h>
// compile with command line
// clang add-inline.c -o add-inline_x86_64 -arch x86_64
// clang add-inline.c -o add-inline_arm64 -arch arm64
// disassemble with
// otool -otV add-inline_x86_64
// otool -otV add-inline_arm64

int main(int argc, const char * argv[]) {
  int a = 10;
  int b = 25;
  int ans = 0;
#ifdef __x86_64__
  __asm__(  "add %2,%1;\n" // %1 += %2 add source to destination
            "mov %1,%0;\n" // move data from %1 to %0
          : "=r"(ans)
          : "r"(a), "r"(b)
          : );
#endif
#ifdef __arm64__
  __asm__(  "add %w0,%w1,%w2;\n" // load %w0 = %w1 + %w2
          : "=r"(ans)
          : "r"(a), "r"(b)
          : );
#endif
  printf("The answer is %d\n",ans);
  return 0;
}
(2) Demo the assembly source code as a separate function for x86_64 and arm64
- add-main.c Select all
#include <stdio.h>
// compile with command line
// clang add-main.c add.s -o add-main_x86_64 -arch x86_64
// clang add-main.c add.s -o add-main_arm64 -arch arm64
#include <stdio.h>

int add(int x, int y);
int main(int argc, const char * argv[]) {
  int ans = add(15,40);
  printf("The answer is %d\n",ans);
  return 0;
}
- add.s Select all
.text
.globl  _add
.align 2

_add:
#ifdef __x86_64__
        add     %esi,%edi // %edi += %esi, source is the first
        mov     %edi,%eax // move data from %edi to %eax
// x86_64 calling convention
// rdi, rsi, rdx, rcx, r8, r9
// The 32-bit general purpose registers are edi, esi, edx, ecx, r8d, r9d instead.
// The 16-bit general purpose registers are di, si, dx, cx, r8w, r9w instead.
// The syscall number is placed in rax
// see https://sigsegv.pl/osx-bsd-syscalls/
// Return value is in rax
#endif
#ifdef __arm64__
        add     w0,w0,w1  // load w0 with w0+w1, destination is the first
// calling convention for arm64
// x0,x1,x2,x3,x4,x5,x6,x7 or r0 to r7
// The 32-bit general purpose registers are w0-w7 instead.
// The syscall number is placed in r8
// Return value is in x0

// see https://wiki.cdot.senecacollege.ca/wiki/Syscalls
#endif
ret
- entitlements Select all
<?xml version="1.0" encoding="UTF-8"?>
<!DOCTYPE plist PUBLIC "-//Apple//DTD PLIST 1.0//EN" "http://www.apple.com/DTDs/PropertyList-1.0.dtd">
<plist version="1.0">
<dict>
        <key>com.apple.security.get-task-allow</key>
        <true/>
</dict>
</plist>
(3) Compile with
clang add-inline.c -o add-inline_x86_64 -arch x86_64
clang add-inline.c -o add-inline_arm64 -arch arm64
clang add-main.c add.s -o add-main_x86_64 -arch x86_64
clang add-main.c add.s -o add-main_arm64 -arch arm64
(4) Disassemble with (e.g.)
otool -otV add-inline_arm64
(5) Install Rosetta 2 on M1 to run the x86_64 version (e.g.)
./add-main_x86_64
(6) codesign and debug with lldb (e.g.)
clang -g -o add-inline_x86_64 add-inline.c -arch x86_64
codesign --entitlement entitlements --force -s - add-inline_x86_64
lldb add-inline_x86_64
(lldb) breakpoint set --file add-inline.c --line 7
(7) floating point example for x86_64 and arm64
compile with
clang sum.s callsum.c -o callsum_x86_64 -arch x86_64
clang sum.s callsum.c -o callsum_arm64 -arch arm64
Debug and codesign similar to above example
- callsum.c Select all
/*
 * callsum.c
 *
 * Illustrates how to call the sum.s function wrote in assembly language.
 */
// clang sum.s callsum.c -o callsum_x86_64 -arch x86_64
// clang sum.s callsum.c -o callsum_arm64 -arch arm64
#include <stdio.h>

double sum(double[], unsigned);

int main() {
    double test[] = {
        40.5, 26.7, 21.9, 1.5, -40.5, -23.4
    };
    printf("%20.7f\n", sum(test, 6));
    printf("%20.7f\n", sum(test, 2));
    printf("%20.7f\n", sum(test, 0));
    printf("%20.7f\n", sum(test, 3));
    return 0;
}
- sum.s Select all
# -----------------------------------------------------------------------
# A 64-bit function that returns the sum of the elements in a
# floating-point array for x86_64 and arm64. The function has prototype:
#
#   double sum(double[] array, unsigned length)
# -----------------------------------------------------------------------

        .global _sum
        .text
        .align 2

_sum:
#ifdef __x86_64__
        xorpd   %xmm0, %xmm0            // initialize the sum to 0
                                        // floats are passed in xmm0
        cmp     $0, %rsi                // special case for length = 0
        je      done
#endif
#ifdef __arm64__
        movi    d0, #0                  // initialize the sum to 0
                                        // floats are passed in s0-7 and doubles in the d0-7 registers.
        cmp     x1, #0                  // special case for length = 0
        b.eq    done
#endif

next:
#ifdef __x86_64__
        addsd   (%rdi), %xmm0           // add in the current array element, return floating point value in xmm0
        add     $8, %rdi                // move to next array element
        dec     %rsi                    // count down
        jnz     next                    // if not done counting, continue
#endif
#ifdef __arm64__
        ldr     d16, [x0]               // load the float into d16
                                        // floats in s0-7 and doubles in the d0-7 registers.
        fadd    d0, d0, d16             // add in the current array element, return floating point value in d0
        add     x0, x0, #8              // move to next array element
        subs    x1, x1, #1              // count down
        cbnz    w1, next                // if not done counting, continue
#endif

done:
        ret
Wednesday, December 23, 2020
How to install Parallel Desktop and Windows 10 on Mac M1
Mac M1 can install Parallel Desktop Preview and run x64 Windows app
1) Install PD for M1 Mac from https://www.parallels.com/blogs/parallels-desktop-apple-silicon-mac/ and click Try Technical Preview. Need to login and register.
Direct download link
MD5 checksum 5fc71f89fcc67ed13bac1995604a962f
Activation key You have to register and login to activate the product
2) Install Windows 10 Client ARM64 Insider Preview download from https://www.microsoft.com/en-us/software-download/windowsinsiderpreviewARM64. Need to login and register as Insider Preview Program.
Direct download link>
>
3) Update Win10 ARM to version 21277 which can install and run x64 Windows programs.
Have to login Windows Insider Program and set to "Dev Channel" to recieve preview updates.


1) Install PD for M1 Mac from https://www.parallels.com/blogs/parallels-desktop-apple-silicon-mac/ and click Try Technical Preview. Need to login and register.
Direct download link
MD5 checksum 5fc71f89fcc67ed13bac1995604a962f
Activation key You have to register and login to activate the product
2) Install Windows 10 Client ARM64 Insider Preview download from https://www.microsoft.com/en-us/software-download/windowsinsiderpreviewARM64. Need to login and register as Insider Preview Program.
Direct download link>
>
3) Update Win10 ARM to version 21277 which can install and run x64 Windows programs.
Have to login Windows Insider Program and set to "Dev Channel" to recieve preview updates.


Sunday, December 20, 2020
Buid docker image for M1 Mac with development tools and vnc
(1) With the release of docker preview for Mac M1, it is now possible to build some arm64 images.
Docker M1 preview
https://desktop.docker.com/mac/m1preview/Docker-AppleSilicon-Preview7.dmg
(2) Install the above preview and then use terminal the tools. The build script is based on Android SDK docker image for x64 and modify it for arm64. Moreover, swift 5.3.1, clang 10.0.0, kotlin 1.4.21, gradle 6.7.1, gcc 9.3.0, java 11, firefox, visual studio code and codeblocks are added for development purpose.
(3) Shell script run in Mac docker info # check if docker is installed properly in Mac M1
mkdir -p ${HOME}/android_sdk_vnc
cd ${HOME}/android_sdk_vnc
curl -O https://raw.githubusercontent.com/thyrlian/AndroidSDK/master/android-sdk/sshd-banner
curl -O https://raw.githubusercontent.com/thyrlian/AndroidSDK/master/android-sdk/supervisord.conf
curl -O https://raw.githubusercontent.com/thyrlian/AndroidSDK/master/android-sdk/vnc/supervisord_vncserver.conf
curl -O https://raw.githubusercontent.com/thyrlian/AndroidSDK/master/android-sdk/vnc/vncpass.sh
curl -O https://raw.githubusercontent.com/thyrlian/AndroidSDK/master/android-sdk/vnc/watchdog.sh
(4) Create the following Dockfile
(5) build the Dockfile
(6) Copy Mac host id_rsa.pub to authorized_keys and start the container
# To start the container as daemon
# To connect the container via ssh
# To stop the container
(7) To connect to the vnc of the docker image after starting the container
Use the Mac Finder "Go" -> "Connect To Server" and enter "vnc://0.0.0.0:5901"
For other machines in the network enter "vnc://<IP address of your Mac M1>:5901"
The passwords are in the vncpass.sh when building which are
password="android"
password_view_only="docker"
(8) There is a common problem if you are connecting remotely using Mac Terminal, so the solution is to not forward your locale. Edit /etc/ssh/ssh_config and comment out SendEnv LANG LC_* line.
(9) Testing swift
# attach to the running container
If you need port forwarding on macOS, see this article https://www.papercut.com/kb/Main/MacPortForwarding
Docker M1 preview
https://desktop.docker.com/mac/m1preview/Docker-AppleSilicon-Preview7.dmg
(2) Install the above preview and then use terminal the tools. The build script is based on Android SDK docker image for x64 and modify it for arm64. Moreover, swift 5.3.1, clang 10.0.0, kotlin 1.4.21, gradle 6.7.1, gcc 9.3.0, java 11, firefox, visual studio code and codeblocks are added for development purpose.
(3) Shell script run in Mac docker info # check if docker is installed properly in Mac M1
mkdir -p ${HOME}/android_sdk_vnc
cd ${HOME}/android_sdk_vnc
curl -O https://raw.githubusercontent.com/thyrlian/AndroidSDK/master/android-sdk/sshd-banner
curl -O https://raw.githubusercontent.com/thyrlian/AndroidSDK/master/android-sdk/supervisord.conf
curl -O https://raw.githubusercontent.com/thyrlian/AndroidSDK/master/android-sdk/vnc/supervisord_vncserver.conf
curl -O https://raw.githubusercontent.com/thyrlian/AndroidSDK/master/android-sdk/vnc/vncpass.sh
curl -O https://raw.githubusercontent.com/thyrlian/AndroidSDK/master/android-sdk/vnc/watchdog.sh
(4) Create the following Dockfile
- Dockerfile Select all
cat >Dockerfile <<'HEREEOF'
# ====================================================================== #
# Android SDK Docker Image
# ====================================================================== #

# Base image
# ---------------------------------------------------------------------- #
FROM arm64v8/ubuntu:20.04


# install essential tools
RUN apt-get update && \
    apt-get dist-upgrade -y && \
    DEBIAN_FRONTEND=noninteractive apt-get install -y --no-install-recommends git wget wget2 zip unzip && \
    apt-get install -y build-essential vim

# install Android SDK
RUN DEBIAN_FRONTEND=noninteractive apt-get install -y android-sdk && \
    rm -f /usr/lib/android-sdk/build-tools/27.0.1

# install Android SDK cmdline tools
ARG ANDROID_SDK_VERSION=6858069
ENV ANDROID_SDK_ROOT /usr/lib/android-sdk
RUN wget2 -q https://dl.google.com/android/repository/commandlinetools-linux-${ANDROID_SDK_VERSION}_latest.zip && \
    unzip commandlinetools*linux*${ANDROID_SDK_VERSION}*.zip && \
    mv cmdline-tools tools && \
    mkdir -p ${ANDROID_SDK_ROOT}/cmdline-tools && \
    mv tools ${ANDROID_SDK_ROOT}/cmdline-tools/ && \
    (cd /usr/lib/android-sdk/cmdline-tools; ln -s tools latest) && \
    rm -f commandlinetools*linux*.zip


# download and install Gradle
ARG GRADLE_VERSION=6.7.1
ARG GRADLE_DIST=bin
RUN wget2 -q https://services.gradle.org/distributions/gradle-${GRADLE_VERSION}-${GRADLE_DIST}.zip && \
    rm -fr /usr/share/gradle && \
    unzip gradle*.zip -d /usr/share && \
    rm gradle*.zip && \
    mv /usr/share/gradle-${GRADLE_VERSION} /usr/share/gradle

# download and install Kotlin compiler
ARG KOTLIN_VERSION=1.4.10
RUN wget2 -q https://github.com/JetBrains/kotlin/releases/download/v${KOTLIN_VERSION}/kotlin-compiler-${KOTLIN_VERSION}.zip && \
    unzip *kotlin*.zip && \
    mv kotlinc /usr/share && \
    rm *kotlin*.zip

# install swift5 compiler
  RUN wget -qO- https://packagecloud.io/install/repositories/swift-arm/release/script.deb.sh | bash
  RUN apt install -y swiftlang

# setup adb server
EXPOSE 5037

# set the environment variables
ARG JDK_VERSION=1.11.0
ENV JAVA_HOME /usr/lib/jvm/java-${JDK_VERSION}-openjdk-arm64
ENV GRADLE_HOME /usr/share/gradle
ENV KOTLIN_HOME /usr/share/kotlinc
ENV ANDROID_SDK_ROOT /usr/lib/android-sdk
ENV ANDROID_HOME /usr/lib/android-sdk
ENV ANDROID_TOOLS /usr/lib/android-sdk/tools
ENV ANDROID_PLATFORMS /usr/lib/android-sdk/platforms
ENV ANDROID_PLATFORM_TOOLS /usr/lib/android-sdk/platform-tools
ENV ANDROID_BUILD_TOOLS /usr/lib/android-sdk/build-tools
ENV ANDROID_CMDLINE_TOOLS /usr/lib/android-sdk/cmdline-tools/tools
ENV PATH ${PATH}:${GRADLE_HOME}/bin:${KOTLIN_HOME}/bin:${ANDROID_BUILD_TOOLS}/debian:${ANDROID_TOOLS}/bin:${ANDROID_PLATFORM_TOOLS}:${ANDROID_CMDLINE_TOOLS}/bin:${ANDROID_SDK_ROOT}/emulator

# install system image and accept licence, installation of emulator will fail for arm64 system
RUN yes Y | ${ANDROID_CMDLINE_TOOLS}/bin/sdkmanager --install "platform-tools" "system-images;android-24;google_apis;arm64-v8a" "platforms;android-24" "build-tools;30.0.3" && \
    wget https://github.com/qhuyduong/arm_adb/releases/download/v1.0.39-aarch64/adb && \
    chmod +x adb && mv adb /usr/lib/android-sdk/platform-tools/


# install and configure SSH server
EXPOSE 22
ADD sshd-banner /etc/ssh/
# ADD authorized_keys /tmp/
RUN apt-get update && \
    DEBIAN_FRONTEND=noninteractive apt-get install -y --no-install-recommends openssh-server supervisor locales && \
    mkdir -p /var/run/sshd /var/log/supervisord && \
    locale-gen en en_US en_US.UTF-8 && \
    apt-get remove -y locales && apt-get autoremove -y && \
    FILE_SSHD_CONFIG="/etc/ssh/sshd_config" && \
    echo "\nBanner /etc/ssh/sshd-banner" >> $FILE_SSHD_CONFIG && \
    echo "\nPermitUserEnvironment=yes" >> $FILE_SSHD_CONFIG && \
    ssh-keygen -q -N "" -f /root/.ssh/id_rsa && \
    FILE_SSH_ENV="/root/.ssh/environment" && \
    touch $FILE_SSH_ENV && chmod 600 $FILE_SSH_ENV && \
    printenv | grep "JAVA_HOME\|GRADLE_HOME\|KOTLIN_HOME\|ANDROID_SDK_ROOT\|LD_LIBRARY_PATH\|PATH" >> $FILE_SSH_ENV && \
    echo "\nauth required pam_env.so envfile=$FILE_SSH_ENV" >> /etc/pam.d/sshd && \
    FILE_AUTH_KEYS="/root/.ssh/authorized_keys" && \
    touch $FILE_AUTH_KEYS && chmod 600 $FILE_AUTH_KEYS && \
    for file in /tmp/*.pub; \
    do if [ -f "$file" ]; then echo "\n" >> $FILE_AUTH_KEYS && cat $file >> $FILE_AUTH_KEYS && echo "\n" >> $FILE_AUTH_KEYS; fi; \
    done && \
    (rm /tmp/*.pub 2> /dev/null || true)


# install and configure VNC server
ENV USER root
ENV DISPLAY :1
EXPOSE 5901
ADD vncpass.sh /tmp/
ADD watchdog.sh /usr/local/bin/
ADD supervisord_vncserver.conf /etc/supervisor/conf.d/
RUN apt-get update && \
    DEBIAN_FRONTEND=noninteractive apt-get install -y --no-install-recommends xfce4 xfce4-goodies xfonts-base dbus-x11 tightvncserver expect && \
    apt-get install -y --no-install-recommends firefox codeblocks && \
    chmod +x /tmp/vncpass.sh; sync && \
    /tmp/vncpass.sh && \
    rm /tmp/vncpass.sh && \
    apt-get remove -y expect && apt-get autoremove -y && \
    FILE_SSH_ENV="/root/.ssh/environment" && \
    echo "DISPLAY=:1" >> $FILE_SSH_ENV

# install and patch Visual Studio Code
RUN apt update && apt install -y libsecret-1-0 libxss1 libgbm1 && apt-get clean
RUN wget -O code_arm64.deb https://aka.ms/linux-arm64-deb && dpkg -i code_arm64.deb && rm code_arm64.deb
RUN sed 's/BIG-REQUESTS/_IG-REQUESTS/' /usr/lib/aarch64-linux-gnu/libxcb.so.1.1.0 | tee /usr/share/code/libxcb.so.1 > /dev/null


ADD supervisord.conf /etc/supervisor/conf.d/
CMD ["/usr/bin/supervisord"]

HEREEOF
(5) build the Dockfile
docker build -f Dockerfile -t arm64v8/android-sdk-vnc .
(6) Copy Mac host id_rsa.pub to authorized_keys and start the container
cp ~/.ssh/authorized_keys .
cat ~/.ssh/id_rsa.pub >> authorized_keys
# To start the container as daemon
docker run -d --name android-sdk-vnc -p 5901:5901 -p 2222:22 -p 5037:5037 \
-v $(pwd)/authorized_keys:/root/.ssh/authorized_keys arm64v8/android-sdk-vnc
# To connect the container via ssh
ssh root@<IP address of your Mac M1> -p 2222
# To stop the container
docker container stop android-sdk-vnc
(7) To connect to the vnc of the docker image after starting the container
Use the Mac Finder "Go" -> "Connect To Server" and enter "vnc://0.0.0.0:5901"
For other machines in the network enter "vnc://<IP address of your Mac M1>:5901"
The passwords are in the vncpass.sh when building which are
password="android"
password_view_only="docker"
(8) There is a common problem if you are connecting remotely using Mac Terminal, so the solution is to not forward your locale. Edit /etc/ssh/ssh_config and comment out SendEnv LANG LC_* line.
(9) Testing swift
# attach to the running container
docker exec -it android-sdk-vnc bash
# test
mkdir -p ${HOME}/Projects
cd ${HOME}/Projects
git clone https://github.com/apple/example-package-dealer.git
cd example-package-dealer
swift run Dealer
If you need port forwarding on macOS, see this article https://www.papercut.com/kb/Main/MacPortForwarding
Saturday, December 19, 2020
How to setup debian vm with VNC on New Mac Mini M1
(1) Download the ubuntu kernel and images
cd ${HOME}
mkdir debianvm
curl -o - https://cloud-images.ubuntu.com/releases/focal/release/unpacked/ubuntu-20.04-server-cloudimg-arm64-vmlinuz-generic | gunzip > debianvm/vmlinuz
curl -o debianvm/initrd https://cloud-images.ubuntu.com/releases/focal/release/unpacked/ubuntu-20.04-server-cloudimg-arm64-initrd-generic
curl -o - https://cloud-images.ubuntu.com/releases/focal/release/ubuntu-20.04-server-cloudimg-arm64.tar.gz | tar zxvC debianvm
(2) download the raspbian arm64 image
curl -OL https://downloads.raspberrypi.org/raspios_arm64/images/raspios_arm64-2020-08-24/2020-08-20-raspios-buster-arm64.zip
unzip 2020-08-20-raspios-buster-arm64.zip -d debianvm
(3) Copy and expand the disk to say 38G (Don't use this method to expand disk on external HD)
cp debianvm/focal-server-cloudimg-arm64.img debianvm/raspberry-arm64.img
dd if=/dev/zero of=debianvm/raspberry-arm64.img seek=40000000 obs=1024 count=0
(4) Compile and use the latest vftool which is enhanced to mount multiple disks.
cd ${HOME}
git clone https://github.com/evansm7/vftool
cd vftool && xcodebuild
(5) start the vm say
screen -S vm
cd ${HOME}/debianvm
${HOME}/vftool/build/Release/vftool -k vmlinuz -i initrd -d focal-server-cloudimg-arm64.img -d raspberry-arm64.img -d 2020-08-20-raspios-buster-arm64.img -m 2048 -a "console=hvc0"
Detach the screen using Ctrl-A D
(6) start the tty say
screen -S tty /dev/ttys001
(7) prepare the ubuntu cloud image
(8) copy the rootfs to raspberry-arm64.img
#Detach the screen using Ctrl-A D
screen -r vm # resume vm screen # stop the vm by ctrl-C and restart the ubuntu vm
cd ${HOME}/debianvm
${HOME}/vftool/build/Release/vftool -k vmlinuz -i initrd -d focal-server-cloudimg-arm64.img -d raspberry-arm64.img -d 2020-08-20-raspios-buster-arm64.img -m 2048 -a "console=hvc0 root=/dev/vda"
#Detach the screen using Ctrl-A D
#Notice the tty number when starting the vm and start the tty say
screen -S tty /dev/ttys001
# login with id root and password root
# and copy the rootfs to the expanded disk raspberry-arm64.img
dd if=/dev/vdc2 of=/dev/vdb bs=64K conv=noerror,sync
exit
(9) prepare the raspberry-arm64 image
# stop the vm and restart the vm
# Control-A D to detach the tty screen # resume vm screen screen -r vm # Control-C to stop the vm cd ${HOME}/debianvm
${HOME}/vftool/build/Release/vftool -k vmlinuz -i initrd -d raspberry-arm64.img -m 2048 -a "console=hvc0"
(10) login raspberry OS arm64 with id root and password root
# stop the vm and restart the vm with
cd ${HOME}/debianvm
${HOME}/vftool/build/Release/vftool -k vmlinuz -i initrd -d raspberry-arm64.img -m 2048 -a "console=hvc0 root=/dev/vda rw"
# set date say
date -s "29 DEC 2020 14:54:00"
resize2fs /dev/vda
dpkg-reconfigure tzdata # set timezone
apt update
systemctl disable rpi-eeprom-update.service
systemctl disable rng-tools.service
(11) install utilities in raspberry os that can handle qcow2 disk image conversion and resize
apt install qemu-utils libguestfs-tools
hostname -I # get ip address
(13) Install Realvncserver and connect from Mac
passwd pi # set user pi password
# login as user pi
login pi
# Use raspi-config to enable SSH and VNC
sudo apt install realvnc-vnc-server
sudo raspi-config
# Choose 5 Interfacing Options -> P2 SSH
# Choose 5 Interfacing Options -> P3 VNC
# enter vnc key, can put this in /etc/rc.local without sudo
sudo vnclicense -add VKUPN-MTHHC-UDHGS-UWD76-6N36A
# setup vncpasswd for user mode, only user mode can run browser
vncpasswd -user
# edit config file to have these two lines for vnc password auth
echo -e "Authentication=VncAuth" | tee -a ~/.vnc/config.d/vncserver-x11
echo -e "Encryption=PreferOff" | tee -a ~/.vnc/config.d/vncserver-x11
cp ~/.vnc/config.d/vncserver-x11 ~/.vnc/config.d/Xvnc
# start service
vncserver
#put these in rc.local to automate after reboot, Raspberry Pi hardware has bundled vnclicense and no need to add it
/usr/bin/vnclicense -add VKUPN-MTHHC-UDHGS-UWD76-6N36A
sudo -H -u pi /usr/bin/vncserver
#check which port is listening
netstat -tlpn | grep -i listen
This would configure VNC in Virtual Mode
# Screen Sharing Connect from Mac
# In Finder, Go -> Connect to Server, enter IP address and port number of the vm e.g.
# Enter the vncpassword to connect, and connection needs port number
vnc://192.168.64.10:5901
For configuring VNC in Service Mode, please refer to https://www.raspberrypi.org/documentation/remote-access/vnc/
For differences in these modes, please refer to https://help.realvnc.com/hc/en-us/articles/360002253238-Understanding-VNC-Server-Modes
#Start or stop the service with:
# systemctl (start|stop) vncserver-x11-serviced.service
#Mark or unmark the service to be started at boot time with:
# systemctl (enable|disable) vncserver-x11-serviced.service
#sudo systemctl start vncserver-x11-serviced.service
For Service Mode the connection from Mac is (no port number), vnc://192.168.64.10
If you need port forwarding on macOS, so that you can vnc connect from other machines on the LAN to this vm, see this article https://www.papercut.com/kb/Main/MacPortForwarding That is run:5901 on the LAN.
# To install Visual Studio Code
wget -O code_arm64.deb https://aka.ms/linux-arm64-deb && sudo dpkg -i code_arm64.deb && rm code_arm64.deb
sed 's/BIG-REQUESTS/_IG-REQUESTS/' /usr/lib/aarch64-linux-gnu/libxcb.so.1.1.0 | sudo tee /usr/share/code/libxcb.so.1 > /dev/null
Demo - VNC to rapberrypi desktop vm screen capture
P.S. Only vm can run realvncserver, docker environment can only run lightweight vncserver e.g. tightvncserver
(14) For qcow2 image, the conversion to raw image is
wget https://cloud.debian.org/images/cloud/buster/20201214-484/debian-10-generic-arm64-20201214-484.qcow2
qemu-img dd -f qcow2 -O raw bs=64k if=debian-10-generic-arm64-20201214-484.qcow2 of=debian-10.img
# scp debian-10.img to the Mac Mini host and prepare a new expanded debian-arm64.img similar to the raspberry-arm64.img as above
# After restarting vm and mounting images, the dd command to extract rootfs is
# Assume debian-arm64.img is vdb and debian-10.img is vdc
dd if=/dev/vdc1 of=/dev/vdb bs=64K conv=noerror,sync
# For debian image, add this to /etc/hosts 127.0.1.1 debian
cd ${HOME}
mkdir debianvm
curl -o - https://cloud-images.ubuntu.com/releases/focal/release/unpacked/ubuntu-20.04-server-cloudimg-arm64-vmlinuz-generic | gunzip > debianvm/vmlinuz
curl -o debianvm/initrd https://cloud-images.ubuntu.com/releases/focal/release/unpacked/ubuntu-20.04-server-cloudimg-arm64-initrd-generic
curl -o - https://cloud-images.ubuntu.com/releases/focal/release/ubuntu-20.04-server-cloudimg-arm64.tar.gz | tar zxvC debianvm
(2) download the raspbian arm64 image
curl -OL https://downloads.raspberrypi.org/raspios_arm64/images/raspios_arm64-2020-08-24/2020-08-20-raspios-buster-arm64.zip
unzip 2020-08-20-raspios-buster-arm64.zip -d debianvm
(3) Copy and expand the disk to say 38G (Don't use this method to expand disk on external HD)
cp debianvm/focal-server-cloudimg-arm64.img debianvm/raspberry-arm64.img
dd if=/dev/zero of=debianvm/raspberry-arm64.img seek=40000000 obs=1024 count=0
(4) Compile and use the latest vftool which is enhanced to mount multiple disks.
cd ${HOME}
git clone https://github.com/evansm7/vftool
cd vftool && xcodebuild
(5) start the vm say
screen -S vm
cd ${HOME}/debianvm
${HOME}/vftool/build/Release/vftool -k vmlinuz -i initrd -d focal-server-cloudimg-arm64.img -d raspberry-arm64.img -d 2020-08-20-raspios-buster-arm64.img -m 2048 -a "console=hvc0"
Detach the screen using Ctrl-A D
(6) start the tty say
screen -S tty /dev/ttys001
(7) prepare the ubuntu cloud image
mkdir /mnt
mount /dev/vda /mnt
chroot /mnt

touch /etc/cloud/cloud-init.disabled

echo 'root:root' | chpasswd

ssh-keygen -f /etc/ssh/ssh_host_rsa_key -N '' -t rsa
ssh-keygen -f /etc/ssh/ssh_host_dsa_key -N '' -t dsa
ssh-keygen -f /etc/ssh/ssh_host_ecdsa_key -N '' -t ecdsa
ssh-keygen -f /etc/ssh/ssh_host_ed25519_key -N '' -t ed25519

# add fixed IP
cat <<EOF > /etc/netplan/01-dhcp.yaml
network:
    renderer: networkd
    ethernets:
        enp0s1:
            dhcp4: true
            addresses: [192.168.64.33/24]
    version: 2
EOF

# add IP when login prompt
cat <<EOF >> /etc/issue
enp0s1: \4

EOF

exit
umount /dev/vda
(8) copy the rootfs to raspberry-arm64.img
#Detach the screen using Ctrl-A D
screen -r vm # resume vm screen # stop the vm by ctrl-C and restart the ubuntu vm
cd ${HOME}/debianvm
${HOME}/vftool/build/Release/vftool -k vmlinuz -i initrd -d focal-server-cloudimg-arm64.img -d raspberry-arm64.img -d 2020-08-20-raspios-buster-arm64.img -m 2048 -a "console=hvc0 root=/dev/vda"
#Detach the screen using Ctrl-A D
#Notice the tty number when starting the vm and start the tty say
screen -S tty /dev/ttys001
# login with id root and password root
# and copy the rootfs to the expanded disk raspberry-arm64.img
dd if=/dev/vdc2 of=/dev/vdb bs=64K conv=noerror,sync
exit
(9) prepare the raspberry-arm64 image
# stop the vm and restart the vm
# Control-A D to detach the tty screen # resume vm screen screen -r vm # Control-C to stop the vm cd ${HOME}/debianvm
${HOME}/vftool/build/Release/vftool -k vmlinuz -i initrd -d raspberry-arm64.img -m 2048 -a "console=hvc0"
mkdir /mnt
mount /dev/vda /mnt
chroot /mnt

echo 'root:root' | chpasswd

#!!! delete or comment out the lines in /etc/fstab, or there will be "A start job is running on /dev/disk/.." blocking!!
cat <<EOF > /etc/fstab
proc            /proc           proc    defaults          0       0
#PARTUUID=ad09722e-01  /boot           vfat    defaults          0       2
#PARTUUID=ad09722e-02  /               ext4    defaults,noatime  0       1
EOF

ssh-keygen -f /etc/ssh/ssh_host_rsa_key -N '' -t rsa
ssh-keygen -f /etc/ssh/ssh_host_dsa_key -N '' -t dsa
ssh-keygen -f /etc/ssh/ssh_host_ecdsa_key -N '' -t ecdsa
ssh-keygen -f /etc/ssh/ssh_host_ed25519_key -N '' -t ed25519

mkdir -p /etc/network/interfaces.d/
cat <<EOF > /etc/network/interfaces.d/enp0s1
allow-hotplug enp0s1
iface enp0s1 inet dhcp
auto lo
iface lo inet loopback
EOF

cat <<EOF >> /etc/dhcpcd.conf
# add fixed IP
interface enp0s1
static ip_address=192.168.64.10/24
EOF

# put mac host ${HOME}/.ssh/id.rsa.pub key here
mkdir -p /root/.ssh
cat <<EOF > /root/.ssh/authorized_keys
ssh-rsa <mac id.rsa.pub key here>
EOF

# add IP when login prompt
cat <<EOF >> /etc/issue
enp0s1: \4

EOF

exit
umount /dev/vda
(10) login raspberry OS arm64 with id root and password root
# stop the vm and restart the vm with
cd ${HOME}/debianvm
${HOME}/vftool/build/Release/vftool -k vmlinuz -i initrd -d raspberry-arm64.img -m 2048 -a "console=hvc0 root=/dev/vda rw"
# set date say
date -s "29 DEC 2020 14:54:00"
resize2fs /dev/vda
dpkg-reconfigure tzdata # set timezone
apt update
systemctl disable rpi-eeprom-update.service
systemctl disable rng-tools.service
(11) install utilities in raspberry os that can handle qcow2 disk image conversion and resize
apt install qemu-utils libguestfs-tools
hostname -I # get ip address
(13) Install Realvncserver and connect from Mac
passwd pi # set user pi password
# login as user pi
login pi
# Use raspi-config to enable SSH and VNC
sudo apt install realvnc-vnc-server
sudo raspi-config
# Choose 5 Interfacing Options -> P2 SSH
# Choose 5 Interfacing Options -> P3 VNC
# enter vnc key, can put this in /etc/rc.local without sudo
sudo vnclicense -add VKUPN-MTHHC-UDHGS-UWD76-6N36A
# setup vncpasswd for user mode, only user mode can run browser
vncpasswd -user
# edit config file to have these two lines for vnc password auth
echo -e "Authentication=VncAuth" | tee -a ~/.vnc/config.d/vncserver-x11
echo -e "Encryption=PreferOff" | tee -a ~/.vnc/config.d/vncserver-x11
cp ~/.vnc/config.d/vncserver-x11 ~/.vnc/config.d/Xvnc
# start service
vncserver
#put these in rc.local to automate after reboot, Raspberry Pi hardware has bundled vnclicense and no need to add it
/usr/bin/vnclicense -add VKUPN-MTHHC-UDHGS-UWD76-6N36A
sudo -H -u pi /usr/bin/vncserver
#check which port is listening
netstat -tlpn | grep -i listen
This would configure VNC in Virtual Mode
# Screen Sharing Connect from Mac
# In Finder, Go -> Connect to Server, enter IP address and port number of the vm e.g.
# Enter the vncpassword to connect, and connection needs port number
vnc://192.168.64.10:5901
For configuring VNC in Service Mode, please refer to https://www.raspberrypi.org/documentation/remote-access/vnc/
For differences in these modes, please refer to https://help.realvnc.com/hc/en-us/articles/360002253238-Understanding-VNC-Server-Modes
#Start or stop the service with:
# systemctl (start|stop) vncserver-x11-serviced.service
#Mark or unmark the service to be started at boot time with:
# systemctl (enable|disable) vncserver-x11-serviced.service
#sudo systemctl start vncserver-x11-serviced.service
For Service Mode the connection from Mac is (no port number), vnc://192.168.64.10
If you need port forwarding on macOS, so that you can vnc connect from other machines on the LAN to this vm, see this article https://www.papercut.com/kb/Main/MacPortForwarding That is run
echo "
rdr pass on lo0 inet proto tcp from any to self port 5910 -> 192.168.64.10 port 5901
rdr pass on en0 inet proto tcp from any to any port 5910 -> 192.168.64.10 port 5901
rdr pass on wlan0 inet proto tcp from any to any port 5910 -> 192.168.64.10 port 5901
" | sudo pfctl -ef -
Then, test connect from other machines to
# To install Visual Studio Code
wget -O code_arm64.deb https://aka.ms/linux-arm64-deb && sudo dpkg -i code_arm64.deb && rm code_arm64.deb
sed 's/BIG-REQUESTS/_IG-REQUESTS/' /usr/lib/aarch64-linux-gnu/libxcb.so.1.1.0 | sudo tee /usr/share/code/libxcb.so.1 > /dev/null
Demo - VNC to rapberrypi desktop vm screen capture

P.S. Only vm can run realvncserver, docker environment can only run lightweight vncserver e.g. tightvncserver
(14) For qcow2 image, the conversion to raw image is
wget https://cloud.debian.org/images/cloud/buster/20201214-484/debian-10-generic-arm64-20201214-484.qcow2
qemu-img dd -f qcow2 -O raw bs=64k if=debian-10-generic-arm64-20201214-484.qcow2 of=debian-10.img
# scp debian-10.img to the Mac Mini host and prepare a new expanded debian-arm64.img similar to the raspberry-arm64.img as above
# After restarting vm and mounting images, the dd command to extract rootfs is
# Assume debian-arm64.img is vdb and debian-10.img is vdc
dd if=/dev/vdc1 of=/dev/vdb bs=64K conv=noerror,sync
# For debian image, add this to /etc/hosts 127.0.1.1 debian
Thursday, December 3, 2020
How to run docker on the new Mac Mini M1
(1) Reference to this article https://finestructure.co/blog/2020/11/27/running-docker-on-apple-silicon-m1
(2) The problem of this method of running Ubuntu iso live image is not persistent.
(3) So here is the improved method to add persistent storage to this vm.
(4) # First create an empty image data say 50G in Mac Mini
dd if=/dev/zero of=data.img bs=1m count=51200
(5) # Change the command to invoke the vm to include persistent and increase cpu to 2
./vftool -k vmlinuz -i initrd -c focal-desktop-arm64.iso -d data.img -p 2 -m 4096 -a "console=hvc0 persistent rw"
./vftool -k vmlinuz -i initrd -d data.img -c focal-desktop-arm64.iso -p 2 -m 4096 -a "console=hvc0 persistent rw"
P.S.
If you compile the latest vftool, which has added the ability to add more image files and the order of the mounted device will follow the parameters you passed in. The article was written using the first version of the vftool and will mount the data.img as the /dev/vda and the cdrom image as /dev/vdb. So if you use the latest version vftool compiled, you have to check the device name of your mounted data.img.
(6) # Attach the vm and create 3 partitions for the created image
sudo fdisk /dev/vda
# Press (n)(p)(1) to create new partition 1
# Press (enter) to accept starting sector and set size to say +25G
# Press (n)(p)(2) to create new partition 2
# Press (enter) to accept starting sector and set size to say +15G
# Press (n)(p)(3) to create new partition 3
# Accept the default options and starting block and ending block
# Press (w) to write to partition
(6) # Format partition as ext4 with labels casper-rw and home-rw in vm, this create the persistent medium for the rw partition.
sudo mkfs.ext4 /dev/vda1 -L docker-data
sudo mkfs.ext4 /dev/vda2 -L casper-rw
sudo mkfs.ext4 /dev/vda3 -L home-rw
(7) # exit shell and exit vm by ctrl-c
exit
(8) # start vm again and use a new tab using screen command to attach to the vm e.g.
screen -S docker /dev/ttys003
(9) # Create folder to mount /dev/vda1
sudo mkdir -p /mnt/docker-data
# Add this mount commands in /etc/rc.local in order to persist as editing /etc/fstab is ignored in this iso image
# enable rc.local see this.
sudo chmod +x /etc/rc.local
sudo systemctl start rc-local.service
sudo systemctl status rc-local.service
(10) Follow the reference article to install docker related packages.
If you have problem when installing docker. Try this = previous verion
apt install docker-ce=5:19.03.14~3-0~ubuntu-focal
(11) # Move docker data-root to the newly created partition
sudo service docker stop
sudo mv /var/lib/docker /var/lib/docker.old
sudo service docker start
(12) Additionally, install docker-compose
sudo add-apt-repository universe
sudo apt install -y python3-pip
sudo pip3 -v install docker-compose
(13) Test docker
docker run hello-world
docker run -e MYSQL_ROOT_PASSWORD=rootpassword -e MYSQL_USER=wpuser -e MYSQL_PASSWORD=wpuserpassword -e MYSQL_DATABASE=wordpressdb --name wordpressdb -d arm64v8/mariadb
docker run -e WORDPRESS_DB_USER=wpuser -e WORDPRESS_DB_PASSWORD=wpuserpassword -e WORDPRESS_DB_NAME=wordpressdb -p 8080:80 --link wordpressdb:mysql --name wordpress -d arm64v8/wordpress
# show IP address
ip addr | grep inet
# test using browser e.g. http://192.168.64.19:8080/
(14) Test docker-compose 1 (wordpress and mysql)
# create docker-compose.yaml
cd $HOME
mkdir my-wordpress
cd my-wordpress
docker-compose up -d
# test using browser e.g. http://192.168.64.19:8000/
# after testing bring it down
docker-compose down -v
(15) Test docker-compose 2 (mongo-express)
# create docker-compose.yaml
cd $HOME
mkdir my-mongoexpress
cd my-mongoexpress
docker-compose up -d --remove-orphans
# test using browser e.g. http://192.168.64.19:8081/ with user password
# after testing bring it down
docker-compose down -v
(16) Change password and install openssh-server
sudo apt install -y openssh-server
# change /etc/ssh/sshd_config PermitEmptyPasswords to yes
PermitEmptyPasswords yes
(17) Use another terminal session to connect e.g.
ssh-copy-id ubuntu@192.168.64.19
ssh ubuntu@192.168.64.19
(18) This iso image has desktop Applications, so it is possible to install vnc server and connect to it via Remote Desktop or vnc://localhost:590x. To install vnc server
sudo apt install -y tightvncserver
vncserver
# restart vncserver in vm
vncserver -localhost
# create ssh tunnel in Mac, where x is the desktop number when starting vncserver
ssh ubuntu@192.168.64.19 -L 590x:localhost:590x # Reference : https://www.digitalocean.com/community/tutorials/how-to-install-and-configure-vnc-on-ubuntu-20-04
https://cat.pdx.edu/platforms/mac/remote-access/vnc-to-linux/
P.S. follow up post for the docker M1 preview and building of docker image with vnc server.
https://iphonesdkdev.blogspot.com/2020/12/20201205.html
If you need port forwarding on macOS to connect to this vm service (e.g. ssh or vnc), see this article https://www.papercut.com/kb/Main/MacPortForwarding
(2) The problem of this method of running Ubuntu iso live image is not persistent.
(3) So here is the improved method to add persistent storage to this vm.
(4) # First create an empty image data say 50G in Mac Mini
dd if=/dev/zero of=data.img bs=1m count=51200
(5) # Change the command to invoke the vm to include persistent and increase cpu to 2
./vftool -k vmlinuz -i initrd -d data.img -c focal-desktop-arm64.iso -p 2 -m 4096 -a "console=hvc0 persistent rw"
P.S.
If you compile the latest vftool, which has added the ability to add more image files and the order of the mounted device will follow the parameters you passed in. The article was written using the first version of the vftool and will mount the data.img as the /dev/vda and the cdrom image as /dev/vdb. So if you use the latest version vftool compiled, you have to check the device name of your mounted data.img.
(6) # Attach the vm and create 3 partitions for the created image
sudo fdisk /dev/vda
# Press (n)(p)(1) to create new partition 1
# Press (enter) to accept starting sector and set size to say +25G
# Press (n)(p)(2) to create new partition 2
# Press (enter) to accept starting sector and set size to say +15G
# Press (n)(p)(3) to create new partition 3
# Accept the default options and starting block and ending block
# Press (w) to write to partition
(6) # Format partition as ext4 with labels casper-rw and home-rw in vm, this create the persistent medium for the rw partition.
sudo mkfs.ext4 /dev/vda1 -L docker-data
sudo mkfs.ext4 /dev/vda2 -L casper-rw
sudo mkfs.ext4 /dev/vda3 -L home-rw
(7) # exit shell and exit vm by ctrl-c
exit
(8) # start vm again and use a new tab using screen command to attach to the vm e.g.
screen -S docker /dev/ttys003
(9) # Create folder to mount /dev/vda1
sudo mkdir -p /mnt/docker-data
# Add this mount commands in /etc/rc.local in order to persist as editing /etc/fstab is ignored in this iso image
cat << EOF | sudo tee -a /etc/rc.local
#!/bin/sh -e
#
# rc.local
#
# This script is executed at the end of each multiuser runlevel.
# Make sure that the script will "exit 0" on success or any other
# value on error.
#
# In order to enable or disable this script just change the execution
# bits.
#
# By default this script does nothing.

mount /dev/vda1 -t ext4 /mnt/docker-data
exit 0
EOF
cat << EOF | sudo tee -a /etc/systemd/system/rc-local.service
[Unit]
 Description=/etc/rc.local Compatibility
 ConditionPathExists=/etc/rc.local

[Service]
 Type=forking
 ExecStart=/etc/rc.local start
 TimeoutSec=0
 StandardOutput=tty
 RemainAfterExit=yes
 SysVStartPriority=99

[Install]
 WantedBy=multi-user.target
EOF
# enable rc.local see this.
sudo chmod +x /etc/rc.local
sudo systemctl start rc-local.service
sudo systemctl status rc-local.service
(10) Follow the reference article to install docker related packages.
If you have problem when installing docker. Try this = previous verion
apt install docker-ce=5:19.03.14~3-0~ubuntu-focal
(11) # Move docker data-root to the newly created partition
sudo service docker stop
cat << EOF | sudo tee -a /etc/docker/daemon.json
{
"storage-driver": "overlay2",
"data-root": "/mnt/docker-data"
}
EOF
sudo rsync -aP /var/lib/docker/ /mnt/docker-datasudo mv /var/lib/docker /var/lib/docker.old
sudo service docker start
(12) Additionally, install docker-compose
sudo add-apt-repository universe
sudo apt install -y python3-pip
sudo pip3 -v install docker-compose
(13) Test docker
docker run hello-world
docker run -e MYSQL_ROOT_PASSWORD=rootpassword -e MYSQL_USER=wpuser -e MYSQL_PASSWORD=wpuserpassword -e MYSQL_DATABASE=wordpressdb --name wordpressdb -d arm64v8/mariadb
docker run -e WORDPRESS_DB_USER=wpuser -e WORDPRESS_DB_PASSWORD=wpuserpassword -e WORDPRESS_DB_NAME=wordpressdb -p 8080:80 --link wordpressdb:mysql --name wordpress -d arm64v8/wordpress
# show IP address
ip addr | grep inet
# test using browser e.g. http://192.168.64.19:8080/
(14) Test docker-compose 1 (wordpress and mysql)
# create docker-compose.yaml
cd $HOME
mkdir my-wordpress
cd my-wordpress
cat > docker-compose.yaml <<EOF
version: '3'
services:
  db:
    image: arm64v8/mariadb
    volumes:
      - "./.data/db:/var/lib/mysql"
    restart: always
    environment:
      MYSQL_ROOT_PASSWORD: rootpassword
      MYSQL_DATABASE: wordpressdb
      MYSQL_USER: wpuser
      MYSQL_PASSWORD: wpuserpassword

  wordpress:
    depends_on:
      - db
    image: arm64v8/wordpress
    links:
      - db:mysql
    ports:
      - "8000:80"
    restart: always
    environment:
      WORDPRESS_DB_HOST: db:3306
      WORDPRESS_DB_NAME: wordpressdb
      WORDPRESS_DB_USER: wpuser
      WORDPRESS_DB_PASSWORD: wpuserpassword
EOF
# Start docker-composedocker-compose up -d
# test using browser e.g. http://192.168.64.19:8000/
# after testing bring it down
docker-compose down -v
(15) Test docker-compose 2 (mongo-express)
# create docker-compose.yaml
cd $HOME
mkdir my-mongoexpress
cd my-mongoexpress
cat > docker-compose.yaml <<EOF
version: '3.1'
services:
  mongo:
    image: arm64v8/mongo
    volumes:
      - ./data:/data/db
    ports:
      - '27018:27017'
    restart: always
    environment:
      MONGO_INITDB_ROOT_USERNAME: 'root'
      MONGO_INITDB_ROOT_PASSWORD: 'example'
      MONGO_INITDB_DATABASE: 'db'

  mongo-express:
    image: arm64v8/mongo-express
    links:
      - mongo
    ports:
      - "8081:8081"
    restart: always
    environment:
      ME_CONFIG_MONGODB_ADMINUSERNAME: 'root'
      ME_CONFIG_MONGODB_ADMINPASSWORD: 'example'
      ME_CONFIG_MONGODB_ENABLE_ADMIN: 'true'
      ME_CONFIG_MONGODB_AUTH_DATABASE: 'db'
      ME_CONFIG_OPTIONS_EDITORTHEME: 'ambiance'
      ME_CONFIG_BASICAUTH_USERNAME: 'user'
      ME_CONFIG_BASICAUTH_PASSWORD: 'password'
EOF
# Start docker-composedocker-compose up -d --remove-orphans
# test using browser e.g. http://192.168.64.19:8081/ with user password
# after testing bring it down
docker-compose down -v
(16) Change password and install openssh-server
sudo apt install -y openssh-server
# change /etc/ssh/sshd_config PermitEmptyPasswords to yes
PermitEmptyPasswords yes
(17) Use another terminal session to connect e.g.
ssh-copy-id ubuntu@192.168.64.19
ssh ubuntu@192.168.64.19
(18) This iso image has desktop Applications, so it is possible to install vnc server and connect to it via Remote Desktop or vnc://localhost:590x. To install vnc server
sudo apt install -y tightvncserver
vncserver
# restart vncserver in vm
vncserver -localhost
# create ssh tunnel in Mac, where x is the desktop number when starting vncserver
ssh ubuntu@192.168.64.19 -L 590x:localhost:590x # Reference : https://www.digitalocean.com/community/tutorials/how-to-install-and-configure-vnc-on-ubuntu-20-04
https://cat.pdx.edu/platforms/mac/remote-access/vnc-to-linux/
P.S. follow up post for the docker M1 preview and building of docker image with vnc server.
https://iphonesdkdev.blogspot.com/2020/12/20201205.html
If you need port forwarding on macOS to connect to this vm service (e.g. ssh or vnc), see this article https://www.papercut.com/kb/Main/MacPortForwarding
How to run on Headless Mac Mini M1 with nohup and screen

(2) Disable sleep mode and set never sleep for HD and monitor on System Preferences of Mac Mini.
(3) Enable Sharing and SSH login on Mac Mini.
(4) generate ssh key-pair on mac mini and your terminal or your phone. If using Android phone, recommend Termux app for remote shell access.
e.g. ssh-keygen -t rsa # generate key pair on Mac Mini and remote client
(5) copy the ssh key-pair to mac mini if using another terminal from mac.
e.g. ssh-copy-id user@x.x.x.x
(6) Login in Mac Mini via ssh remotely
e.g. ssh user@x.x.x.x
(7) # Apple Compressor command line batch submission example (no need for nohup)
/Applications/Compressor.app/Contents/MacOS/Compressor -batchname "My First Batch" \
-jobpath ~/Movies/MySource_x265.mp4 \
-settingpath /Applications/Compressor.app/Contents/Resources/Settings/ProRes/proRes422Name.compressorsetting \
-locationpath ~/Movies/MyOutput_ProRes422.mov
(8) # install youtube-dl, prerequisite: Command Line Tools for Xcode 12.2 for Python 3.8 to be installed
sudo mkdir -p /usr/local/bin
sudo curl -L https://github.com/l1ving/youtube-dl/releases/latest/download/youtube-dl -o /usr/local/bin/youtube-dl
sudo chmod a+rx /usr/local/bin/youtube-dl
youtube-dl --version
sudo youtube-dl -U # update youtube-dl
youtube-dl --version # check version after update
cd $HOME/Downloads
mkdir -p youtube
cd youtube
youtube-dl -f mp4 <youtube url>
(9) Either use nohup or screen command for persistent jobs.
# nohup example
nohup bash -c 'youtube-dl -f 401 https://youtu.be/8rPB4A3zDnQ' &> nohup.youtubedl.4k_2.out &
(10)screen example (suitable for command utility with tty input
# create a screen and run python script
screen -S tensorflow
conda activate python38
python cnn.py
# leave (detach) the screen by Control-A d
# create second screen and run handbrake conversion
screen -S handbrake
conda deactivate
$HOME/Downloads/HandBrakeCLI -i $HOME/Downloads/8KVIDEO120FPS-8rPB4A3zDnQ_4.1G.mp4 -o $HOME/Downloads/8KVIDEO_x265.mp4 -e x265 -q24
# leave (detach) the screen by Control-A d
# list all the screen ids
screen -ls
# Reattach to one of the screen e.g. 6473.tensorflow
screen -r 6473
# Exit Screen if the process terimated
exit
Saturday, November 21, 2020
How to install tensorflow for the new Mac M1 hardware
Prerequisite: Xcode 12.2 and Command Line Tools for Xcode 12.2
(1) # Download the archive for this repo from https://github.com/apple/tensorflow_macos/releases
cd $HOME/Downloads/
curl -fsSLO https://github.com/apple/tensorflow_macos/releases/download/v0.1alpha0/tensorflow_macos-0.1alpha0.tar.gz
tar xzvf tensorflow_macos-0.1alpha0.tar.gz
/bin/bash ./tensorflow_macos/install_venv.sh --help
(2) # Download Miniconda from https://conda-forge.org/blog/posts/2020-10-29-macos-arm64/
(3) # Install Miniconda and after installtion, exit shell and login again
/bin/bash -c "$(curl -fsSL https://github.com/conda-forge/miniforge/releases/latest/download/Miniforge3-MacOSX-arm64.sh)"
(4) # Once it's installed, create a Python 3.8 env by running
conda create --name python38 python=3.8
(5) # Put a path to where the arm64 libraries are. For example...
libs="$HOME/Downloads/tensorflow_macos/arm64/"
(6) # Replace this with the path of your Conda environment
env="$HOME/miniforge3/envs/python38"
(7) # upgrade
conda upgrade -c conda-forge pip setuptools cached-property six
(8) # activate env
conda activate python38
# conda deactivate
(9) pip install --upgrade -t "$env/lib/python3.8/site-packages/" --no-dependencies --force "$libs/grpcio-1.33.2-cp38-cp38-macosx_11_0_arm64.whl"
(10) pip install --upgrade -t "$env/lib/python3.8/site-packages/" --no-dependencies --force "$libs/h5py-2.10.0-cp38-cp38-macosx_11_0_arm64.whl"
(11) pip install --upgrade -t "$env/lib/python3.8/site-packages/" --no-dependencies --force "$libs/numpy-1.18.5-cp38-cp38-macosx_11_0_arm64.whl"
(12) pip install --upgrade -t "$env/lib/python3.8/site-packages/" --no-dependencies --force "$libs/tensorflow_addons-0.11.2+mlcompute-cp38-cp38-macosx_11_0_arm64.whl"
(13) # install these
(14) pip install --upgrade -t "$env/lib/python3.8/site-packages/" --no-dependencies --force "$libs/tensorflow_macos-0.1a0-cp38-cp38-macosx_11_0_arm64.whl"
(15) # Run this to test
(16) Test run this cnn.py https://github.com/apple/tensorflow_macos/issues/25
(1) # Download the archive for this repo from https://github.com/apple/tensorflow_macos/releases
cd $HOME/Downloads/
curl -fsSLO https://github.com/apple/tensorflow_macos/releases/download/v0.1alpha0/tensorflow_macos-0.1alpha0.tar.gz
tar xzvf tensorflow_macos-0.1alpha0.tar.gz
/bin/bash ./tensorflow_macos/install_venv.sh --help
(2) # Download Miniconda from https://conda-forge.org/blog/posts/2020-10-29-macos-arm64/
(3) # Install Miniconda and after installtion, exit shell and login again
/bin/bash -c "$(curl -fsSL https://github.com/conda-forge/miniforge/releases/latest/download/Miniforge3-MacOSX-arm64.sh)"
(4) # Once it's installed, create a Python 3.8 env by running
conda create --name python38 python=3.8
(5) # Put a path to where the arm64 libraries are. For example...
libs="$HOME/Downloads/tensorflow_macos/arm64/"
(6) # Replace this with the path of your Conda environment
env="$HOME/miniforge3/envs/python38"
(7) # upgrade
conda upgrade -c conda-forge pip setuptools cached-property six
(8) # activate env
conda activate python38
# conda deactivate
(9) pip install --upgrade -t "$env/lib/python3.8/site-packages/" --no-dependencies --force "$libs/grpcio-1.33.2-cp38-cp38-macosx_11_0_arm64.whl"
(10) pip install --upgrade -t "$env/lib/python3.8/site-packages/" --no-dependencies --force "$libs/h5py-2.10.0-cp38-cp38-macosx_11_0_arm64.whl"
(11) pip install --upgrade -t "$env/lib/python3.8/site-packages/" --no-dependencies --force "$libs/numpy-1.18.5-cp38-cp38-macosx_11_0_arm64.whl"
(12) pip install --upgrade -t "$env/lib/python3.8/site-packages/" --no-dependencies --force "$libs/tensorflow_addons-0.11.2+mlcompute-cp38-cp38-macosx_11_0_arm64.whl"
(13) # install these
conda install -c conda-forge -y absl-py
conda install -c conda-forge -y astunparse
conda install -c conda-forge -y gast
conda install -c conda-forge -y opt_einsum
conda install -c conda-forge -y termcolor
conda install -c conda-forge -y typing_extensions
conda install -c conda-forge -y wheel
conda install -c conda-forge -y typeguard

pip install tensorboard

pip install wrapt flatbuffers tensorflow_estimator google_pasta keras_preprocessing protobuf
(14) pip install --upgrade -t "$env/lib/python3.8/site-packages/" --no-dependencies --force "$libs/tensorflow_macos-0.1a0-cp38-cp38-macosx_11_0_arm64.whl"
(15) # Run this to test
time python tftest.py
- tftest.py Select all
from datetime import datetime
import numpy as np
import tensorflow as tf
from tensorflow.python.compiler.mlcompute import mlcompute

mlcompute.set_mlc_device(device_name="cpu")
# tensorflow:Eager mode on GPU is extremely slow. So use CPU instead

print("Hello, Tensorflow! ", end='')
print(tf.__version__)

print("start" , datetime.now())
X_raw = np.array([2013, 2014, 2015, 2016, 2017, 2018], dtype=np.float32)
y_raw = np.array([12000, 14000, 15000, 16500, 17500, 19000], dtype=np.float32)

X = (X_raw - X_raw.min()) / (X_raw.max() - X_raw.min())
y = (y_raw - y_raw.min()) / (y_raw.max() - y_raw.min())

X = tf.constant(X)
y = tf.constant(y)

a = tf.Variable(initial_value=0.)
b = tf.Variable(initial_value=0.)
variables = [a, b]

num_epoch = 10000
optimizer = tf.keras.optimizers.SGD(learning_rate=1e-3)
for e in range(num_epoch):

    with tf.GradientTape() as tape:
        y_pred = a * X + b
        loss = 0.5 * tf.reduce_sum(tf.square(y_pred - y))

    grads = tape.gradient(loss, variables)

    optimizer.apply_gradients(grads_and_vars=zip(grads, variables))

print(a, b)
print("end" , datetime.now())
(16) Test run this cnn.py https://github.com/apple/tensorflow_macos/issues/25
Saturday, October 24, 2020
How to use SpriteKit in SwiftUI and preview SKScene in Xcode 12
This demo the code using Xcode 12.0.1 under macOSX 10.15.7
The iOS14 has a new SpriteView for the SKScene, this demo a player movement with on-screen joystick control. This file does not need the creation of sks file and using code to generate the SKNodes required. The graphics assets and touches codes are borrowed from this Elton Game - Introduction to Sprite Kit. https://designcode.io/spritekit-intro
Create this swift file for iOS14 and you can preview it in SwiftUI under Xcode 12

player/1
 arrow
 knob

Create this swift file for iOS14 and you can preview it in SwiftUI under Xcode 12
- SKContentView.swift.sh Select all
//
//  SKContentView.swift
//

import SwiftUI
import SpriteKit

class GameScene: SKScene {
    // Nodes
    var player : SKNode?
    var joystick : SKNode?
    var joystickKnob : SKNode?

    // Boolean
    var joystickAction = false

    // Measure
    var knobRadius : CGFloat = 50.0

    // Sprite Engine added in Lesson 2
    var previousTimeInterval : TimeInterval = 0
    let playerSpeed = 4.0

    override func didMove(to view: SKView) {
        physicsBody = SKPhysicsBody(edgeLoopFrom: frame)
        let player = SKSpriteNode(imageNamed: "player/1")
        self.player = player
        let joystick = SKSpriteNode(imageNamed: "arrow")
        self.joystick = joystick
        let joystickKnob = SKSpriteNode(imageNamed: "knob")
        self.joystickKnob = joystickKnob
        joystick.addChild(joystickKnob)

        player.position = CGPoint(x: frame.midX, y: frame.size.height / 5 * 3)
        joystick.position = CGPoint(x: 80, y: 80)
        addChild(player)
        addChild(joystick)

   		view.showsFPS = true
        view.showsNodeCount = true
    }

}

extension GameScene {
    // Touch Began
    override func touchesBegan(_ touches: Set<UITouch>, with event: UIEvent?) {
        for touch in touches {
            if let joystickKnob = joystickKnob {
                let location = touch.location(in: joystick!)
                joystickAction = joystickKnob.frame.contains(location)
            }
        }
    }

    // Touch Moved
    override func touchesMoved(_ touches: Set<UITouch>, with event: UIEvent?) {
        guard let joystick = joystick else { return }
        guard let joystickKnob = joystickKnob else { return }

        if !joystickAction { return }

        // Distance
        for touch in touches {
            let position = touch.location(in: joystick)

            let length = sqrt(pow(position.y, 2) + pow(position.x, 2))
            let angle = atan2(position.y, position.x)

            if knobRadius > length {
                joystickKnob.position = position
            } else {
                joystickKnob.position = CGPoint(x: cos(angle) * knobRadius, y: sin(angle) * knobRadius)
            }
        }
    }

    // Touch End   added in Lesson 2
    override func touchesEnded(_ touches: Set<UITouch>, with event: UIEvent?) {
        for touch in touches {
            let xJoystickCoordinate = touch.location(in: joystick!).x
            let xLimit: CGFloat = 200.0
            if xJoystickCoordinate > -xLimit && xJoystickCoordinate > xLimit {
                resetKnobPosition()
            }
        }

    }
}

// MARKS: Action added in Lesson 2
extension GameScene {
    func resetKnobPosition() {
        let initialPoint = CGPoint(x:0, y:0)
        let moveBack = SKAction.move(to: initialPoint, duration:0.1)
        moveBack.timingMode = .linear
        joystickKnob?.run(moveBack)
        joystickAction = false
    }
}

// MARKS: Game Loop added in Lesson 2
extension GameScene {
 override func update( _ currentTime: TimeInterval) {
        let deltaTime = currentTime - previousTimeInterval
        previousTimeInterval = currentTime

        // player movement
        guard let joystickKnob = joystickKnob else { return }
        let xPosition = Double(joystickKnob.position.x)
        let yPosition = Double(joystickKnob.position.y)
        let displacement = CGVector(dx:deltaTime * xPosition * playerSpeed, dy:deltaTime * yPosition * playerSpeed)
        let move = SKAction.move(by: displacement, duration:0)
        player?.run(move)
    }
}

struct SKContentView: View {
    var scene: SKScene {
        let scene = GameScene()
            scene.size = CGSize(width: 300, height: 400)
            scene.scaleMode = .fill
            return scene
        }

    var body: some View {
        SpriteView(scene: scene)
            .frame(width: 300, height: 400)
            .edgesIgnoringSafeArea(.all)
    }


}

struct SKContentView_Previews: PreviewProvider {
    static var previews: some View {
        SKContentView()
    }
}

player/1


Saturday, October 17, 2020
How to download WWDC2020 videos and subtitles
The scripts for previous WWDC are here
https://iphonesdkdev.blogspot.com/2017/07/how-to-fetch-wwdc-2017-video-subtitle.html
Create and Run this script wwdc2020_fetch_srt.sh to fetch WWDC2020 subtitle
Run this shell script to format as SRT subtitle
Run this script wwdc2020_fetch_mp4.sh to download all mp4 (HD and SD) videos (also works for 2021)
Run this script to rename the video or subtitles to proper title (HD & SD) videos
# Example nohup commnad for Linux Download
nohup bash -c 'cd $HOME/Downloads/WWDC/; ./wwdc2020_fetch_mp4.sh' &> nohup.wwdc2020.mp4.out &
nohup bash -c 'cd $HOME/Downloads/WWDC/; ./wwdc2020_fetch_en.srt.sh' &> nohup.wwdc2020.en.srt.out &
# or use screen utility to download
screen -S wwdcdownloadmp4
bash wwdc2020_fetch_mp4.sh
If want to remove special characters in filename "brew install rename" and use this command to rename
rename "s/[\@:’\'\,]//g" *.mp4 *.srt

Create and Run this script wwdc2020_fetch_srt.sh to fetch WWDC2020 subtitle
- wwdc2020_fetch_en.srt.sh Select all
#!/bin/bash
# @Last Modified by:   javacom
# @Last Modified time: 2020-10-17

WWDC_YEAR=2020;
#
WWDC_SESSION_PREFIX=https://developer.apple.com/videos/play/wwdc$WWDC_YEAR;
WWDC_LOCAL_DIR=$(basename $WWDC_SESSION_PREFIX);

detect_video_m3u8 () {
 local session_url=$WWDC_SESSION_PREFIX/$SESSION_ID/;
 local session_html=$(curl -s $session_url);
 local video_url=$(echo "$session_html" | grep .m3u8 | grep $SESSION_ID | head -n1 | sed "s#.*\"\(https://.*m3u8\)\".*#\1#");
 echo "$session_html" | grep .mp4 | grep $SESSION_ID | sed "s#.*\"\(https://.*mp4\).*\".*#\1#" | while read mp4_url; do
  local mp4_filename=$(basename $mp4_url | cut -d. -f1);
  local srt_filename=$mp4_filename.en.srt;
#  local srt_filename=$mp4_filename.zh.srt;
  echo "> Subtitle local: $WWDC_LOCAL_DIR/$srt_filename" >&2;
  > $WWDC_LOCAL_DIR/$srt_filename;
 done
 echo "$video_url";
 echo "> Video: $video_url" >&2;
}

detect_subtitle_m3u8 () {
 local video_url=$1;
 # en subtitle
 local subtitle_uri=$(curl -s $video_url | grep "LANGUAGE=\"en\",URI" | sed "s#.*URI=\"\(.*\)\"#\1#");
 # zh subtitle
 #local subtitle_uri=$(curl -s $video_url | grep "LANGUAGE=\"zh\"" | sed "s#.*URI=\"\(.*\)\"#\1#");
 local subtitle_url=$subtitle_uri;
 [[ "$subtitle_uri" != http* ]] && {
  subtitle_url=$(dirname $video_url)/$subtitle_uri;
 }
 echo "$subtitle_url";
 echo "> Subtitle: $subtitle_url" >&2;
}

download_subtitle_contents () {
 local subtitle_url=$1;
 echo "> Downloading... "

 local subtitle_base_url=$(dirname $subtitle_url);
 curl -s $subtitle_url | grep "webvtt" | while read webvtt; do
  local subtitle_webvtt=$subtitle_base_url/$webvtt;
  #echo "- get $subtitle_webvtt";
  local subtitle_content=$(curl -s $subtitle_webvtt);
# en subtitle
  ls $WWDC_LOCAL_DIR/"wwdc$WWDC_YEAR"_"$SESSION_ID"*.en.srt | while read srt_file; do
# zh subtitle
#  ls $WWDC_LOCAL_DIR/"wwdc$WWDC_YEAR"_"$SESSION_ID"*.zh.srt | while read srt_file; do
   echo "$subtitle_content" >> $srt_file;
  done
 done
}

main () {
 [ ! -d $WWDC_LOCAL_DIR ] && {
  mkdir $WWDC_LOCAL_DIR;
 }

#Year 2020 change {3\} to {3,5\}
 curl -s $WWDC_SESSION_PREFIX | grep /videos/play/wwdc$WWDC_YEAR | sed "s#.*/videos/play/wwdc$WWDC_YEAR/\([0-9]\{3,5\}\).*#\1#" | sort | uniq | while read SESSION_ID; do
  #echo "SESSION_ID is" $SESSION_ID
  local video_url=$(detect_video_m3u8 $SESSION_ID);
  local subtitle_url=$(detect_subtitle_m3u8 $video_url);

  download_subtitle_contents $subtitle_url;
 done
}

main;
Run this shell script to format as SRT subtitle
- shellscript.sh Select all
WWDC_YEAR=2020;
#
cd wwdc$WWDC_YEAR
mkdir -p sd
mkdir -p hd
for i in *_sd.??.srt; do sed -e '/WEBVTT/d;/X-TIMESTAMP/d;s/align.middle line.*$//;' $i | awk '/^[0-9]{2}:[0-9]{2}:/ {seen[$0]++; skipduplicated=0} {if (seen[$0]>1) skipduplicated=1; if (!skipduplicated) print $0}' | awk -v RS="" '{gsub("\n", "-Z"); print}' | awk '$0 !~/^WEB/ {print $0}' | uniq | awk '{printf "\n%s-Z%s", NR,$0 }' | awk -v ORS="\n\n" '{gsub("-Z", "\n"); print}' | sed -e 's/.A:middle$//g;s/>/>/g;s/</</g;1,2d;' > sd/$i; done
for i in *_hd.??.srt; do sed -e '/WEBVTT/d;/X-TIMESTAMP/d;s/align.middle line.*$//;' $i | awk '/^[0-9]{2}:[0-9]{2}:/ {seen[$0]++; skipduplicated=0} {if (seen[$0]>1) skipduplicated=1; if (!skipduplicated) print $0}' | awk -v RS="" '{gsub("\n", "-Z"); print}' | awk '$0 !~/^WEB/ {print $0}' | uniq | awk '{printf "\n%s-Z%s", NR,$0 }' | awk -v ORS="\n\n" '{gsub("-Z", "\n"); print}' | sed -e 's/.A:middle$//g;s/>/>/g;s/</</g;1,2d;' > hd/$i; done
Run this script wwdc2020_fetch_mp4.sh to download all mp4 (HD and SD) videos (also works for 2021)
- wwdc2020_fetch_mp4.sh Select all
#!/bin/bash
# @Last Modified by:   javacom
# @Last Modified time: 2020-10-17

WWDC_YEAR=2020; # change to 2021 also works for WWDC2021
#
WWDC_SESSION_PREFIX=https://developer.apple.com/videos/play/wwdc$WWDC_YEAR;
WWDC_LOCAL_DIR=$(basename $WWDC_SESSION_PREFIX);

download_mp4_video () {
 local session_url=$WWDC_SESSION_PREFIX/$SESSION_ID/;
 local session_html=$(curl -s $session_url);
 local video_url=$(echo "$session_html" | grep .m3u8 | grep $SESSION_ID | head -n1 | sed "s#.*\"\(https://.*m3u8\)\".*#\1#");
 echo "$session_html" | grep .mp4 | grep $SESSION_ID | sed "s#.*\"\(https://.*mp4\).*\".*#\1#" | while read mp4_url; do
  local mp4_filename=$(basename $mp4_url);
  if [ -e $WWDC_LOCAL_DIR/$mp4_filename ]
  then
      echo "> MP4 already existed : $WWDC_LOCAL_DIR/$mp4_filename" >&2;
      echo "> To resume broken download use curl -C - --connect-timeout 1200 -o $WWDC_LOCAL_DIR/$mp4_filename $mp4_url" >&2;
      echo " " >&2;
  else
      echo "> MP4 Downloading... : $mp4_url" >&2;
      curl  --connect-timeout 120 -o $WWDC_LOCAL_DIR/$mp4_filename $mp4_url
  fi
 done
}

main () {
 [ ! -d $WWDC_LOCAL_DIR ] && {
  mkdir $WWDC_LOCAL_DIR;
 }

#Year 2020 change {3\} to {3,5\}
 curl -s $WWDC_SESSION_PREFIX | grep /videos/play/wwdc$WWDC_YEAR | sed "s#.*/videos/play/wwdc$WWDC_YEAR/\([0-9]\{3,5\}\).*#\1#" | sort | uniq | while read SESSION_ID; do
  download_mp4_video $SESSION_ID;
 done
}

main;
Run this script to rename the video or subtitles to proper title (HD & SD) videos
- wwdc2020_rename_title.sh Select all
#!/bin/sh
# @Last Modified by:   javacom
# @Last Modified time: 2020-10-17

#sd video
curl -s https://developer.apple.com/videos/wwdc2020/ | grep -B1 "video-title"  | sed -e 's#[[:space:]]\{10,\}<a href="/videos/play/wwdc2020/\([0-9]\{3,5\}\).*#\[ -f  "wwdc2020_\1_sd.mp4" \] \&\& mv "wwdc2020_\1_sd.mp4" "wwdc2020_\1_sd_#' -e "s/[\@:’\'\,?]//g" -e "s/\"\(The.*\)\"/\1/" -e 's#.*video-title..\(.*\)\(</h4>\)#\1.mp4"#' -e '/--/d' | sed '/^\[ -f/{N;s/\n//;}' | /bin/bash


#hd video
curl -s https://developer.apple.com/videos/wwdc2020/ | grep -B1 "video-title"  | sed -e 's#[[:space:]]\{10,\}<a href="/videos/play/wwdc2020/\([0-9]\{3,5\}\).*#\[ -f  "wwdc2020_\1_hd.mp4" \] \&\& mv "wwdc2020_\1_hd.mp4" "wwdc2020_\1_hd_#' -e "s/[\@:’\'\,?]//g" -e "s/\"\(The.*\)\"/\1/" -e 's#.*video-title..\(.*\)\(</h4>\)#\1.mp4"#' -e '/--/d' | sed '/^\[ -f/{N;s/\n//;}' | /bin/bash


#sd video en.srt
curl -s https://developer.apple.com/videos/wwdc2020/ | grep -B1 "video-title"  | sed -e 's#[[:space:]]\{10,\}<a href="/videos/play/wwdc2020/\([0-9]\{3,5\}\).*#\[ -f  "wwdc2020_\1_sd.en.srt" \] \&\& mv "wwdc2020_\1_sd.en.srt" "wwdc2020_\1_sd_#' -e "s/[\@:’\'\,?]//g" -e "s/\"\(The.*\)\"/\1/" -e 's#.*video-title..\(.*\)\(</h4>\)#\1.en.srt"#' -e '/--/d' | sed '/^\[ -f/{N;s/\n//;}' | /bin/bash

#hd video en.srt
curl -s https://developer.apple.com/videos/wwdc2020/ | grep -B1 "video-title"  | sed -e 's#[[:space:]]\{10,\}<a href="/videos/play/wwdc2020/\([0-9]\{3,5\}\).*#\[ -f  "wwdc2020_\1_hd.en.srt" \] \&\& mv "wwdc2020_\1_hd.en.srt" "wwdc2020_\1_hd_#' -e "s/[\@:’\'\,?]//g" -e "s/\"\(The.*\)\"/\1/" -e 's#.*video-title..\(.*\)\(</h4>\)#\1.en.srt"#' -e '/--/d' | sed '/^\[ -f/{N;s/\n//;}' | /bin/bash


#sd video zh.srt
curl -s https://developer.apple.com/videos/wwdc2020/ | grep -B1 "video-title"  | sed -e 's#[[:space:]]\{10,\}<a href="/videos/play/wwdc2020/\([0-9]\{3,5\}\).*#\[ -f  "wwdc2020_\1_sd.zh.srt" \] \&\& mv "wwdc2020_\1_sd.zh.srt" "wwdc2020_\1_sd_#' -e "s/[\@:’\'\,?]//g" -e "s/\"\(The.*\)\"/\1/" -e 's#.*video-title..\(.*\)\(</h4>\)#\1.zh.srt"#' -e '/--/d' | sed '/^\[ -f/{N;s/\n//;}' | /bin/bash

#hd video zh.srt
curl -s https://developer.apple.com/videos/wwdc2020/ | grep -B1 "video-title"  | sed -e 's#[[:space:]]\{10,\}<a href="/videos/play/wwdc2020/\([0-9]\{3,5\}\).*#\[ -f  "wwdc2020_\1_hd.zh.srt" \] \&\& mv "wwdc2020_\1_hd.zh.srt" "wwdc2020_\1_hd_#' -e "s/[\@:’\'\,?]//g" -e "s/\"\(The.*\)\"/\1/" -e 's#.*video-title..\(.*\)\(</h4>\)#\1.zh.srt"#' -e '/--/d' | sed '/^\[ -f/{N;s/\n//;}' | /bin/bash

# For WWDC2021
WWDC_YEAR=2021; VIDEO=sd; curl -s https://developer.apple.com/videos/wwdc${WWDC_YEAR}/ | grep -B1 "video-title"  | sed -e "s#[[:space:]]\{10,\}<a href=./videos/play/wwdc202./\([0-9]\{3,5\}\).*#\[ -f  \"wwdc${WWDC_YEAR}-\1_${VIDEO}.mp4\" \] \&\& mv \"wwdc${WWDC_YEAR}-\1_${VIDEO}.mp4\" \"wwdc${WWDC_YEAR}-\1_sd_#" -e "s/[\@:’\'\,?]//g" -e "s/\"\(The.*\)\"/\1/" -e 's#.*video-title..\(.*\)\(</h4>\)#\1.mp4"#' -e '/--/d' | sed '/^\[ -f/{N;s/\n//;}' | sed  "s#[\/@:’\'\,]#_#g" | /bin/bash
# Example nohup commnad for Linux Download
nohup bash -c 'cd $HOME/Downloads/WWDC/; ./wwdc2020_fetch_mp4.sh' &> nohup.wwdc2020.mp4.out &
nohup bash -c 'cd $HOME/Downloads/WWDC/; ./wwdc2020_fetch_en.srt.sh' &> nohup.wwdc2020.en.srt.out &
# or use screen utility to download
screen -S wwdcdownloadmp4
bash wwdc2020_fetch_mp4.sh
If want to remove special characters in filename "brew install rename" and use this command to rename
rename "s/[\@:’\'\,]//g" *.mp4 *.srt

Wednesday, August 7, 2019
Xcode 11 beta 5 SwiftUI changes

- NavigationButton becomes NavigationLink Select all
                        NavigationButton(
                        destination: LandmarkDetail(landmark: landmark)) {
                            LandmarkRow(landmark: landmark)
                        }
- NavigationButton becomes NavigationLink Select all
                        NavigationLink(
                            destination: LandmarkDetail(landmark: landmark)
                                .environmentObject(self.userData)
                        ) {
                            LandmarkRow(landmark: landmark)
                        }
- ForEach .identified by: Select all
        ForEach(["iPhone SE", "iPhone XS Max"].identified(by: \.self)) { deviceName in
            LandmarkList()
                .previewDevice(PreviewDevice(rawValue: deviceName))
                .previewDisplayName(deviceName)
        }
        .environmentObject(UserData())
- ForEach id: Select all
        ForEach(["iPhone SE", "iPhone XS Max"], id: \.self) { deviceName in
            LandmarkList()
                .previewDevice(PreviewDevice(rawValue: deviceName))
                .previewDisplayName(deviceName)
        }
        .environmentObject(UserData())

- BindableObject becomes ObservableObject Select all
final class UserData: BindableObject {
    let didChange = PassthroughSubject<UserData, Never>()

    var showFavoritesOnly = false {
        didSet {
            didChange.send(self)
        }
    }

    var landmarks = landmarkData {
        didSet {
            didChange.send(self)
        }
    }
}
- BindableObject becomes ObservableObject Select all
final class UserData: ObservableObject {
    @Published var showFavoritesOnly = false
    @Published var landmarks = landmarkData
}
Saturday, June 8, 2019
How to use SwiftUI previews for existing project and storyboard
Here is an example code to create a new swift file for an existing project
and use the storyboard Main.storyboard and preview the MainViewController instance in the new iOS 13 SwiftUI framework under Xcode 11.
If you add TabbedView to NavigationView in this example, please use Xcode 11 Beta 2.
It is important to assign a storyboard ID say "MainController" to your MainViewController in Main.storyboard's identity inspector.
If you add TabbedView to NavigationView in this example, please use Xcode 11 Beta 2.
- MainViewPreviews.swift Select all
//  MainViewPreviews.swift
//  FishTagCreator
//
//  Created by javacom on 8 Jun 2019.
//
import SwiftUI

#if DEBUG

struct MainViewControllerPreviews : PreviewProvider, UIViewControllerRepresentable {

    // MARK: PreviewProvider

    static var previews: some View {

        MainViewControllerPreviews()
    }

    // MARK: UIViewControllerRepresentable

    typealias UIViewControllerType = MainViewController

    func makeUIViewController(
        context: Context
        ) -> MainViewController {
          let mainStoryboard: UIStoryboard = UIStoryboard(name: "Main", bundle: nil)

          let mainViewController: MainViewController = mainStoryboard.instantiateViewController(withIdentifier: "MainController") as! MainViewController

          return mainViewController
        }

    func updateUIViewController(
        _ uiViewController : MainViewController, context: Context) {

    }
}

#endif
It is important to assign a storyboard ID say "MainController" to your MainViewController in Main.storyboard's identity inspector.
Subscribe to:
Posts (Atom)
