Wednesday, April 15, 2009

APNS : Pushing tweets to iPhone

see here :
http://arstechnica.com/apple/guides/2009/04/pushing-tweets-to-your-iphone-with-apple-push-notifications.ars

You can modify it to get the RSS feed as well. see code sample here

pushtweet.m Select all

while (1 > 0)
{

TreeNode *root = [[XMLParser sharedInstance] parseXMLFromURL: [NSURL URLWithString:URL_STRING]];
TreeNode *found = nil;
for (TreeNode *node in [root children])
{
if (![[node key] isEqualToString:@"channel"]) continue;
if ([[node key] isEqualToString:@"channel"])
{
found = nil;
for (TreeNode *node2 in [node children]) {
// [node2 dump];
if ([[node2 key] isEqualToString:@"item"]) {
found = node2;
break;
}
}
if (found) break;
}
}

if (found)
{
NSString *testString = [NSString stringWithFormat:@"%@:%@", [found leafForKey:@"title"], [found leafForKey:@"link"]];
NSString *prevString = [NSString stringWithContentsOfFile:TWEET_FILE encoding:NSUTF8StringEncoding error:nil];
if (![prevString isEqualToString:testString])
{
// Update with the new tweet information
NSLog(@"\nNew RSS title from %@:\n \"%@\"\n\"%@\"\n", [found leafForKey:@"title"], [[found leafForKey:@"description"] substringToIndex:30], [found leafForKey:@"link"]);

// Save the unmessed tweet to the ~/.tweet file
[testString writeToFile:TWEET_FILE atomically:YES encoding:NSUTF8StringEncoding error:nil];

// handle reserved stuff. There's got to be a better way to escape
testString = [testString stringByReplacingOccurrencesOfString:@"\"" withString:@"\\\""];
testString = [testString stringByReplacingOccurrencesOfString:@"'" withString:@""];
testString = [testString stringByReplacingOccurrencesOfString:@":" withString:@"-"];
testString = [testString stringByReplacingOccurrencesOfString:@"{" withString:@"("];
testString = [testString stringByReplacingOccurrencesOfString:@"}" withString:@")"];

// push it
system([PUSH_CMD UTF8String]);
}
}

[NSThread sleepForTimeInterval:(double) delay];
if (SHOW_TICK) printf("tick\n");
}


There is also a Mac Xcode project sample on how to push from Desktop App here
http://stefan.hafeneger.name/download/PushMeBabySource.zip


Monday, April 13, 2009

APNS : How to generate JSON payload in C

For the communication program with APNS, you have many implementation choices, either php, perl, python, ruby or even C#.

You may wonder why the sample of raw interface given by Apple is a C function.
static bool sendPayload(SSL *sslPtr, char *deviceTokenBinary, char *payloadBuff, size_t payloadLength)

Would there be many implementations that use C /C++ or Objective C ? I guess the number will be increasing if the developer is looking for scalability and performance.

If you would like to implement it in C variant, you need to implement a raw TLS/SSL socket program (and may be with threading) and the handling of JSON payload. One of the possibilities is to use open source JSON C Library, but I think it is too heavy to use it here as the communication program needs to construct the Payload message only. So I write this function (genPayloadData ) to generate the payload message for the APNS.

This source code includes the JSON escape string function and the C structure to generate the APNS Payload.

apns.c Select all

#include <stdio.h>
#include <stdlib.h>
#include <strings.h>
#include <stdbool.h>

#define Debug 1
#define logerror dprintf
#define dprintf if (Debug) printf

#define DEVICE_BINARY_SIZE 32
#define MAXPAYLOAD_SIZE 256

typedef struct
{
char* alert;
int badge;
char* sound;
char* name_key[4]; //custom key
char* str_value[4]; // custom key value
int int_value[4]; // custom key int
char* action_loc_key; // for custom button label
char* loc_key; // formatted localized string
char* loc_args[4]; // formatted localized string arguments
} PayloadData;

/* string escaping */
const char *json_number_chars = "0123456789.+-eE";
const char *json_hex_chars = "0123456789abcdef";

char *json_escape_str(char *str)
{
char *results = (char*)malloc(200);
char *resultsPt = results;
int pos = 0, start_offset = 0;
unsigned char c;
do {
c = str[pos];
switch(c) {
case '\0':
break;
case '\b':
case '\n':
case '\r':
case '\t':
case '"':
case '\\':
case '/':
if(pos - start_offset > 0)
{memcpy(resultsPt, str + start_offset, pos - start_offset); resultsPt+=pos - start_offset;}
if(c == '\b') {memcpy(resultsPt, "\\b", 2); resultsPt+=2;}
else if(c == '\n') {memcpy(resultsPt, "\\n", 2); resultsPt+=2;}
else if(c == '\r') {memcpy(resultsPt, "\\r", 2); resultsPt+=2;}
else if(c == '\t') {memcpy(resultsPt, "\\t", 2); resultsPt+=2;}
else if(c == '"') {memcpy(resultsPt, "\\\"", 2); resultsPt+=2;}
else if(c == '\\') {memcpy(resultsPt, "\\\\", 2); resultsPt+=2;}
else if(c == '/') {memcpy(resultsPt, "\\/", 2); resultsPt+=2;}
start_offset = ++pos;
break;
default:
if(c < ' ') {
if(pos - start_offset > 0)
{memcpy(resultsPt, str + start_offset, pos - start_offset); resultsPt+=pos-start_offset;}
sprintf(resultsPt, "\\u00%c%c",
json_hex_chars[c >> 4],
json_hex_chars[c & 0xf]);
start_offset = ++pos;
} else pos++;
}
} while(c);
if(pos - start_offset > 0)
{memcpy(resultsPt, str + start_offset, pos - start_offset); resultsPt+=pos-start_offset;}
memcpy(resultsPt, "\0", 1);
dprintf("results:%s\n",results);
return results;
return 0;
}


#define APSHEAD "{\"aps\":{"
#define APSTAIL "}"


void genPayloadData(PayloadData myPaylodData, char *msgbuf) {
char *alert = (char*)malloc(200);
char *message = (char*)malloc(200);
char *sound = (char*)malloc(20);
char *badge = (char *)malloc(20);
char *msgbufPt = msgbuf;
bool isAlert=false, isBadge=false, isSound=false;
bool isToken=false;
int len;
int i;

if (myPaylodData.alert) {
if (myPaylodData.action_loc_key) {
sprintf(alert, "\"alert\":{\"body\":\"%s\",\"action-loc-key\":\"%s\"}",json_escape_str(myPaylodData.alert),json_escape_str(myPaylodData.action_loc_key));
}
else {
sprintf(alert, "\"alert\":\"%s\"",json_escape_str(myPaylodData.alert));
}
isAlert = true;
} else if (myPaylodData.loc_key) {
isToken=false;
sprintf(alert, "\"alert\":{\"loc-key\":\"%s\"",json_escape_str(myPaylodData.loc_key));
for (i=0 ; i < 4; i++) {
if (myPaylodData.loc_args[i]) {
if (isToken) {
sprintf(alert, "%s,\"%s\"",alert,json_escape_str(myPaylodData.loc_args[i]));
}
else {
sprintf(alert, "%s,\"loc-args\":[\"%s\"",alert,json_escape_str(myPaylodData.loc_args[i]));
}
isToken=true;
}
}
if (isToken) {
sprintf(alert, "%s]}",alert);
}
isAlert = true;
}
if (myPaylodData.badge > 0) {
sprintf(badge, "\"badge\":%d",myPaylodData.badge);
isBadge = true;
}
if (myPaylodData.sound) {
sprintf(sound, "\"sound\":\"%s\"",myPaylodData.sound);
isSound = true;
}
if (isAlert | isBadge | isSound) {
len = strlen(APSHEAD);
memcpy(msgbufPt, APSHEAD, len);
msgbufPt += len;
}
else {
memcpy(msgbufPt, "{", 1);
msgbufPt += 1;
}
if (isAlert) {
len = strlen(alert);
memcpy(msgbufPt, alert, len);
msgbufPt += len;
}
if (isBadge) {
if (isAlert) {
memcpy(msgbufPt++, ",", 1);
}
len = strlen(badge);
memcpy(msgbufPt, badge, len);
msgbufPt += len;
}
if (isSound) {
if (isAlert | isBadge) {
memcpy(msgbufPt++, ",", 1);
}
len = strlen(sound);
memcpy(msgbufPt, sound, len);
msgbufPt += len;
}
if (isAlert | isBadge | isSound) {
len = strlen(APSTAIL);
memcpy(msgbufPt, APSTAIL, len);
msgbufPt += len;
isToken = true;
}
isToken=false;
if (msgbufPt-msgbuf < MAXPAYLOAD_SIZE) {
for (i=0; i < 4; i++) {
if (myPaylodData.name_key[i]) {
if (myPaylodData.str_value[i]) {
sprintf(message, "%s\"%s\":\"%s\"",(isToken?",":""),json_escape_str(myPaylodData.name_key[i]),json_escape_str(myPaylodData.str_value[i]));
len = strlen(message);
if (msgbufPt-msgbuf+len<MAXPAYLOAD_SIZE) {
memcpy(msgbufPt, message, len);
msgbufPt += len;
isToken = true;
}
else {
dprintf("\n!!!!Warnings: Total Payload message overlimit (>%d) when processing %s",MAXPAYLOAD_SIZE,message);
}
}
if (myPaylodData.int_value[i]) {
sprintf(message, "%s\"%s\":%d",(isToken?",":""),json_escape_str(myPaylodData.name_key[i]),myPaylodData.int_value[i]);
len = strlen(message);
if (msgbufPt-msgbuf+len<MAXPAYLOAD_SIZE) {
memcpy(msgbufPt, message, len);
msgbufPt += len;
isToken = true;
}
else {
dprintf("\n!!!!Warnings: Total Payload message overlimit (>%d) when processing %s",MAXPAYLOAD_SIZE,message);
}
}
}
}
}
len = strlen(APSTAIL);
memcpy(msgbufPt, APSTAIL, len);
msgbufPt += len;
memcpy(msgbufPt, "\0", 1);
dprintf("\nconstructed message:%s\n",msgbuf);
if (strlen(msgbuf) > MAXPAYLOAD_SIZE) {
dprintf("\n!!!!Warnings: Payload (>%d) : %d\n",MAXPAYLOAD_SIZE,(unsigned)strlen(msgbuf));
}
else {
dprintf("\nPayload (<=%d) size : %d\n",MAXPAYLOAD_SIZE,(unsigned)strlen(msgbuf));
}
free(alert);
free(badge);
free(sound);
free(message);
}

int main(){
char msgbuf[512]; /* payload messages */

PayloadData myPaylodData = {0};
myPaylodData.badge = 3;
myPaylodData.alert = "Message from javacom";
// myPaylodData.action_loc_key = "";
// myPaylodData.loc_args[0] = "";
// myPaylodData.loc_args[1] = "";
// myPaylodData.loc_args[2] = "";
myPaylodData.sound = "received3.caf";
myPaylodData.name_key[0] = "test1";
myPaylodData.str_value[0] = "Hello iPhone";
genPayloadData(myPaylodData,msgbuf);
printf("%s\n",msgbuf);
return 0;

}


Friday, April 10, 2009

APNS Client Development Certificate Available Now


(1) You need to create an App ID without .* in the Program Portal (that means one cert for one app)

(2) Generate a certificate signing request from your Mac's keychain and save to disk

(3) Upload the CertificateSigningRequest.certSigningRequest to the Program Portal

(4) Wait for the generation of cert (about 1 min). Download the certificate (aps_developer_identity.cer) from the Program Portal (If you need to renew this cert, it is under the App ID that you created in step 1, and choose Action Configure)

(5) Keep (or rename them if you prefer) these 2 files (steps 2 and 4) in a safe place. You might need the CertificateSigningRequest.certSigningRequest file to request a new cert for a new app in the future or renew the old cert when expired.

(6) Suppose you have imported the aps_developer_identity.cer to the keychain. Then you have to export these new cert and the private key of this cert (not the public key) and saved as .p12 files.

(7) Then you use these commands to generate the cert and key in Mac's Terminal for PEM format (Privacy Enhanced Mail Security Certificate)

openssl pkcs12 -clcerts -nokeys -out cert.pem -in cert.p12
openssl pkcs12 -nocerts -out key.pem -in key.p12


(8) The cert.pem and key.pem files will be used by your own php script communicating with APNS.

(9) If you want to remove the passphase of private key in key.pem, do this

openssl rsa -in key.pem -out key.unencrypted.pem


Then combine the certificate and key

cat cert.pem key.unencrypted.pem > ck.pem


But please set the file permission of this unencrypted key by using chmod 400 and is only readable by root in a sever configuration.

(10) The testing APNS is at ssl://gateway.sandbox.push.apple.com:2195

(11) For the source codes to push payload message to the APNS, you can find them in the Developer Forum. This is the one that I used, for php script. Run this (after obtaining the device token from the testing device and with iPhone Client program setup)
php -f apns.php "My Message" 2

or if you put this php script and the ck.pem in a local web server, you can use this to test
http://127.0.0.1/apns/apns.php?message=test%20from%20javacom&badge=2&sound=received5.caf

Please be patient to get message from the sandbox server. Normally, you need 10 minutes+ to get the first message from push notification testing.

apns.php Select all

#!/usr/bin/env php
<?php
$deviceToken = '02da851dXXXXXXXXb4f2b5bfXXXXXXXXce198270XXXXXXXX0d3dac72bc87cd60'; // masked for security reason
// Passphrase for the private key (ck.pem file)
// $pass = '';

// Get the parameters from http get or from command line
$message = $_GET['message'] or $message = $argv[1] or $message = 'Message received from javacom';
$badge = (int)$_GET['badge'] or $badge = (int)$argv[2];
$sound = $_GET['sound'] or $sound = $argv[3];

// Construct the notification payload
$body = array();
$body['aps'] = array('alert' => $message);
if ($badge)
$body['aps']['badge'] = $badge;
if ($sound)
$body['aps']['sound'] = $sound;


/* End of Configurable Items */

$ctx = stream_context_create();
stream_context_set_option($ctx, 'ssl', 'local_cert', 'ck.pem');
// assume the private key passphase was removed.
// stream_context_set_option($ctx, 'ssl', 'passphrase', $pass);

$fp = stream_socket_client('ssl://gateway.sandbox.push.apple.com:2195', $err, $errstr, 60, STREAM_CLIENT_CONNECT, $ctx);
// for production change the server to ssl://gateway.push.apple.com:2195
if (!$fp) {
print "Failed to connect $err $errstr\n";
return;
}
else {
print "Connection OK\n";
}

$payload = json_encode($body);
$msg = chr(0) . pack("n",32) . pack('H*', str_replace(' ', '', $deviceToken)) . pack("n",strlen($payload)) . $payload;
print "sending message :" . $payload . "\n";
fwrite($fp, $msg);
fclose($fp);
?>


(12) For iPhone Client Program, you need to edit the bundle identifier to the App ID that you created and imported the new provisioning profile for that APP ID to the XCode and iPhone. And codesign with that new provisioning profile. Then implement the following methods in AppDelegate to Build & Go

AppDelegate.m Select all

- (void)applicationDidFinishLaunching:(UIApplication *)application {
NSLog(@"Registering Remote Notications");

[[UIApplication sharedApplication] registerForRemoteNotificationTypes:(UIRemoteNotificationTypeBadge | UIRemoteNotificationTypeSound | UIRemoteNotificationTypeAlert)];

// Override point for customization after app launch
[window addSubview:viewController.view];
[window makeKeyAndVisible];
}


// Delegation methods
- (void)application:(UIApplication *)app didRegisterForRemoteNotificationsWithDeviceToken:(NSData *)devToken {
const void *devTokenBytes = [devToken bytes];
// self.registered = YES;
NSLog(@"deviceToken: %@", devToken);
// [self sendProviderDeviceToken:devTokenBytes]; // custom method
}

- (void)application:(UIApplication *)app didFailToRegisterForRemoteNotificationsWithError:(NSError *)err {
NSLog(@"Error in registration. Error: %@", err);
}


(13) Additional tips for sandbox testing
- The feedback service is feedback.sandbox.push.apple.com:2195
- Send your messages to gateway.sandbox.push.apple.com:2195


Here is the feedback server request php code. For the sandbox feedback server, you have to create a second dummy app to make the first one works. May be the sandbox feedback server is buggy as the production push and feedback servers does not have this problem.

php -f feedback.php

feedback.php Select all

#!/usr/bin/env php
<?php

$ctx = stream_context_create();
stream_context_set_option($ctx, 'ssl', 'local_cert', 'ck.pem');
stream_context_set_option($ctx, 'ssl', 'verify_peer', false);
// assume the private key passphase was removed.
// stream_context_set_option($ctx, 'ssl', 'passphrase', $pass);


$fp = stream_socket_client('ssl://feedback.sandbox.push.apple.com:2196', $error, $errorString, 60, STREAM_CLIENT_CONNECT, $ctx);
// production server is ssl://feedback.push.apple.com:2196

if (!$fp) {
print "Failed to connect feedback server: $err $errstr\n";
return;
}
else {
print "Connection to feedback server OK\n";
}

print "APNS feedback results\n";
while ($devcon = fread($fp, 38))
{
$arr = unpack("H*", $devcon);
$rawhex = trim(implode("", $arr));
$feedbackTime = hexdec(substr($rawhex, 0, 8));
$feedbackDate = date('Y-m-d H:i', $feedbackTime);
$feedbackLen = hexdec(substr($rawhex, 8, 4));
$feedbackDeviceToken = substr($rawhex, 12, 64);
print "TIMESTAMP:" . $feedbackDate . "\n";
print "DEVICE ID:" . $feedbackDeviceToken. "\n\n";
}
fclose($fp);
?>


Hints: If you want to test the production push and feedback servers, use the adhoc distribution certificate and adhoc build to your devices. Moreover, the device tokens are different for the same device under sandbox and production servers.


Monday, April 6, 2009

OpenGL ES for iPhone : Part 3 with Accelerometer control

In this part 3, we will add the accelerometer control to move the position of ellipse object that we have created in part 2 of the Tutorial.


1) UIAccelerometerDelegate
We need to add the UIAccelerometerDelegate protocol to the EAGLView and implement the accelerometer: didAccelerate: method as below


@interface EAGLView : UIView <UIAccelerometerDelegate>

- (void)accelerometer:(UIAccelerometer*)accelerometer didAccelerate:(UIAcceleration*)acceleration;


We need to configure and start the accelerometer in the setupView method

[[UIAccelerometer sharedAccelerometer] setUpdateInterval:(1.0 / kAccelerometerFrequency)];
[[UIAccelerometer sharedAccelerometer] setDelegate:self];


2) Accelerometer values
Inside the accelerometer: didAccelerate: method, we add a low-pass filter in the accelerometer values. This low-pass filter codes are sourced from the GLGravity Sample Code from Apple.

//Use a basic low-pass filter in the accelerometer values
accel[0] = acceleration.x * kFilteringFactor + accel[0] * (1.0 - kFilteringFactor);
accel[1] = acceleration.y * kFilteringFactor + accel[1] * (1.0 - kFilteringFactor);
accel[2] = acceleration.z * kFilteringFactor + accel[2] * (1.0 - kFilteringFactor);


The meaning of accelerometer values:

acceleration.x = Roll. It corresponds to roll, or rotation around the axis that runs from your home button to your earpiece. Values vary from 1.0 (rolled all the way to the right) to -1.0 (rolled all the way to the left).

acceleration.y = Pitch. Place your iPhone on the table and mentally draw a horizontal line about half-way down the screen. That's the axis around which the Y value rotates. Values go from 1.0 (the headphone jack straight down) to -1.0 (the headphone jack straight up).

acceleration.z = Face up/face down. It refers to whether your iPhone is face up (-1.0) or face down (1.0). When placed on it side, either the side with the volume controls and ringer switch, or the side directly opposite, the Z value equates to 0.0.

3) Control on movement of the ellipse is using the variables moveX and moveY and the ellipse position will be changed according to acceleration.x (that is accel[0]) and acceleration.y (that is accel[1]) values that passed from the Accelerometer control after the low-pass filter. The larger the absolute value of acceleration.x/acceleration.y, the greater for the magnitude for the value of moveX/moveY and thus the faster the ellipse will change its position to that direction. As the object should not move beyond the screen view, the ellipseData.pos.x and ellipseData.pos.y values will be governed by the boundaries of the screen.

 ellipseData.pos.x += moveX;
 if (accel[0] > -0.1 & accel[0] < 0.1 ) {
   moveX = 0.0f;
 }
 else {
  moveX = 10.0f * accel[0];
 }

 ellipseData.pos.y += moveY;
 if (accel[1] > -0.1 & accel[1] < 0.1 ) {
   moveY = 0.0f;
 }
 else {
   moveY = -10.0f * accel[1];
 }


4) Conditional compilation code for the iPhone Simulator and on-screen debug info
As iPhone Simulator does not have Accelerometer control, we have added the code that will change the ellipse position inside this compiler directive, so that the ellipse will keep moving on the iPhone Simulator.
  #if TARGET_IPHONE_SIMULATOR

Moroever, we have added a UILabel to the code so that we can read the Accelerometer values while we debug the program on actual device. This UILabel can be disabled using this define directive.
  #undef DEBUGSCREEN

5) The source codes are here, you just need to create a new project from OpenGL ES Application template of XCode and copy the source codes of EAGLView.h and EAGLView.m from below and paste them for Build & Go in XCode. The accelerometer control can only be tested on actual device.


EAGLView.h Select all

// EAGLView.h
// OpenGL ES Tutorial - Part 3 by javacom


// To enable Debug NSLog, add GCC_PREPROCESSOR_DEFINITIONS DEBUGON in Project Settings for Debug Build Only and replace NSLog() with DEBUGLOG()
#ifdef DEBUGON
#define DEBUGLOG if (DEBUGON) NSLog
#else
#define DEBUGLOG
#endif

#define DEBUGSCREEN

#import <UIKit/UIKit.h>
#import <OpenGLES/EAGL.h>
#import <OpenGLES/ES1/gl.h>
#import <OpenGLES/ES1/glext.h>

typedef struct
{
BOOL rotstop; // stop self rotation
BOOL touchInside; // finger tap inside of the object ?
BOOL scalestart; // start to scale the obejct ?
CGPoint pos; // position of the object on the screen
CGPoint startTouchPosition; // Start Touch Position
CGPoint currentTouchPosition; // Current Touch Position
GLfloat pinchDistance; // distance between two fingers pinch
GLfloat pinchDistanceShown; // distance that have shown on screen
GLfloat scale; // OpenGL scale factor of the object
GLfloat rotation; // OpenGL rotation factor of the object
GLfloat rotspeed; // control rotation speed of the object
} ObjectData;

/*
This class wraps the CAEAGLLayer from CoreAnimation into a convenient UIView subclass.
The view content is basically an EAGL surface you render your OpenGL scene into.
Note that setting the view non-opaque will only work if the EAGL surface has an alpha channel.
*/
@interface EAGLView : UIView {

@private
/* The pixel dimensions of the backbuffer */
GLint backingWidth;
GLint backingHeight;

EAGLContext *context;

/* OpenGL names for the renderbuffer and framebuffers used to render to this view */
GLuint viewRenderbuffer, viewFramebuffer;

/* OpenGL name for the depth buffer that is attached to viewFramebuffer, if it exists (0 if it does not exist) */
GLuint depthRenderbuffer;

NSTimer *animationTimer;
NSTimeInterval animationInterval;

@public
ObjectData squareData;
ObjectData ellipseData;
GLfloat ellipseVertices[720];
CGFloat initialDistance;
UIAccelerationValue accel[3];
GLfloat moveX, moveY;
#ifdef DEBUGSCREEN
UILabel *textView;
#endif
}

@property NSTimeInterval animationInterval;

@property (nonatomic) ObjectData squareData;
@property (nonatomic) ObjectData ellipseData;
@property CGFloat initialDistance;
#ifdef DEBUGSCREEN
@property (nonatomic, assign) UILabel *textView;
#endif

- (void)startAnimation;
- (void)stopAnimation;
- (void)drawView;
- (void)setupView;

@end


EAGLView.m Select all

// EAGLView.m
// OpenGL ES Tutorial - Part 3 by javacom
//
#import <QuartzCore/QuartzCore.h>
#import <OpenGLES/EAGLDrawable.h>

#import "EAGLView.h"

#include <math.h>

// Macros
#define degreesToRadians(__ANGLE__) (M_PI * (__ANGLE__) / 180.0)
#define radiansToDegrees(__ANGLE__) (180.0 * (__ANGLE__) / M_PI)

CGFloat distanceBetweenPoints (CGPoint first, CGPoint second) {
CGFloat deltaX = second.x - first.x;
CGFloat deltaY = second.y - first.y;
return sqrt(deltaX*deltaX + deltaY*deltaY );
};

CGFloat angleBetweenPoints(CGPoint first, CGPoint second) {
// atan((top - bottom)/(right - left))
CGFloat rads = atan((second.y - first.y) / (first.x - second.x));
return radiansToDegrees(rads);
}

CGFloat angleBetweenLines(CGPoint line1Start, CGPoint line1End, CGPoint line2Start, CGPoint line2End) {

CGFloat a = line1End.x - line1Start.x;
CGFloat b = line1End.y - line1Start.y;
CGFloat c = line2End.x - line2Start.x;
CGFloat d = line2End.y - line2Start.y;

CGFloat rads = acos(((a*c) + (b*d)) / ((sqrt(a*a + b*b)) * (sqrt(c*c + d*d))));

return radiansToDegrees(rads);
}

#define USE_DEPTH_BUFFER 0

// CONSTANTS
#define kMinimumTouchLength 30
#define kMaximumScale 7.0f
#define kMinimumPinchDelta 15
#define kAccelerometerFrequency 100.0 // Hz
#define kFilteringFactor 0.1


// A class extension to declare private methods
@interface EAGLView ()

@property (nonatomic, retain) EAGLContext *context;
@property (nonatomic, assign) NSTimer *animationTimer;

- (BOOL) createFramebuffer;
- (void) destroyFramebuffer;

@end


@implementation EAGLView

@synthesize context;
@synthesize animationTimer;
@synthesize animationInterval;
@synthesize squareData;
@synthesize ellipseData;
@synthesize initialDistance;
#ifdef DEBUGSCREEN
@synthesize textView;
#endif

// You must implement this method
+ (Class)layerClass {
return [CAEAGLLayer class];
}


//The GL view is stored in the nib file. When it's unarchived it's sent -initWithCoder:
- (id)initWithCoder:(NSCoder*)coder {

if ((self = [super initWithCoder:coder])) {

// Get the layer
CAEAGLLayer *eaglLayer = (CAEAGLLayer *)self.layer;

eaglLayer.opaque = YES;
eaglLayer.drawableProperties = [NSDictionary dictionaryWithObjectsAndKeys:
[NSNumber numberWithBool:NO], kEAGLDrawablePropertyRetainedBacking, kEAGLColorFormatRGBA8, kEAGLDrawablePropertyColorFormat, nil];

context = [[EAGLContext alloc] initWithAPI:kEAGLRenderingAPIOpenGLES1];

if (!context || ![EAGLContext setCurrentContext:context]) {
[self release];
return nil;
}

animationInterval = 1.0 / 60.0;
[self setupView];
}
return self;
}

// These are four methods touchesBegan, touchesMoved, touchesEnded, touchesCancelled and use to notify about touches and gestures

- (void)touchesBegan:(NSSet *)touches withEvent:(UIEvent *)event {
/*
NSUInteger numTaps = [[touches anyObject] tapCount]; // number of taps
NSUInteger numTouches = [touches count]; // number of touches
*/
UITouch *touch = [[touches allObjects] objectAtIndex:0];

DEBUGLOG(@"TouchBegan event counts = %d ",[[event touchesForView:self] count]);
DEBUGLOG(@"TouchBegan tounches counts = %d ",[touches count]);
if ([touches count]== 2) {
NSArray *twoTouches = [touches allObjects];
UITouch *first = [twoTouches objectAtIndex:0];
UITouch *second = [twoTouches objectAtIndex:1];
initialDistance = distanceBetweenPoints([first locationInView:self], [second locationInView:self]);
squareData.rotstop = YES;
squareData.touchInside = NO;
}
else if ([touches count]==[[event touchesForView:self] count] & [[event touchesForView:self] count] == 1) {
squareData.startTouchPosition = [touch locationInView:self];
if (distanceBetweenPoints([touch locationInView:self], squareData.pos) <= kMinimumTouchLength * squareData.scale) {
DEBUGLOG(@"Square Touch at %.2f, %.2f ",squareData.pos.x,squareData.pos.y);
squareData.rotstop = YES;
squareData.touchInside = YES;
}
}

}

- (void)touchesMoved:(NSSet *)touches withEvent:(UIEvent *)event {
UITouch *touch = [[touches allObjects] objectAtIndex:0];
squareData.currentTouchPosition = [touch locationInView:self];
if ([touches count]== 2) {
NSArray *twoTouches = [touches allObjects];
UITouch *first = [twoTouches objectAtIndex:0];
UITouch *second = [twoTouches objectAtIndex:1];

// Calculate the distance bewtween the two fingers(touches) to determine the pinch distance
CGFloat currentDistance = distanceBetweenPoints([first locationInView:self], [second locationInView:self]);

squareData.rotstop = YES;
squareData.touchInside = NO;

if (initialDistance == 0.0f)
initialDistance = currentDistance;
if (currentDistance - initialDistance > kMinimumPinchDelta) {
squareData.pinchDistance = currentDistance - initialDistance;
squareData.scalestart = YES;
DEBUGLOG(@"Outward Pinch %.2f", squareData.pinchDistance);
}
else if (initialDistance - currentDistance > kMinimumPinchDelta) {
squareData.pinchDistance = currentDistance - initialDistance;
squareData.scalestart = YES;
DEBUGLOG(@"Inward Pinch %.2f", squareData.pinchDistance);
}
}
else if ([touches count]==[[event touchesForView:self] count] & [[event touchesForView:self] count] == 1) {
if (squareData.touchInside) {
// Only move the square to new position when touchBegan is inside the square
squareData.pos.x = [touch locationInView:self].x;
squareData.pos.y = [touch locationInView:self].y;
DEBUGLOG(@"Square Move to %.2f, %.2f ",squareData.pos.x,squareData.pos.y);
squareData.rotstop = YES;
}
}
}


- (void)touchesEnded:(NSSet *)touches withEvent:(UIEvent *)event {
if ([touches count] == [[event touchesForView:self] count]) {
initialDistance = squareData.pinchDistanceShown = squareData.pinchDistance = 0.0f;
squareData.rotstop = squareData.touchInside = squareData.scalestart = NO;
DEBUGLOG(@"touchesEnded, all fingers up");
}
else {
initialDistance = squareData.pinchDistanceShown = squareData.pinchDistance = 0.0f;
squareData.scalestart = NO;
DEBUGLOG(@"touchesEnded");
}
}


- (void)touchesCancelled:(NSSet *)touches withEvent:(UIEvent *)event {
initialDistance = squareData.pinchDistanceShown = squareData.pinchDistance = 0.0f;
squareData.rotstop = squareData.touchInside = squareData.scalestart = NO;
DEBUGLOG(@"touchesCancelled");
}

- (void)setupView { // new method for intialisation of variables and states

// Enable Multi Touch of the view
self.multipleTouchEnabled = YES;

//Configure and start accelerometer
[[UIAccelerometer sharedAccelerometer] setUpdateInterval:(1.0 / kAccelerometerFrequency)];
[[UIAccelerometer sharedAccelerometer] setDelegate:self];
#if TARGET_IPHONE_SIMULATOR
moveX = 2.0f;
moveY = 3.0f;
#else
moveX = 0.0f;
moveY = 0.0f;
#endif

#ifdef DEBUGSCREEN
UIColor *bgColor = [[UIColor alloc] initWithWhite:1.0f alpha:0.0f];
textView = [[UILabel alloc] initWithFrame:CGRectMake(10.0f, 350.0f, 300.0f, 96.0f)];
textView.text = [NSString stringWithFormat:@"-Accelerometer Data-"];
textView.textAlignment = UITextAlignmentLeft;
[textView setNumberOfLines:4];
textView.backgroundColor = bgColor;
textView.font = [UIFont fontWithName:@"Arial" size:18];
[self addSubview:textView];
[self bringSubviewToFront:textView];
#endif


// Initialise square data
squareData.rotation = squareData.pinchDistance = squareData.pinchDistanceShown = 0.0f;
ellipseData.rotation = 0.0f;
squareData.scale = 1.0f;
squareData.rotstop = squareData.touchInside = squareData.scalestart = NO;
squareData.pos.x = 160.0f;
squareData.pos.y = 240.0f;
squareData.pinchDistance = 0.0f;
squareData.rotspeed = 1.0f;

// Initialise ellipse data
ellipseData.rotation = 0.0f;
ellipseData.rotstop = ellipseData.touchInside = ellipseData.scalestart = NO;
ellipseData.pos.x = 160.0f;
ellipseData.pos.y = 100.0f;
ellipseData.rotspeed = -4.0f;

// calculate the vertices of ellipse
const GLfloat xradius = 35.0f;
const GLfloat yradius = 25.0f;
for (int i = 0; i < 720; i+=2) {
ellipseVertices[i] = (cos(degreesToRadians(i)) * xradius) + 0.0f;
ellipseVertices[i+1] = (sin(degreesToRadians(i)) * yradius) + 0.0f;
// DEBUGLOG(@"ellipseVertices[v%d] %.1f, %.1f",i, ellipseVertices[i], ellipseVertices[i+1]);
}

// setup the projection matrix
glMatrixMode(GL_PROJECTION);
glLoadIdentity();

// Setup Orthographic Projection for the 320 x 480 of the iPhone screen
glOrthof(0.0f, 320.0f, 480.0f, 0.0f, -1.0f, 1.0f);
glMatrixMode(GL_MODELVIEW);

}

- (void)drawView {

// Define the square vertices
const GLfloat squareVertices[] = {
-20.0f, -20.0f,
20.0f, -20.0f,
-20.0f, 20.0f,
20.0f, 20.0f,
};

// Define the colors of the square vertices
const GLubyte squareColors[] = {
255, 255, 0, 255,
0, 255, 255, 255,
0, 0, 0, 0,
255, 0, 255, 255,
};


// Define the colors of the ellipse vertices
const GLubyte ellipseColors[] = {
233, 85, 85, 255,
233, 85, 85, 255,
233, 85, 85, 255,
233, 85, 85, 255,
233, 85, 85, 255,
};


[EAGLContext setCurrentContext:context];
glBindFramebufferOES(GL_FRAMEBUFFER_OES, viewFramebuffer);
glViewport(0, 0, backingWidth, backingHeight);

// Clear background color
glClearColor(0.5f, 0.5f, 0.5f, 1.0f);
glClear(GL_COLOR_BUFFER_BIT);

// draw the square
glLoadIdentity();
glTranslatef(squareData.pos.x, squareData.pos.y, 0.0f);
glRotatef(squareData.rotation, 0.0f, 0.0f, 1.0f);
glScalef(squareData.scale, squareData.scale, 1.0f);
glVertexPointer(2, GL_FLOAT, 0, squareVertices);
glColorPointer(4, GL_UNSIGNED_BYTE, 0, squareColors);
glEnableClientState(GL_VERTEX_ARRAY);
glEnableClientState(GL_COLOR_ARRAY);
glDrawArrays(GL_TRIANGLE_STRIP, 0, 4);

// draw the ellipse
glLoadIdentity();
glTranslatef(ellipseData.pos.x, ellipseData.pos.y, 0.0f);
glRotatef(ellipseData.rotation, 0.0f, 0.0f, 1.0f);
glVertexPointer(2, GL_FLOAT, 0, ellipseVertices);
glColorPointer(4, GL_UNSIGNED_BYTE, 0, ellipseColors);
glEnableClientState(GL_VERTEX_ARRAY);
glEnableClientState(GL_COLOR_ARRAY);
glDrawArrays(GL_TRIANGLE_FAN, 0, 360); // the ellipse has 360 vertices

// control the square rotation
if (!squareData.rotstop) {
squareData.rotation += squareData.rotspeed;
if(squareData.rotation > 360.0f)
squareData.rotation -= 360.0f;
else if(squareData.rotation < -360.0f)
squareData.rotation += 360.0f;
}

// control the ellipse rotation
if (!ellipseData.rotstop) {
ellipseData.rotation += ellipseData.rotspeed;
if(ellipseData.rotation > 360.0f)
ellipseData.rotation -= 360.0f;
else if(ellipseData.rotation < -360.0f)
ellipseData.rotation += 360.0f;
}

// control the square scaling
if (squareData.scalestart && squareData.scale <= kMaximumScale) {
GLfloat pinchDelta = squareData.pinchDistance - squareData.pinchDistanceShown;
if (squareData.pinchDistance != 0.0f) {
squareData.scale += pinchDelta/30;
squareData.pinchDistanceShown = squareData.pinchDistance;
if (squareData.scale >= kMaximumScale) {
squareData.scale = kMaximumScale;
squareData.pinchDistanceShown = squareData.pinchDistance = 0.0f;
squareData.scalestart = NO;
} else if (squareData.scale <= 1.0f) {
squareData.scale = 1.0f;
squareData.pinchDistanceShown = squareData.pinchDistance = 0.0f;
squareData.scalestart = NO;
}
DEBUGLOG(@"scale is %.2f",squareData.scale);
}
}

// control the ellipse movement
#if TARGET_IPHONE_SIMULATOR
ellipseData.pos.x += moveX;
if (ellipseData.pos.x >= 290.f) {
moveX = -2.0f;
}
else if (ellipseData.pos.x <= 30.f) {
moveX = 2.0f;
}

ellipseData.pos.y += moveY;
if (ellipseData.pos.y >= 450.f) {
moveY = -1.5f;
}
else if (ellipseData.pos.y <= 55.f) {
moveY = 3.5f;
}
#else
ellipseData.pos.x += moveX;
if (accel[0] > -0.1 & accel[0] < 0.1 ) {
moveX = 0.0f;
}
else {
moveX = 10.0f * accel[0];
}

ellipseData.pos.y += moveY;
if (accel[1] > -0.1 & accel[1] < 0.1 ) {
moveY = 0.0f;
}
else {
moveY = -10.0f * accel[1];
}
#endif
if (ellipseData.pos.x >= 290.f) {
ellipseData.pos.x = 290.0f;
}
else if (ellipseData.pos.x <= 30.f) {
ellipseData.pos.x = 30.0f;
}
if (ellipseData.pos.y >= 450.f) {
ellipseData.pos.y = 450.0f;
}
else if (ellipseData.pos.y <= 55.f) {
ellipseData.pos.y = 55.0f;
}


glBindRenderbufferOES(GL_RENDERBUFFER_OES, viewRenderbuffer);
[context presentRenderbuffer:GL_RENDERBUFFER_OES];
}

- (void)accelerometer:(UIAccelerometer*)accelerometer didAccelerate:(UIAcceleration*)acceleration
{
/*
The meaning of acceleration values for firmware 2.x
acceleration.x = Roll. It corresponds to roll, or rotation around the axis that runs from your home button to your earpiece.
Values vary from 1.0 (rolled all the way to the right) to -1.0 (rolled all the way to the left).

acceleration.y = Pitch. Place your iPhone on the table and mentally draw a horizontal line about half-way down the screen.
That's the axis around which the Y value rotates.
Values go from 1.0 (the headphone jack straight down) to -1.0 (the headphone jack straight up).

acceleration.z = Face up/face down.
It refers to whether your iPhone is face up (-1.0) or face down (1.0).
When placed on it side, either the side with the volume controls and ringer switch, or the side directly opposite
, the Z value equates to 0.0.
*/

//Use a basic low-pass filter in the accelerometer values
accel[0] = acceleration.x * kFilteringFactor + accel[0] * (1.0 - kFilteringFactor);
accel[1] = acceleration.y * kFilteringFactor + accel[1] * (1.0 - kFilteringFactor);
accel[2] = acceleration.z * kFilteringFactor + accel[2] * (1.0 - kFilteringFactor);

#ifdef DEBUGSCREEN
textView.text = [NSString stringWithFormat:
@"X (roll, %4.1f%%): %f\nY (pitch %4.1f%%): %f\nZ (%4.1f%%) : %f",
100.0 - (accel[0] + 1.0) * 50.0, accel[0],
100.0 - (accel[1] + 1.0) * 50.0, accel[1],
100.0 - (accel[2] + 1.0) * 50.0, accel[2]
];
#endif
}

- (void)layoutSubviews {
[EAGLContext setCurrentContext:context];
[self destroyFramebuffer];
[self createFramebuffer];
[self drawView];
}


- (BOOL)createFramebuffer {

glGenFramebuffersOES(1, &viewFramebuffer);
glGenRenderbuffersOES(1, &viewRenderbuffer);

glBindFramebufferOES(GL_FRAMEBUFFER_OES, viewFramebuffer);
glBindRenderbufferOES(GL_RENDERBUFFER_OES, viewRenderbuffer);
[context renderbufferStorage:GL_RENDERBUFFER_OES fromDrawable:(CAEAGLLayer*)self.layer];
glFramebufferRenderbufferOES(GL_FRAMEBUFFER_OES, GL_COLOR_ATTACHMENT0_OES, GL_RENDERBUFFER_OES, viewRenderbuffer);

glGetRenderbufferParameterivOES(GL_RENDERBUFFER_OES, GL_RENDERBUFFER_WIDTH_OES, &backingWidth);
glGetRenderbufferParameterivOES(GL_RENDERBUFFER_OES, GL_RENDERBUFFER_HEIGHT_OES, &backingHeight);

if (USE_DEPTH_BUFFER) {
glGenRenderbuffersOES(1, &depthRenderbuffer);
glBindRenderbufferOES(GL_RENDERBUFFER_OES, depthRenderbuffer);
glRenderbufferStorageOES(GL_RENDERBUFFER_OES, GL_DEPTH_COMPONENT16_OES, backingWidth, backingHeight);
glFramebufferRenderbufferOES(GL_FRAMEBUFFER_OES, GL_DEPTH_ATTACHMENT_OES, GL_RENDERBUFFER_OES, depthRenderbuffer);
}

if(glCheckFramebufferStatusOES(GL_FRAMEBUFFER_OES) != GL_FRAMEBUFFER_COMPLETE_OES) {
DEBUGLOG(@"failed to make complete framebuffer object %x", glCheckFramebufferStatusOES(GL_FRAMEBUFFER_OES));
return NO;
}

return YES;
}


- (void)destroyFramebuffer {

glDeleteFramebuffersOES(1, &viewFramebuffer);
viewFramebuffer = 0;
glDeleteRenderbuffersOES(1, &viewRenderbuffer);
viewRenderbuffer = 0;

if(depthRenderbuffer) {
glDeleteRenderbuffersOES(1, &depthRenderbuffer);
depthRenderbuffer = 0;
}
}


- (void)startAnimation {
self.animationTimer = [NSTimer scheduledTimerWithTimeInterval:animationInterval target:self selector:@selector(drawView) userInfo:nil repeats:YES];
}


- (void)stopAnimation {
self.animationTimer = nil;
}


- (void)setAnimationTimer:(NSTimer *)newTimer {
[animationTimer invalidate];
animationTimer = newTimer;
}


- (void)setAnimationInterval:(NSTimeInterval)interval {

animationInterval = interval;
if (animationTimer) {
[self stopAnimation];
[self startAnimation];
}
}


- (void)dealloc {

[self stopAnimation];

if ([EAGLContext currentContext] == context) {
[EAGLContext setCurrentContext:nil];
}

[context release];
[super dealloc];
}

@end

.
.
.

Sunday, April 5, 2009

OpenGL ES for iPhone : Part 2 with touch controls

We will continue to explore OpenGL ES for iPhone by interacting with input controls. This tutorial is for iPhone Development Environment, so the touch screen control is the major and fun part to play with.

In this tutorial, we will draw two objects using OpenGL ES and implement touch controls to drag and move an object around the screen and also to pinch and resize the object independently.


Similar to the first tutorial, we need to create a new project using the OpenGL ES Application template from XCode. We want to draw a new ellipse object but there is no direct function to draw an ellipse / circle in OpenGL ES, so we need to use a loop to calculate the vertices as below.

1) Draw an ellipse / a circle

We use degreesToRadians, cos and sin functions to calculate the required vertices positions. If you want a circle, just put yradius = xradius.

GLfloat ellipseVertices[720];

// calculate the vertices of ellipse
const GLfloat xradius = 35.0f;
const GLfloat yradius = 25.0f;
for (int i = 0; i < 720; i+=2) {
    ellipseVertices[i] = (cos(degreesToRadians(i)) * xradius) + 0.0f;
    ellipseVertices[i+1] = (sin(degreesToRadians(i)) * yradius) + 0.0f;
}


and we will use GL_TRIANGLE_FAN to draw the ellipse.

glDrawArrays(GL_TRIANGLE_FAN, 0, 360); // the ellipse has 360 vertices


2) Create data structure

We will create a C structure to hold the states of the two objects, so that we can independently control the status and behavior of the two objects

typedef struct
{
    BOOL rotstop;                  // stop self rotation
    BOOL touchInside;              // finger tap inside of the object ?
    BOOL scalestart;               // start to scale the obejct ?
    CGPoint pos;                   // position of the object on the screen
    CGPoint startTouchPosition;    // Start Touch Position
    CGPoint currentTouchPosition;  // Current Touch Position
    GLfloat pinchDistance;         // distance between two fingers pinch
    GLfloat pinchDistanceShown;    // distance that have shown on screen
    GLfloat scale;                 // OpenGL scale factor of the object
    GLfloat rotation;              // OpenGL rotation factor of the object
    GLfloat rotspeed;              // control rotation speed of the object
} ObjectData;

@public
    ObjectData squareData;
    ObjectData ellipseData;


3) Implement new method (void)setupView;

We need to create a new method so that we can do some initialization codes after the EAGLView is created. The setupView is called after - (id)initWithCoder:(NSCoder*)coder method

We also put some OpenGL code inside setupView method. We need to separate the codes into two setupView and drawView methods, and put the initialization codes to the setupView so that it is only called once after init. The drawing codes for after each layoutSubviews refreshes are still in drawView method.

We also need to change the Orthographic Projection in order to match with the iPhone screen resolution 320 x 480

  // Setup Orthographic Projection for the 320 x 480 of the iPhone screen
  glOrthof(0.0f, 320.0f, 480.0f, 0.0f, -1.0f, 1.0f);


4) Enable multitouch and implement the touch control events

To enable multitouch in the EAGLView, as it is not enabled by default
  self.multipleTouchEnabled = YES;

and we also need to implement these standard four touch control methods for EAGLView in order to handle drag and pinch

- (void)touchesBegan:(NSSet *)touches withEvent:(UIEvent *)event
It sends the touchesBegan:withEvent: message when one or more fingers touch down on the screen.
We record the starting position of the pinch and drag here

- (void)touchesMoved:(NSSet *)touches withEvent:(UIEvent *)event
It sends the touchesMoved:withEvent: message when one or more fingers move.
We handle the pinch and drag gestures here

- (void)touchesEnded:(NSSet *)touches withEvent:(UIEvent *)event
It sends the touchesEnded:withEvent: message when one or more fingers lift up from the screen.
We reset the status of the touch controls when all fingers are lifted up

- (void)touchesCancelled:(NSSet *)touches withEvent:(UIEvent *)event
It sends the touchesCancelled:withEvent: message when the touch sequence is cancelled by a system event, such as an incoming phone call.


5) Control the moving and scaling of OpenGL ES objects independently

We have the following codes to draw the objects in OpenGL ES and by changing the variables *.rotation, *.scale of the 2 objects through the touch control events, we can change the location and scale of the 2 objects independently.


  // draw the square
  glLoadIdentity();
  glTranslatef(squareData.pos.x, squareData.pos.y, 0.0f);
  glRotatef(squareData.rotation, 0.0f, 0.0f, 1.0f);
  glScalef(squareData.scale, squareData.scale, 1.0f);
  glVertexPointer(2, GL_FLOAT, 0, squareVertices);
  glColorPointer(4, GL_UNSIGNED_BYTE, 0, squareColors);
  glEnableClientState(GL_VERTEX_ARRAY);
  glEnableClientState(GL_COLOR_ARRAY);
  glDrawArrays(GL_TRIANGLE_STRIP, 0, 4);

  // draw the ellipse
  glLoadIdentity();
  glTranslatef(ellipseData.pos.x, ellipseData.pos.y, 0.0f);
  glRotatef(ellipseData.rotation, 0.0f, 0.0f, 1.0f);
  glVertexPointer(2, GL_FLOAT, 0, ellipseVertices);
  glColorPointer(4, GL_UNSIGNED_BYTE, 0, ellipseColors);
  glEnableClientState(GL_VERTEX_ARRAY);
  glEnableClientState(GL_COLOR_ARRAY);
  glDrawArrays(GL_TRIANGLE_FAN, 0, 360);  // the ellipse has 360 vertices


6) Enable NSLog for Debug build and disable for Release build

Use the following define to turnon NSLog output for Debug build and turnoff for Release build
You need to add this user-defined in Project Settings (in Debug build only)
GCC_PREPROCESSOR_DEFINITIONS    DEBUGON


Or if you have an older XCode template version, it should be like this


#ifdef DEBUGON
#define DEBUGLOG if (DEBUGON) NSLog
#else
#define DEBUGLOG
#endif


Then you should use DEBUGLOG() instead of NSLog() in your code. Another hint is that you can define DEBUGLOG1, DEBUGLOG2,... etc, in this case, you can turn on / off individual sections of NSLog.

7) The source codes are here, you just need to create a new project from OpenGL ES Application template of XCode and copy the source codes of EAGLView.h and EAGLView.m from below and paste them for Build & Go in XCode.


We did not implement the ellipse object to move, may be it's your turn to explore and enhance it. Feel free to add double-tap or multi-fingers swipe controls or add any new objects to the project. Enjoy OpenGL ES coding in iPhone !

P.S. In case you weren’t already aware, this is how to emulate multi-touch in the iPhone Simulator that accompanies the iPhone SDK.

- Option-Click: Allows you to pinch in and out.
- Option-Shift-Click: Allows you to perform a two-fingers drag.

EAGLView.h Select all

// EAGLView.h
// OpenGL ES Tutorial - Part 2 by javacom

// To enable Debug NSLog, add GCC_PREPROCESSOR_DEFINITIONS DEBUGON in Project Settings for Debug Build Only and replace NSLog() with DEBUGLOG()
#ifdef DEBUGON
#define DEBUGLOG if (DEBUGON) NSLog
#else
#define DEBUGLOG
#endif

#import <UIKit/UIKit.h>
#import <OpenGLES/EAGL.h>
#import <OpenGLES/ES1/gl.h>
#import <OpenGLES/ES1/glext.h>

typedef struct
{
BOOL rotstop; // stop self rotation
BOOL touchInside; // finger tap inside of the object ?
BOOL scalestart; // start to scale the obejct ?
CGPoint pos; // position of the object on the screen
CGPoint startTouchPosition; // Start Touch Position
CGPoint currentTouchPosition; // Current Touch Position
GLfloat pinchDistance; // distance between two fingers pinch
GLfloat pinchDistanceShown; // distance that have shown on screen
GLfloat scale; // OpenGL scale factor of the object
GLfloat rotation; // OpenGL rotation factor of the object
GLfloat rotspeed; // control rotation speed of the object
} ObjectData;

/*
This class wraps the CAEAGLLayer from CoreAnimation into a convenient UIView subclass.
The view content is basically an EAGL surface you render your OpenGL scene into.
Note that setting the view non-opaque will only work if the EAGL surface has an alpha channel.
*/
@interface EAGLView : UIView {

@private
/* The pixel dimensions of the backbuffer */
GLint backingWidth;
GLint backingHeight;

EAGLContext *context;

/* OpenGL names for the renderbuffer and framebuffers used to render to this view */
GLuint viewRenderbuffer, viewFramebuffer;

/* OpenGL name for the depth buffer that is attached to viewFramebuffer, if it exists (0 if it does not exist) */
GLuint depthRenderbuffer;

NSTimer *animationTimer;
NSTimeInterval animationInterval;

@public
ObjectData squareData;
ObjectData ellipseData;
GLfloat ellipseVertices[720];
CGFloat initialDistance;
}

@property NSTimeInterval animationInterval;

@property (nonatomic) ObjectData squareData;
@property (nonatomic) ObjectData ellipseData;
@property CGFloat initialDistance;

- (void)startAnimation;
- (void)stopAnimation;
- (void)drawView;
- (void)setupView;

@end


EAGLView.m Select all

// EAGLView.m
// OpenGL ES Tutorial - Part 2 by javacom
//
#import <QuartzCore/QuartzCore.h>
#import <OpenGLES/EAGLDrawable.h>

#import "EAGLView.h"

#include <math.h>

// Macros
#define degreesToRadians(__ANGLE__) (M_PI * (__ANGLE__) / 180.0)
#define radiansToDegrees(__ANGLE__) (180.0 * (__ANGLE__) / M_PI)

CGFloat distanceBetweenPoints (CGPoint first, CGPoint second) {
CGFloat deltaX = second.x - first.x;
CGFloat deltaY = second.y - first.y;
return sqrt(deltaX*deltaX + deltaY*deltaY );
};

CGFloat angleBetweenPoints(CGPoint first, CGPoint second) {
// atan((top - bottom)/(right - left))
CGFloat rads = atan((second.y - first.y) / (first.x - second.x));
return radiansToDegrees(rads);
}

CGFloat angleBetweenLines(CGPoint line1Start, CGPoint line1End, CGPoint line2Start, CGPoint line2End) {

CGFloat a = line1End.x - line1Start.x;
CGFloat b = line1End.y - line1Start.y;
CGFloat c = line2End.x - line2Start.x;
CGFloat d = line2End.y - line2Start.y;

CGFloat rads = acos(((a*c) + (b*d)) / ((sqrt(a*a + b*b)) * (sqrt(c*c + d*d))));

return radiansToDegrees(rads);
}

#define USE_DEPTH_BUFFER 0

#define kMinimumTouchLength 30
#define kMaximumScale 7.0f
#define kMinimumPinchDelta 15


// A class extension to declare private methods
@interface EAGLView ()

@property (nonatomic, retain) EAGLContext *context;
@property (nonatomic, assign) NSTimer *animationTimer;

- (BOOL) createFramebuffer;
- (void) destroyFramebuffer;

@end


@implementation EAGLView

@synthesize context;
@synthesize animationTimer;
@synthesize animationInterval;
@synthesize squareData;
@synthesize ellipseData;
@synthesize initialDistance;

// You must implement this method
+ (Class)layerClass {
return [CAEAGLLayer class];
}


//The GL view is stored in the nib file. When it's unarchived it's sent -initWithCoder:
- (id)initWithCoder:(NSCoder*)coder {

if ((self = [super initWithCoder:coder])) {

// Get the layer
CAEAGLLayer *eaglLayer = (CAEAGLLayer *)self.layer;

eaglLayer.opaque = YES;
eaglLayer.drawableProperties = [NSDictionary dictionaryWithObjectsAndKeys:
[NSNumber numberWithBool:NO], kEAGLDrawablePropertyRetainedBacking, kEAGLColorFormatRGBA8, kEAGLDrawablePropertyColorFormat, nil];

context = [[EAGLContext alloc] initWithAPI:kEAGLRenderingAPIOpenGLES1];

if (!context || ![EAGLContext setCurrentContext:context]) {
[self release];
return nil;
}

animationInterval = 1.0 / 60.0;
[self setupView];
}
return self;
}

// These are four methods touchesBegan, touchesMoved, touchesEnded, touchesCancelled and use to notify about touches and gestures

- (void)touchesBegan:(NSSet *)touches withEvent:(UIEvent *)event {
/*
NSUInteger numTaps = [[touches anyObject] tapCount]; // number of taps
NSUInteger numTouches = [touches count]; // number of touches
*/
UITouch *touch = [[touches allObjects] objectAtIndex:0];

DEBUGLOG(@"TouchBegan event counts = %d ",[[event touchesForView:self] count]);
DEBUGLOG(@"TouchBegan tounches counts = %d ",[touches count]);
if ([touches count]== 2) {
NSArray *twoTouches = [touches allObjects];
UITouch *first = [twoTouches objectAtIndex:0];
UITouch *second = [twoTouches objectAtIndex:1];
initialDistance = distanceBetweenPoints([first locationInView:self], [second locationInView:self]);
squareData.rotstop = YES;
squareData.touchInside = NO;
}
else if ([touches count]==[[event touchesForView:self] count] & [[event touchesForView:self] count] == 1) {
squareData.startTouchPosition = [touch locationInView:self];
if (distanceBetweenPoints([touch locationInView:self], squareData.pos) <= kMinimumTouchLength * squareData.scale) {
DEBUGLOG(@"Square Touch at %.2f, %.2f ",squareData.pos.x,squareData.pos.y);
squareData.rotstop = YES;
squareData.touchInside = YES;
}
}

}

- (void)touchesMoved:(NSSet *)touches withEvent:(UIEvent *)event {
UITouch *touch = [[touches allObjects] objectAtIndex:0];
squareData.currentTouchPosition = [touch locationInView:self];
if ([touches count]== 2) {
NSArray *twoTouches = [touches allObjects];
UITouch *first = [twoTouches objectAtIndex:0];
UITouch *second = [twoTouches objectAtIndex:1];

// Calculate the distance bewtween the two fingers(touches) to determine the pinch distance
CGFloat currentDistance = distanceBetweenPoints([first locationInView:self], [second locationInView:self]);

squareData.rotstop = YES;
squareData.touchInside = NO;

if (initialDistance == 0.0f)
initialDistance = currentDistance;
if (currentDistance - initialDistance > kMinimumPinchDelta) {
squareData.pinchDistance = currentDistance - initialDistance;
squareData.scalestart = YES;
DEBUGLOG(@"Outward Pinch %.2f", squareData.pinchDistance);
}
else if (initialDistance - currentDistance > kMinimumPinchDelta) {
squareData.pinchDistance = currentDistance - initialDistance;
squareData.scalestart = YES;
DEBUGLOG(@"Inward Pinch %.2f", squareData.pinchDistance);
}
}
else if ([touches count]==[[event touchesForView:self] count] & [[event touchesForView:self] count] == 1) {
if (squareData.touchInside) {
// Only move the square to new position when touchBegan is inside the square
squareData.pos.x = [touch locationInView:self].x;
squareData.pos.y = [touch locationInView:self].y;
DEBUGLOG(@"Square Move to %.2f, %.2f ",squareData.pos.x,squareData.pos.y);
squareData.rotstop = YES;
}
}
}


- (void)touchesEnded:(NSSet *)touches withEvent:(UIEvent *)event {
if ([touches count] == [[event touchesForView:self] count]) {
initialDistance = squareData.pinchDistanceShown = squareData.pinchDistance = 0.0f;
squareData.rotstop = squareData.touchInside = squareData.scalestart = NO;
DEBUGLOG(@"touchesEnded, all fingers up");
}
else {
initialDistance = squareData.pinchDistanceShown = squareData.pinchDistance = 0.0f;
squareData.scalestart = NO;
DEBUGLOG(@"touchesEnded");
}
}


- (void)touchesCancelled:(NSSet *)touches withEvent:(UIEvent *)event {
initialDistance = squareData.pinchDistanceShown = squareData.pinchDistance = 0.0f;
squareData.rotstop = squareData.touchInside = squareData.scalestart = NO;
DEBUGLOG(@"touchesCancelled");
}

- (void)setupView { // new method for intialisation of variables and states

// Enable Multi Touch of the view
self.multipleTouchEnabled = YES;

// Initialise square data
squareData.rotation = squareData.pinchDistance = squareData.pinchDistanceShown = 0.0f;
ellipseData.rotation = 0.0f;
squareData.scale = 1.0f;
squareData.rotstop = squareData.touchInside = squareData.scalestart = NO;
squareData.pos.x = 160.0f;
squareData.pos.y = 240.0f;
squareData.pinchDistance = 0.0f;
squareData.rotspeed = 1.0f;

// Initialise ellipse data
ellipseData.rotation = 0.0f;
ellipseData.rotstop = ellipseData.touchInside = ellipseData.scalestart = NO;
ellipseData.pos.x = 160.0f;
ellipseData.pos.y = 100.0f;
ellipseData.rotspeed = -4.0f;

// calculate the vertices of ellipse
const GLfloat xradius = 35.0f;
const GLfloat yradius = 25.0f;
for (int i = 0; i < 720; i+=2) {
ellipseVertices[i] = (cos(degreesToRadians(i)) * xradius) + 0.0f;
ellipseVertices[i+1] = (sin(degreesToRadians(i)) * yradius) + 0.0f;
DEBUGLOG(@"ellipseVertices[v%d] %.1f, %.1f",i, ellipseVertices[i], ellipseVertices[i+1]);
}

// setup the projection matrix
glMatrixMode(GL_PROJECTION);
glLoadIdentity();

// Setup Orthographic Projection for the 320 x 480 of the iPhone screen
glOrthof(0.0f, 320.0f, 480.0f, 0.0f, -1.0f, 1.0f);
glMatrixMode(GL_MODELVIEW);

}

- (void)drawView {

// Define the square vertices
const GLfloat squareVertices[] = {
-20.0f, -20.0f,
20.0f, -20.0f,
-20.0f, 20.0f,
20.0f, 20.0f,
};

// Define the colors of the square vertices
const GLubyte squareColors[] = {
255, 255, 0, 255,
0, 255, 255, 255,
0, 0, 0, 0,
255, 0, 255, 255,
};


// Define the colors of the ellipse vertices
const GLubyte ellipseColors[] = {
233, 85, 85, 255,
233, 85, 85, 255,
233, 85, 85, 255,
233, 85, 85, 255,
233, 85, 85, 255,
};


[EAGLContext setCurrentContext:context];
glBindFramebufferOES(GL_FRAMEBUFFER_OES, viewFramebuffer);
glViewport(0, 0, backingWidth, backingHeight);

// Clear background color
glClearColor(0.5f, 0.5f, 0.5f, 1.0f);
glClear(GL_COLOR_BUFFER_BIT);

// draw the square
glLoadIdentity();
glTranslatef(squareData.pos.x, squareData.pos.y, 0.0f);
glRotatef(squareData.rotation, 0.0f, 0.0f, 1.0f);
glScalef(squareData.scale, squareData.scale, 1.0f);
glVertexPointer(2, GL_FLOAT, 0, squareVertices);
glColorPointer(4, GL_UNSIGNED_BYTE, 0, squareColors);
glEnableClientState(GL_VERTEX_ARRAY);
glEnableClientState(GL_COLOR_ARRAY);
glDrawArrays(GL_TRIANGLE_STRIP, 0, 4);

// draw the ellipse
glLoadIdentity();
glTranslatef(ellipseData.pos.x, ellipseData.pos.y, 0.0f);
glRotatef(ellipseData.rotation, 0.0f, 0.0f, 1.0f);
glVertexPointer(2, GL_FLOAT, 0, ellipseVertices);
glColorPointer(4, GL_UNSIGNED_BYTE, 0, ellipseColors);
glEnableClientState(GL_VERTEX_ARRAY);
glEnableClientState(GL_COLOR_ARRAY);
glDrawArrays(GL_TRIANGLE_FAN, 0, 360); // the ellipse has 360 vertices

// control the square rotation
if (!squareData.rotstop) {
squareData.rotation += squareData.rotspeed;
if(squareData.rotation > 360.0f)
squareData.rotation -= 360.0f;
else if(squareData.rotation < -360.0f)
squareData.rotation += 360.0f;
}

// control the ellipse rotation
if (!ellipseData.rotstop) {
ellipseData.rotation += ellipseData.rotspeed;
if(ellipseData.rotation > 360.0f)
ellipseData.rotation -= 360.0f;
else if(ellipseData.rotation < -360.0f)
ellipseData.rotation += 360.0f;
}

// control the square scaling
if (squareData.scalestart && squareData.scale <= kMaximumScale) {
GLfloat pinchDelta = squareData.pinchDistance - squareData.pinchDistanceShown;
if (squareData.pinchDistance != 0.0f) {
squareData.scale += pinchDelta/30;
squareData.pinchDistanceShown = squareData.pinchDistance;
if (squareData.scale >= kMaximumScale) {
squareData.scale = kMaximumScale;
squareData.pinchDistanceShown = squareData.pinchDistance = 0.0f;
squareData.scalestart = NO;
} else if (squareData.scale <= 1.0f) {
squareData.scale = 1.0f;
squareData.pinchDistanceShown = squareData.pinchDistance = 0.0f;
squareData.scalestart = NO;
}
DEBUGLOG(@"scale is %.2f",squareData.scale);
}
}

glBindRenderbufferOES(GL_RENDERBUFFER_OES, viewRenderbuffer);
[context presentRenderbuffer:GL_RENDERBUFFER_OES];
}

- (void)layoutSubviews {
[EAGLContext setCurrentContext:context];
[self destroyFramebuffer];
[self createFramebuffer];
[self drawView];
}


- (BOOL)createFramebuffer {

glGenFramebuffersOES(1, &viewFramebuffer);
glGenRenderbuffersOES(1, &viewRenderbuffer);

glBindFramebufferOES(GL_FRAMEBUFFER_OES, viewFramebuffer);
glBindRenderbufferOES(GL_RENDERBUFFER_OES, viewRenderbuffer);
[context renderbufferStorage:GL_RENDERBUFFER_OES fromDrawable:(CAEAGLLayer*)self.layer];
glFramebufferRenderbufferOES(GL_FRAMEBUFFER_OES, GL_COLOR_ATTACHMENT0_OES, GL_RENDERBUFFER_OES, viewRenderbuffer);

glGetRenderbufferParameterivOES(GL_RENDERBUFFER_OES, GL_RENDERBUFFER_WIDTH_OES, &backingWidth);
glGetRenderbufferParameterivOES(GL_RENDERBUFFER_OES, GL_RENDERBUFFER_HEIGHT_OES, &backingHeight);

if (USE_DEPTH_BUFFER) {
glGenRenderbuffersOES(1, &depthRenderbuffer);
glBindRenderbufferOES(GL_RENDERBUFFER_OES, depthRenderbuffer);
glRenderbufferStorageOES(GL_RENDERBUFFER_OES, GL_DEPTH_COMPONENT16_OES, backingWidth, backingHeight);
glFramebufferRenderbufferOES(GL_FRAMEBUFFER_OES, GL_DEPTH_ATTACHMENT_OES, GL_RENDERBUFFER_OES, depthRenderbuffer);
}

if(glCheckFramebufferStatusOES(GL_FRAMEBUFFER_OES) != GL_FRAMEBUFFER_COMPLETE_OES) {
DEBUGLOG(@"failed to make complete framebuffer object %x", glCheckFramebufferStatusOES(GL_FRAMEBUFFER_OES));
return NO;
}

return YES;
}


- (void)destroyFramebuffer {

glDeleteFramebuffersOES(1, &viewFramebuffer);
viewFramebuffer = 0;
glDeleteRenderbuffersOES(1, &viewRenderbuffer);
viewRenderbuffer = 0;

if(depthRenderbuffer) {
glDeleteRenderbuffersOES(1, &depthRenderbuffer);
depthRenderbuffer = 0;
}
}


- (void)startAnimation {
self.animationTimer = [NSTimer scheduledTimerWithTimeInterval:animationInterval target:self selector:@selector(drawView) userInfo:nil repeats:YES];
}


- (void)stopAnimation {
self.animationTimer = nil;
}


- (void)setAnimationTimer:(NSTimer *)newTimer {
[animationTimer invalidate];
animationTimer = newTimer;
}


- (void)setAnimationInterval:(NSTimeInterval)interval {

animationInterval = interval;
if (animationTimer) {
[self stopAnimation];
[self startAnimation];
}
}


- (void)dealloc {

[self stopAnimation];

if ([EAGLContext currentContext] == context) {
[EAGLContext setCurrentContext:nil];
}

[context release];
[super dealloc];
}

@end

.
.
.

Thursday, April 2, 2009

OpenGL ES for iPhone : A Simple Tutorial Part 1

It is difficult to find a beginner's book/tutorial suitable for OpenGL ES 1.1 in iPhone Development, partly because the current version of OpenGL ES is already 2.0 (there is a book on it). OpenGL ES 2.0 code is, unfortunately, NOT backward compatible with the OpenGL ES version 1.1 that iPhone use. If you rely on the materials from OpenGL (not ES) 1.5, some functions / features are not available in OpenGL ES as well. Upto now, there is no primer books on OpenGL ES 1.1 for iPhone Development Environment.

OpenGL ES specification can be obtained here
http://www.khronos.org/opengles/spec/
http://www.khronos.org/registry/gles/specs/1.1/es_full_spec.1.1.12.pdf

The OpenGL ES is an API suitable for contrained devices, and is derived from the OpenGL 1.5 specification. To achieve this goal, redundancy was removed from the OpenGL API. For example, in OpenGL ES, only vertex arrays exist and immediate mode and display lists were removed.

It is not easy to learn OpenGL ES for iPhone based on the existing available resources, so I decided to write this article based on the materials that I collected from different sources.

1) What is OpenGL ES ?
OpenGL ES is an API for advanced 3D graphics targeted at handheld devices such as iPhone. In OpenGL ES, geometric objects are drawn by specifying a series of coordinate sets that include vertice attributes like position, normal color and texture coordinates. Vertice position is specified using vertex arrays.

OpenGL ES is a "State Machine". This describes the use of state variables in OpenGL ES and commands are used for querying, enabling, and disabling states. So enabling states in different orders may have different behavior.

If you have read some OpenGL (not ES) books, you would know that OpenGL ES does not use glBegin() and glEnd(). Moreover, some OpenGL Extensions are not available in iPhone as well. For the list of supported Extensions in iPhone and iPhone Simulator, please refer to "Drawing With OpenGL ES" in iPhone Application Programming Guide from Apple.

2) How to start learning OpenGL ES ?
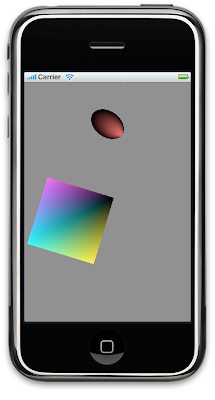
The most easiest way is to learn Open GL ES by actual coding and running in an emulator and iPhone Simulator from the SDK is a perfect emulator to test the OpenGL ES code. In iPhone SDK, you can create a new project from the OpenGL ES Application Template and without any modification, after you build & go in Simulator, you will see a colored square rotating at the middle of the screen. If you look closely into the source code, you will notice that the rotating square is defined and created inside the (void)drawView method of the source file EAGLView.m

From the source code, we could learn how to do basic drawings in OpenGL ES for iPhone. Here is the step by step tutorial and we have taken the approach to explain the existing code inside drawView() method first, so that you know what the code does and where to change the code if you want to mess around. You may also consider to use the Snapshot feature of XCode which is a very good "time machine" for your XCode Project.

3) How to specify the coordinates for a square ?
  const GLfloat squareVertices[] = {
    -0.5f, -0.5f,    // position v0
     0.5f, -0.5f,    // position v1
    -0.5f,  0.5f,    // position v2
     0.5f,  0.5f,    // position v3
  };

Each set of 2 floats given above specifies the x, y value of a vertex. The x is the horizontal position, the y is the vertical position that should be. If you give the third float number in the set, this would be z coordinate. The more positive the z coordinate, the more out of the screen (towards you) it is. Later tutorials, we will show you how to draw a pyramid which is a 3D model.

For the vertices position of each set in the square, please refer to diagram of point (4) below.

The vertices positions correspond to the different OpenGL ES Primitive Types in glDrawArrays() function that you will use later.

4) How to specify the colors for a square ?
  const GLubyte squareColors[] = {
    255, 255,   0, 255,    // yellow color
      0, 255, 255, 255,    // cyan color
      0,   0,   0,   0,    // black color
    255,   0, 255, 255,    // magenta color
  };


The colors are specified in groups of 4 given as above. The first color is red+green=yellow, the second is green+blue=cyan and the third is black and the fourth is red+blue=magenta. The first three parameters indicate your red, green and blue values. The larger the value, the brighter the color. If all values are 0, you get black. If all values are 255, you get white. The last value is the alpha value and is used for transparency. 0 is completely transparent.
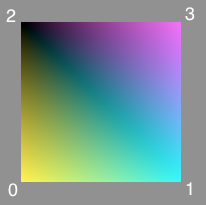


5) OpenGL projection matrix glMatrixMode(GL_PROJECTION);
The next OpenGL function is glMatrixMode. When working with OpenGL, there are various matrices that are available to work with. These define the view and how primitives should be placed. When transforming primitives later, the GL_MODELVIEW matrix will be used. If the projection (how objects are viewed) need to be changed later, GL_PROJECTION matrix will be used.

6) Identity Matrix glLoadIdentity();
This is a 4 x 4 matrix with 1's on the diagonals and 0's everywhere else. The identity matrix has the same properties as the value 1 in normal multiplication. Any matrix that multiply by the identity matrix will stay the same. The loading of identity matrix function glLoadIdentity() takes no parameters. We use the glLoadIdentity(); to clear the currently modifiable matrix for future transformation commands, as these commands modify the current matrix. Typically, we call this command before specifying projection or viewing transformations and also might call it before specifying a modeling transformation.

7) Orthographic Projection glOrthof(left, right, bottom, top, near, far);
There are 2 ways to view things. One is by viewing objects in an Orthogrpahic manner and the other is viewing objects in a perspective view. If you have ever looked down a long road, you will notice that the road gets smaller and smaller the further down you look. This is a perspective view. In an Orthographic view, the road would remain the same width as far as you could see. Orthographic projection runs quicker than perspective projection. This does not mean that we should always use it though. Sometimes you do not necessarily want depth eg. for 2D applications or games. Here, orthographic projection is extremely useful.

The glOrthof() function is used to specify orthographic projection. This function takes 6 parameters, each explained below.


GLfloat left & GLfloat right
        These specify the values for the left and right clipping planes.

GLfloat bottom & GLfloat top
        These specify the values for the bottom and top clipping planes.

GLfloat near & GLfloat far
        These specify the drawing distance. Any objects out of this range will
        not be displayed.
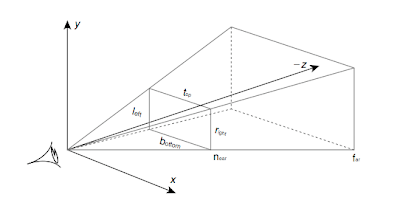


All parameters above specify an area that will be displayed in the window. Looking back at the vertices specified for the square, you can see that the square will be displayed in the center of the window.


8) Rotating the square glRotatef(3.0f, 0.0f, 0.0f, 1.0f);
The rotation transformation is done using the glRotatef() function. The first parameter specifies the angle in degrees to rotate the objects, positive float value means counter-clockwise direction, negative float means clockwise. The next 3 parameters are used to specify in what axis to rotate. These specify a vector. A value of 1.0 is normally used to specify an axis. If you comment out the glRotatef() function call, you will see the square in steady position and we have numbered the vertices position in the diagram below.


9) Clearing color for the background glClearColor(0.5f, 0.5f, 0.5f, 1.0f);
The first three parameters indicate your red, green and blue values for the background color. The larger the value, the brighter the color. If all values are 0, you get black. If all values are 1, you get white. The last value is the alpha value. This is used for transparency. 1.0f is completely opaque and 0.0f is completely transparent.

10) Clearing the color buffer glClear(GL_COLOR_BUFFER_BIT);
This function accepts one parameter being which buffers you want to clear. This causes the screen to be cleared to the grey color specified in point (9) above.

11) Set the current Vertex Array glVertexPointer(2, GL_FLOAT, 0, squareVertices);
Primitives in OpenGL ES are drawn using Vertex Arrays. You need to set the current vertices to use. This is accomplished by using the glVertexPointer function. This function takes 4 parameters :

GLint size
        This specifies the number of coordinates per vertex.
        As we had left off the 0.0f's in the square vertices above,
        we would place a 2 here.
        If each vertex has been specified using 3 values (x,y,z) ,
        we would use a 3 for this parameter.

GLenum type
        specifies what data type is being used for the values in the array
        eg. GL_BYTE, GL_SHORT, GL_FLOAT, etc.

GLsizei stride
        specifies the offset between consecutive vertices ie. how many
        extra values exist between the end of the current vertex and
        the beginning of the next vertex. We do not have any extra data
        between vertices and so we therefore pass 0 for this parameter.

const GLvoid *pointer
        The last parameter is used to specify the memory location of
        the first value in the array of values ie. the pointer to the array.


12) Enable the Vertex Array glEnableClientState(GL_VERTEX_ARRAY);
Like the Vertex Array, there are a number of other arrays that will be covered. If not all of these arrays are being used, resources can be saved by disabling the others. All are disabled by default and so we therefore need to enable the Vertex Array. This is done by using the glEnableClientState(GL_VERTEX_ARRAY) function. This function takes one parameter, specifying the array that must be enabled. We therefore pass the GL_VERTEX_ARRAY flag to enable the Vertex Array.

13) Set the current Color Array glColorPointer(4, GL_UNSIGNED_BYTE, 0, squareColors);
Similar to Vertex Array, color array is setup by glColorPointer() function. We pass a 4 as the first parameter to indicate that there are 4 floats per vertex. Other parameters are similar to that of glVertexPointer().

If you want to change the shading mode, you can use glShadeModel() function. The default is smooth shaded glShadeModel(GL_SMOOTH) and the other option is flat shaded glShadeModel(GL_FLAT).

14) Enable the Color Array glEnableClientState(GL_COLOR_ARRAY);
The Color Array is enabled by using the glEnableClientState(GL_COLOR_ARRAY) function

15) Display a shape on the screen glDrawArrays(GL_TRIANGLE_STRIP, 0, 4);
Finally, we need to display the shape on the iPhone screen using the glDrawArrays() function. The parameters are as follows :

GLenum mode
        This is used to specify what primitive to draw. see point (16) below.
GLint first
        This is used to specify the starting index in the array
        ie. how many vertices in the array to skip before starting to read them.
        We want to start from the beginning, thus requiring a value of 0 to be passed.

GLsizei count
        This specifies how many vertices to process. We have 4 vertices
        that we want to use. This is the value that we need to pass to the function.


16) OpenGL Primitives
The first parameter is primitive flag and OpenGL has defined the following types. Primitives are created by specifying vertices. These are points in 3D space which specify points on the shape. A list of primitives are given below along with how their vertices should be placed (also refer to the diagram below). The primitive type defined the order of the vertices are drawn.

Primitive Flag       Description
GL_POINTS            A point is placed at each vertex.
GL_LINES             A line is drawn for every pair of vertices that are given.
GL_LINE_STRIP        A continuous set of lines are drawn. After the first
                     vertex, a line is drawn between every successive vertex
                     and the vertex before it.
GL_LINE_LOOP         This is the same as GL_LINE_STRIP except that the start and end
                     vertices are connected as well.
GL_TRIANGLES         For every triplet of vertices, a triangle is drawn with corners
                     specified by the coordinates of the vertices.
                     It begins with v0,v1,v2 then v3,v4,v5 and so on.
GL_TRIANGLE_STRIP    After the first 2 vertices, every successive vertex uses the
                     previous 2 vertices to draw a triangle.
                     It begins with v0,v1,v2 then v1,v2,v3 then v2,v3,v4 and so on.
GL_TRIANGLE_FAN      After the first 2 vertices, every successive vertex uses the
                     previous vertex and the first vertex to draw a triangle.
                     This is used to draw cone-like shapes
                     It begins with v0,v1,v2 then v0,v2,v3 then v0,v3,v4 and so on.
GL_QUADS             Draws a series of quadrilaterals (four sided polygons)
                     beginning with v0,v1,v2,v3 then v4,v5,v6,v7 and so on
GL_QUAD_STRIP        Does a series of quadrilaterals beginning with
                     v0,v1,v3,v2 then v2,v3,v5,v4 then v4,v5,v7,v6 and so on
GL_POLYGON           Draws a polygon using the points v0,v1,...,vn
                     as vertices. n must be at least 3, or nothing is drawn.
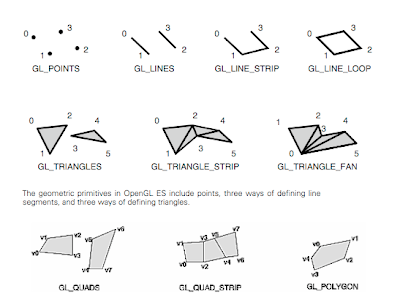


17) How to change it to a triangle, move/scale the object ?
You can simply change the last parameter of glDrawArrays to 3 like below, you will see a rotating triangle. By using the parameter 3, the code ignores the 4th position of the Array. If you want to change the triangle position or the shape, you should change the values in the array or use transform function to move the triangle.

    glDrawArrays(GL_TRIANGLE_STRIP, 0, 3);


You can use the glTranslatef() function to move the triangle and the glTranslatef() function should be inserted before the glMatrixMode function as below.
    glTranslatef(0.25f, 0.5f, 0.0f);
    glMatrixMode(GL_MODELVIEW);
    glRotatef(3.0f, 0.0f, 0.0f, 1.0f);


We pass 3 floats to the glTranslatef() function, specifying the value to move the drawn objects in the x, y and z direction. Our first transformation is to move the triangle right 0.25 units and up 0.5 units.

You can use the glScalef() function to scale the triangle and the glScalef() function should be inserted before the glMatrixMode function as below. The code below reduces the size of the triangle by half. You can scale an object a different amount in each axis. Try to experiment different values for the parameters of glScalef() function to see the effect.
    glScalef(0.5f, 0.5f, 0.5f);
    glMatrixMode(GL_MODELVIEW);
    glRotatef(3.0f, 0.0f, 0.0f, 1.0f);


18) Transformation: "translate first then rotate" or "rotate first then translate" ?

The output of the following codes by changing the order of glTranslatef() and glRotatef() functions will be different. You can try these codes and see the results in the Simulator.

Please take note that these glTranslatef() and glRotatef() function calls are before glMatrixMode(GL_MODELVIEW);


    glTranslatef(0.0f, 0.5f, 0.0f);        // translate first
    glRotatef(30.0f, 0.0f, 0.0f, 1.0f);    // then rotate
    glMatrixMode(GL_MODELVIEW);

is different from

    glRotatef(30.0f, 0.0f, 0.0f, 1.0f);    // rotate first
    glTranslatef(0.0f, 0.5f, 0.0f);        // then translate
    glMatrixMode(GL_MODELVIEW);


If you try these codes above, and translate something to the right and then rotate it, you will view a rotated shape sitting on the horizontal axis. If you first rotate the object and then translate it, you will view a rotated shape that has been moved out diagonally from the origin.

19) Transformation after glMatrixMode(GL_MODELVIEW);

Try changing the order or values of the glTranslatef() and glRotatef() functions below to see what affect each one has.

    glMatrixMode(GL_MODELVIEW);
    glTranslatef(0.0f, 0.05f, 0.0f);      // move the object
    glRotatef(3.0f, 0.0f, 0.0f, 1.0f);    // rotate the object


20) How to change it to a polygon ?
If you change these codes, you will see a rotating polygon outline as below, we have also numbered the vertices position in the diagram.
  const GLfloat squareVertices[] = {
    -0.5f, -0.5f,    // position v0
    -0.5f,  0.5f,    // position v1
     0.0f, 0.75f,    // position v2
     0.5f,  0.5f,    // position v3
     0.5f, -0.5f,    // position v4
  };

  const GLubyte squareColors[] = {
    255, 255,   0, 255,    // yellow color
      0, 255, 255, 255,    // cyan color
      0,   0,   0,   0,    // black color
    255,   0,   0,   1,    // red color
    255,   0, 255, 255,    // magenta color
  };


  glDrawArrays(GL_LINE_LOOP, 0, 5);


You may notice that the primitive types for GL_QUADS, GL_QUAD_STRIP & GL_POLYGON are not available in OpenGL ES. To draw the polygon as below, you need to use GL_TRIANGLE_STRIP with these codes

  const GLfloat squareVertices[] = {
    -0.5f, -0.5f,    // position v0
     0.5f, -0.5f,    // position v1
    -0.5f,  0.5f,    // position v2
     0.5f,  0.5f,    // position v3
     0.0f,  0.75f,   // position v4
  };

and

  glDrawArrays(GL_TRIANGLE_STRIP, 0, 5);


It does a series of triangle drawings beginning with v0, v1, v2 then v1, v2, v3 and finally v2, v3, v4.


You can download the old OpenGLTemplate from here http://www.2shared.com/file/vebAnLSs/OpenGLTemplate.html
.
.